Development environment setup
In this article, we’ll walk through the installation of the Local WP application and creation of a WordPress website on a local computer.
There are basically two paths to follow this guide:
A) Create local site from scratch:
Just follow all the steps in this guide starting at Step 1 – Install the Local WP application.
B) Restoring local site from another team member:
After downloading the backup file and extracting it, please follow the instructions:
- Step 1 – Install the Local WP application
- Step 2 – Create a new local website
- Jump to Extra step 2 – Import the local site backup from another team member
- If you are not going to work directly with code, there is no need to follow steps 5 to 8.
Step 1 – Install the Local WP application
Local WP is a desktop application that gives you a graphical interface to create an manage multiple WordPress websites on your own computer.
- Go to Local WP homepage
- Click the “Download” button on the site header.
- Run the installation program you downloaded and follow its installation steps according to your operational system.
- Open the Local WP application.
- (optional) Create an account for Local WP; or
- Close the account creation screen to reach the Local WP start screen.
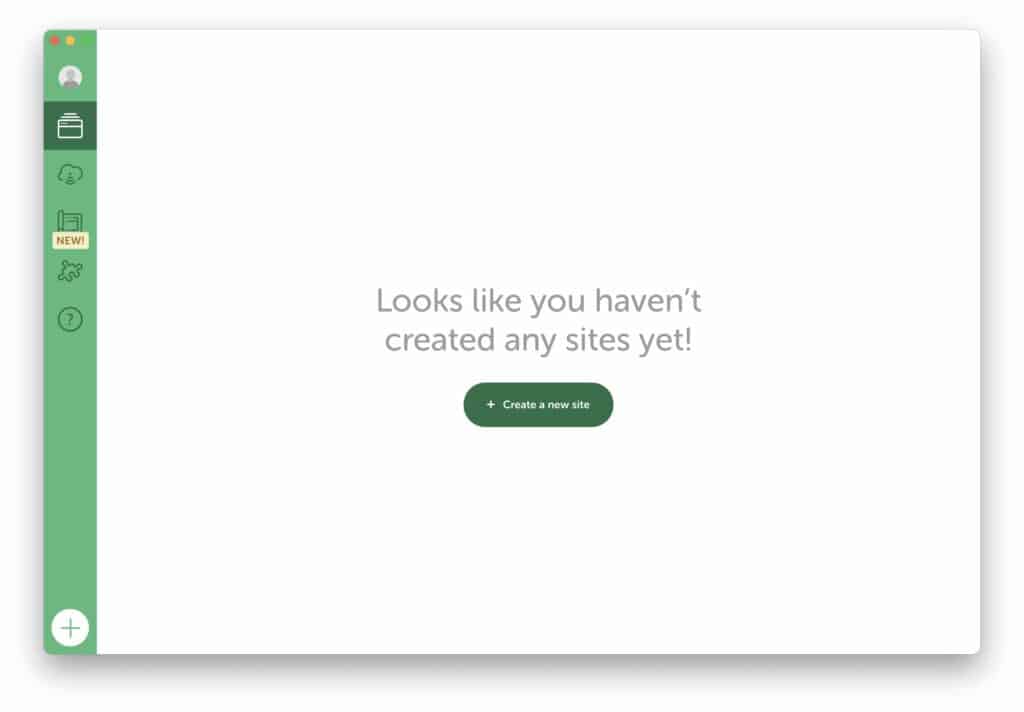
Step 2 – Create a new local website
It is now time to create your first local website with Local WP.
- Open the Local WP application.
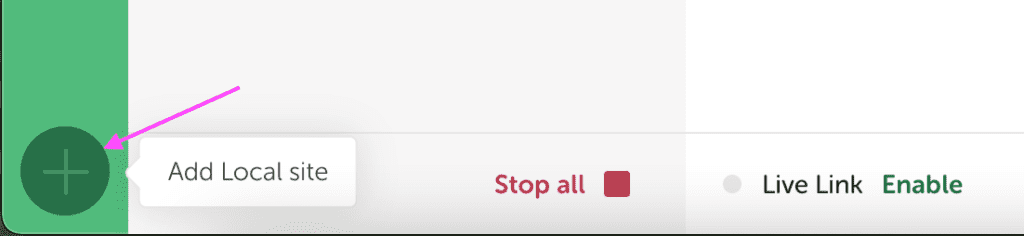
- Click the big “+” button on the bottom left corder of the Local WP application.
- Select the option “Create a new site” and click the “Continue” button on the bottom right of the Local WP application.
- Give your new local site a descriptive name (ie.
fluidcheckoutfor the Fluid Checkout local test site) - Open the “Advanced options” section clicking the button below the site name field.
- Check the local site domain and files location and change it if needed. For the Fluid Checkout local test site, it is important to keep the local domain as
fluidcheckout.localas this is the domain used by the other team members. Keeping the same domain name for the local sites will facilitate sharing links and backup files between team members
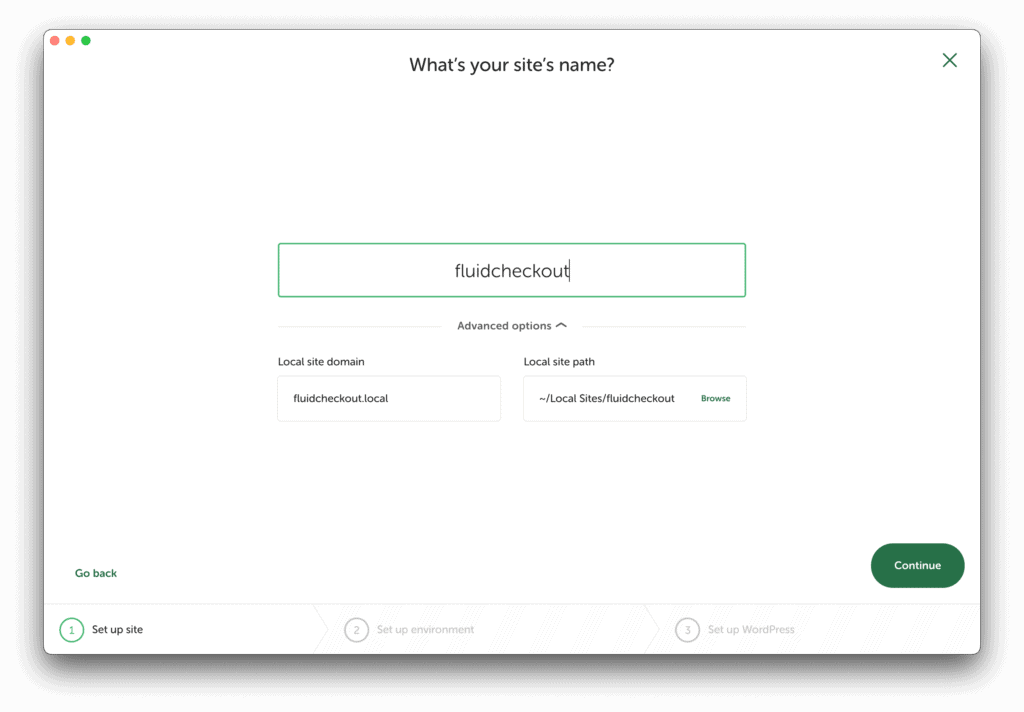
- Click the “Continue” button on the bottom right of the Local WP application.
- On the environment details screen, select the option “Preferred” or use the option “Custom” to configure your environment with more specific settings.
It is recommended to use:
– PHP version: 7.4 or newer;
– Web server: Nginx; and
– Database: MySql 8.0 or newer
On Windows, using PHP 8.0 or newer might not work, in that case, downgrade to PHP 7.4 and see if it solves the issues. - Click the “Continue” button on the bottom right of the Local WP application.
- On the WordPress setup screen, enter an admin username and password, and add your admin email if you want to.
- Click the “Add site” button on the bottom right of the Local WP application.
- Local WP will create your local site, download WordPress and install it.
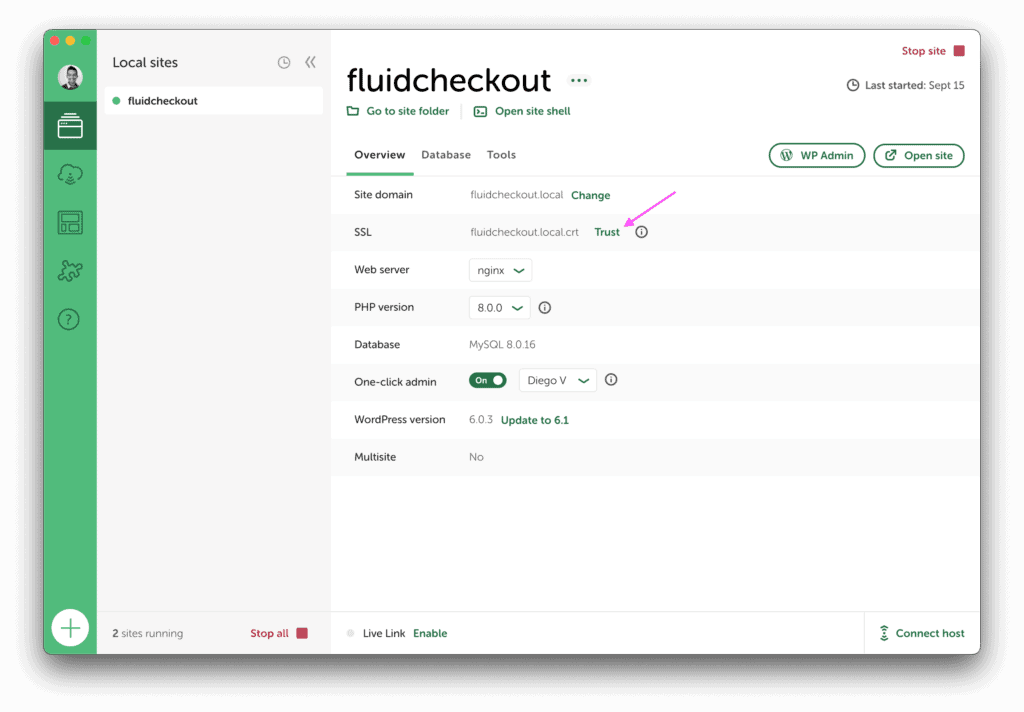
- On the site details screen, click the “Trust” on the SSL certificate line.
- If you run into issues, especially if you are using newer versions of MacOS, click the link on the error message displayed at the top of the Local WP application, or click here to read the instructions on how to fix the SSL certificate issues.
- After trusting the local SSL certificate, your site details screen will look like this:
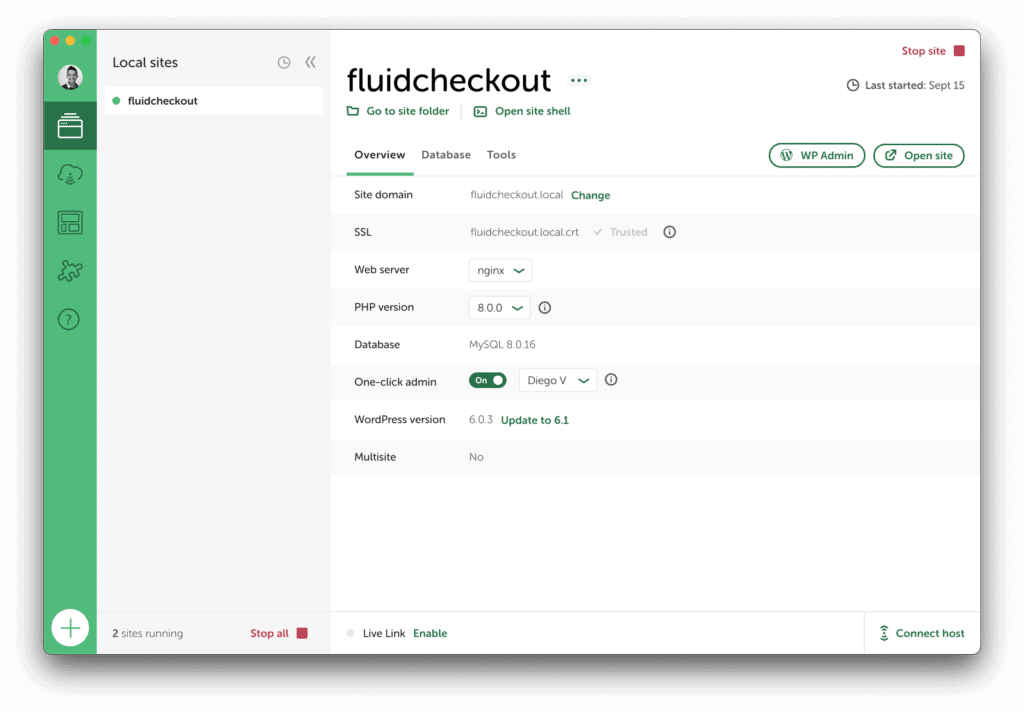
- Open your local site on the browser using the buttons “WP Admin” or “Open site” on the top right of the site details screen.
Step 3 – Install the WooCommerce plugin
Note: If you are going to jump start your development environment from a backup of another team member’s local site, you can jump to Extra step 2 – Import the local site backup from another team member.
Now that you have you new local site created and running, it’s time to install and configure WooCommerce.
- Go to the Local WP site details screen and click the button “WP Admin” on the top right of the Local WP Application.
- Inside the WordPress Admin area, go to WP Admin > Plugins > Add new.
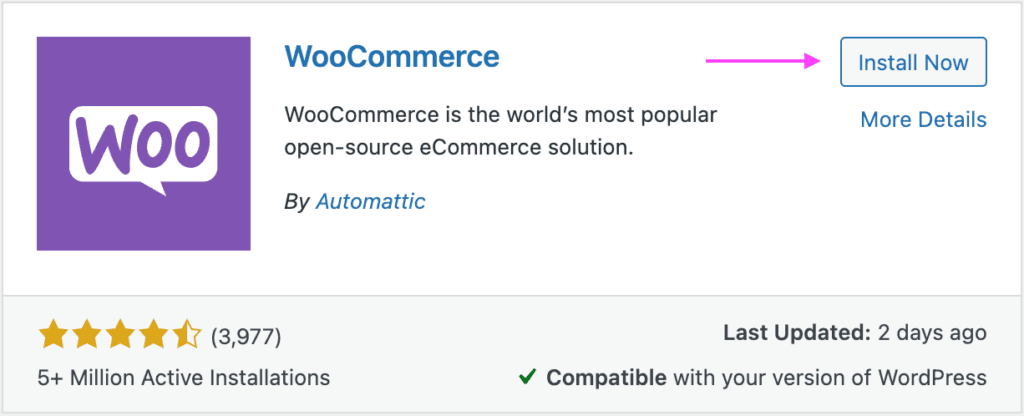
- Type “WooCommerce” in the plugin search field.
- Click the option “Install Now”, then “Activate” on the WooCommerce search result item.
- WooCommerce will bring you to its installation wizard. Follow the WooCommerce installation steps.
- On the step 1, provide any physical address as your shop address, and select any “Industry” on the step 2.
- On the step 3, select both “Physical products” and “Downloads” as the product types sold, and ignore the other options as they need extra paid plugins.
- On the step 4, select any option for the “Business details” tab, and uncheck the option “Add recommended business features to my site” on the “Free features” tab which would install free plugins that are not needed.
- Choose the “Store front” theme on the step 5 and finish the installation wizard.
- WooCommerce will bring you to the WooCommerce home screen, where you have more options to finish configuring WooCommerce.
- You will need to set up at least one product, one shipping method, and one payment option to be able to complete a purchase on your WooCommerce store.
Step 4 – Import WooCoommerce sample data
Instead of creating products manually on your test store, you can import the WooCommerce sample data which will add various types of products at once.
The WooCommerce products sample data is available in two different file formats: CSV or XML. For each file format a different importing tools should be used.
CSV sample data import
- Go to the CSV import tool at “WP Admin > Tools > Import”.
- Locate the tool “WooCommerce products (CSV)” and click the link “Run importer”.
- In the Import Products tool, locate the option “Choose a CSV file from your computer” and click the button “Choose file”.
- Locate the products sample data in the WooCommerce plugin folder in your local website installation. The products sample data file is located at
wp-content/plugins/woocommerce/sample-data/sample_products.csv. - Click the button “Continue” on the bottom right of the importer tool.
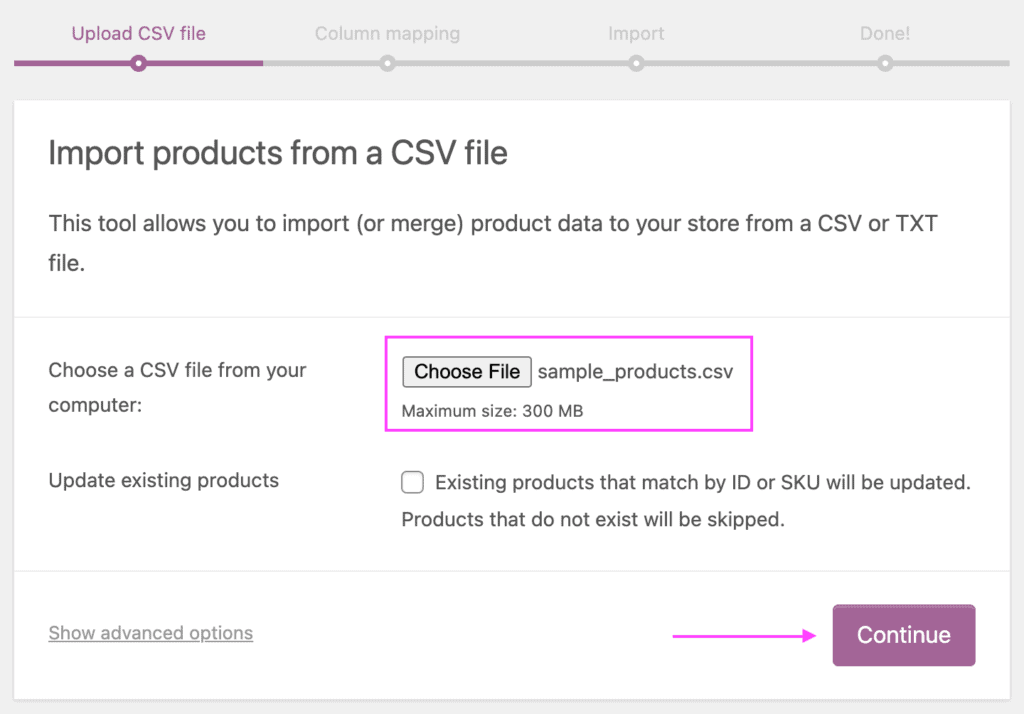
- On the “Column mapping” screen, you can associate the columns in the CSV file with the attributes of WooCommerce products. Since the sample data is already made from and for WooCommerce, you don’t need to change anything in the column mapping. Just scroll to the bottom of the import tool and click the option “Run the importer”.
- Wait until WooCommerce goes through the products sample data file and import the products.
- Once the importer completes the process, you can go to the products list at “WP Admin > Products > All products” and see the newly imported products.
XML sample data import
- Go to the CSV import tool at “WP Admin > Tools > Import”.
- Locate the tool “WordPress”, which is usually the last tool in the list, and click the link “Run importer”. You might need to click first the link “Install Now” to install the importer tool.
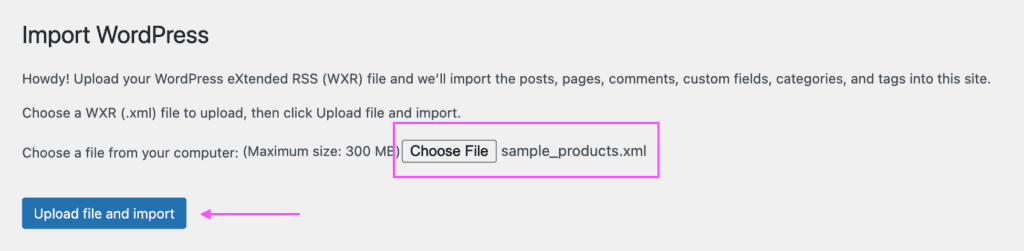
- In the WordPress Import tool, locate the option “Choose a file from your computer” and click the button “Choose file”.
- Locate the products sample data in the WooCommerce plugin folder in your local website installation. The products sample data file is located at
wp-content/plugins/woocommerce/sample-data/sample_products.xml. - Click the button “Upload file and import” at the bottom of the page.
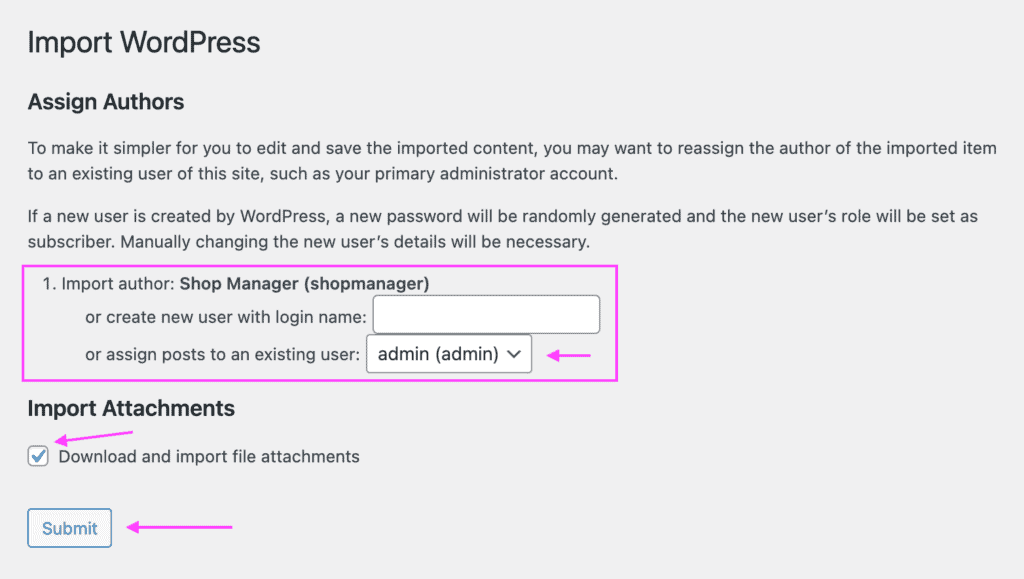
- On the next screen, choose to associate the imported data to an existing user or create a new user.
- Make sure you have selected the option “Download and import file attachments”.
- Click the button “Submit” and wait until the import tool finishes the process.
- Once the importer completes the process, you can go to the products list at “WP Admin > Products > All products” and see the newly imported products.
Step 5 – Cloning git repositories for the Fluid Checkout plugins
Now that you have WooCommerce installed and the sample products imported, it is time to set up your local git repositories for the Fluid Checkout plugins.
Instead of installing the plugins from the WordPress plugins repository or by uploading a zip file for paid plugins, you will be cloning the git repositories inside the wp-content/plugins folder. This allows you to make changes to the plugins and test on your local site.
- Open the “Terminal” application or your command line tool of choice.
- Navigate to the local site plugins directory using a command similar to:
$ cd ~/"Local Sites"/fluidcheckout/app/public/wp-content/plugins/- Delete the plugins folders if they exist by running the commands below:
$ rm -Rf ~/"Local Sites"/fluidcheckout/app/public/wp-content/plugins/fluid-checkout
$ rm -Rf ~/"Local Sites"/fluidcheckout/app/public/wp-content/plugins/fluid-checkout-pro
$ rm -Rf ~/"Local Sites"/fluidcheckout/app/public/wp-content/plugins/fc-google-address-autocomplete- Clone the git repository for each plugin with the commands below:
$ git clone [email protected]:fluidweb-co/fluid-checkout.git
$ git clone [email protected]:fluidweb-co/fluid-checkout-pro.git
$ git clone [email protected]:fluidweb-co/fc-google-address-autocomplete.git
If you do not have access to the Github repositories of paid plugins, please contact the lead developer of the project to give you access.
Step 6 – Install NPM packages
In order to start running the build processes for the plugins after making changes to the code, you’ll need to install the NPM packages for each plugin folder.
Install NPM packages for Fluid Checkout Lite
- Open the “Terminal” application or your command line tool of choice.
- Navigate to the local site plugins directory using a command similar to:
$ cd ~/"Local Sites"/fluidcheckout/app/public/wp-content/plugins/- Navigate to the Fluid Checkout Lite plugin folder using the command line:
$ cd fluid-checkout- Run the NPM install command:
$ npm install- Check the NPM install log for any errors.
- Run the plugin assets build command to make sure everything works:
$ gulp build- Check the command log for any errors.
- No changes are expected to be detected by Git in the plugin assets files.
Install NPM packages for Fluid Checkout PRO
- Open the “Terminal” application or your command line tool of choice.
- Navigate to the local site plugins directory using a command similar to:
$ cd ~/"Local Sites"/fluidcheckout/app/public/wp-content/plugins/- Navigate to the Fluid Checkout PRO plugin folder using the command line:
$ cd fluid-checkout-pro- Run the NPM install command:
$ npm install- Check the NPM install log for any errors.
- Run the plugin assets build command to make sure everything works:
$ gulp build- Check the command log for any errors.
- No changes are expected to be detected by Git in the plugin assets files.
Install NPM packages for Google Address Autocomplete
- Open the “Terminal” application or your command line tool of choice.
- Navigate to the local site plugins directory using a command similar to:
$ cd ~/"Local Sites"/fluidcheckout/app/public/wp-content/plugins/- Navigate to the Google Address Autocomplete plugin folder using the command line:
$ cd fc-google-address-autocomplete- Run the NPM install command:
$ npm install- Check the NPM install log for any errors.
- Run the plugin assets build command to make sure everything works:
$ gulp build- Check the command log for any errors.
- No changes are expected to be detected by Git in the plugin assets files.
Install NPM packages for Address Book
- Open the “Terminal” application or your command line tool of choice.
- Navigate to the local site plugins directory using a command similar to:
$ cd ~/"Local Sites"/fluidcheckout/app/public/wp-content/plugins/- Navigate to the Address Book plugin folder using the command line:
$ cd fc-address-book- Run the NPM install command:
$ npm install- Check the NPM install log for any errors.
- Run the plugin assets build command to make sure everything works:
$ gulp build- Check the command log for any errors.
- No changes are expected to be detected by Git in the plugin assets files.
Install NPM packages for EU-VAT Assistant
- Open the “Terminal” application or your command line tool of choice.
- Navigate to the local site plugins directory using a command similar to:
$ cd ~/"Local Sites"/fluidcheckout/app/public/wp-content/plugins/- Navigate to the EU-VAT Assistant plugin folder using the command line:
$ cd fc-vat-assistant- Run the NPM install command:
$ npm install- Check the NPM install log for any errors.
- Run the plugin assets build command to make sure everything works:
$ gulp build- Check the command log for any errors.
- No changes are expected to be detected by Git in the plugin assets files.
Step 7 – Create a VS Code Workspace for the project
To make it easier to work on various plugins, it is recommended to create a Visual Studio Code (VS Code) workspace and add all the Fluid Checkout plugins, WooCommerce and other plugins and themes you are working with.
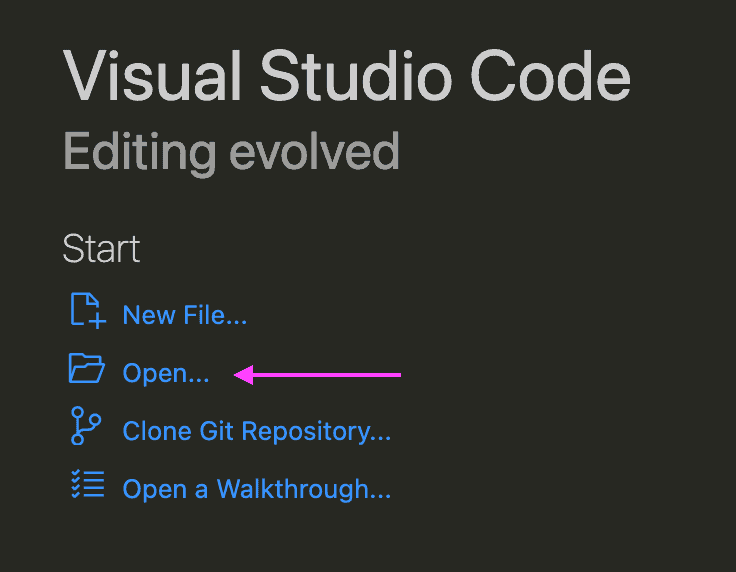
- Open the VS Code application.
- On the start screen, click the option “Open…”.
- On the Finder/Explorer application, select the Fluid Checkout Lite plugin folder to open it on VS code. The Fluid Checkout Lite plugin folder is located at
wp-content/plugins/fluid-checkout. - If requested, click the button “Yes, I trust the authors” to allow VS Code to run code inside the plugin folder.
- Go to the VS Code application menu “File > Add Folder to Workspace”.
- On the Finder/Explorer application, select the Fluid Checkout PRO and Google Address Autocomplete plugin folders to add them to the VS code workspace. The Fluid Checkout PRO and Google Address Autocomplete plugin folder are located at
wp-content/plugins/fluid-checkout-proandwp-content/plugins/fc-google-address-autocompleterespectively. Also add the other add-on and plugin folders that are relevant to your work. - Repeat the process to add the WooCommerce plugin folder, which is located at
wp-content/plugins/woocommerce. - To make the process easier, add the entire
wp-content/pluginsandwp-content/themesto the VS Code workspace. - Go to the VS Code application menu “File > Save Workspace As…” and select a folder of your choice where to save the VS Code Workspace file.
Step 8 – Configure Fluid Checkout plugins
The next step is to configure the Fluid Checkout plugins on your local site. Follow the instructions for each plugin on their respective guides:
Extra step 1 – Export local site backup for other team members
There are many plugins and themes which we integrate and add compatibility with, so it might be a good idea to jump start your local site environment for the Fluid Checkout project with a copy from the local site of another team member.
To export the backup of your local site to send it to another team member, follow the steps below.
- Open the Local WP application.
- On the local sites list, right-click the “fluidcheckout” site item.
- Select the menu item “Open site shell”.
- On the Terminal application or command line tool opened by Local WP, type in the command below to create a database dump file inside the WordPress root folder:
$ wp db export database.sql- Back to the local sites list on the Local WP application, right-click the “fluidcheckout” site item one more time.
- Select the menu item “Go to site folder”. This will open a Finder/Explorer application window at the local site folder.
- On the Finder/Explorer application, navigate to the folder
fluidcheckout/app/public. - Right-click the file
database.sqland select the option “Compress ‘database.sql'” or a similar option to create a zip file of file. - Right-click the folder
wp-contentand select the option “Compress ‘wp-content'” or a similar option to create a zip file of the entire folder. - Upload the two zip files created to a safe file sharing application such as wetransfer.com or use a ClickUp task to share the file with the other team member.
Extra step 2 – Import the local site backup from another team member
There are many plugins and themes which we integrate and add compatibility with, so it might be a good idea to jump start your local site environment for the Fluid Checkout project with a copy from the local site of another team member.
Ask the other team member or the lead developer of the project to create a backup of their local site environment and share the files with you.
After creating the local site on your computer using the Local WP application or another method, follow the instructions below to restore the local site backup on your local site environment.
- Download the
wp-contentanddatabase.sqlzip files and extract their contents to a folder on your computer. - Open the Local WP application.
- On the local sites list, right-click the “fluidcheckout” site item.
- Select the menu item “Go to site folder”. This will open a Finder/Explorer application window at the local site folder.
- Delete the folder
wp-contentfrom your local site folder at~/"Local Sites"/fluidcheckout/app/public/wp-content. - Copy the folder
wp-contentfrom the extracted backup file into your local site folder at~/"Local Sites"/fluidcheckout/app/public. - Copy the file
database.sqlfrom the extracted backup file into your local site folder at~/"Local Sites"/fluidcheckout/app/public. - Back to the local sites list on the Local WP application, right-click the “fluidcheckout” site item one more time.
- Select the menu item “Open site shell”.
- On the Terminal application or command line tool opened by Local WP, type in the commands below to import the database dump file:
$ wp db reset
$ wp db import database.sql- Wait for the database import to finish.
- Back to the local sites list on the Local WP application, click on the button “Open site” on the top right of the site details screen.
- Check that you can access the front end of the local site after the backup.
- Back to the local sites list on the Local WP application, click on the button “WP Admin” on the top right of the site details screen.
- Check that you can log in with your username and password.
- If you cannot access the WP Admin pages of your local site environment, open the Local WP application again and select the site on the sites list.
- Locate the option “One-click admin”.
- Enable the feature by changing the toggle to the “On” position.
- Select any user from the dropdown list, at least one user should be available. All users shown in the dropdown list are admin users.
- Click on the button “WP Admin” on the top right of the site details screen one more time.
- (optional) Go to “WP Admin > Users > Add New” and create a new admin user for yourself.
After completing these steps, you might need to clone the plugin repositories again to associate the repository with your git user. If so, head to Step 5 – Cloning git repositories for the Fluid Checkout plugins and follow through the next steps through Step 8 – Configure Fluid Checkout plugins.