Processing refunds
Refunds for orders are processed according to our Refunds Policy.
Despite our policy stating we do not process refunds without a reason or without the attempt to fix the issues experienced by the customer, it is better to process the refund if the customer is not happy with their purchase and if they asked for a refund within 30 days of the original purchase.
If a refund is not processed, the customer might resource to a payment dispute with the payment provider (also know as a “chargeback”), which has a high cost per dispute and are usually resolved in favor of the customers.
Although, when a customer asks for a refund, they should provide us with some feedback about why they decided to get a refund. This is required to ensure we’ll be able to improve the plugin to avoid other customers from having the same issues.
Jump to the specific section within this article for instructions according to the situation:
- Sales tax (VAT) refund request (another article)
- Check that the customer is eligible for a refund according to our Refund Policy
- Customer asked for a refund without an explanation
- Customer provided an explanation about the issues experienced
The steps to actually process the refund are explained in the section Processing a refund.
Check that the customer is eligible for a refund under our Refund Policy
According to our Refunds Policy, a customer might not be entitle to a receiving a refund.
We’ll not process refunds if the customer had bought the plugin more than 30 days ago, although a couple of days can be granted as a grace period. The grace period also applies to renewals, in which case we’ll not refund renewals if it was charged more than 5 days ago.
There are a couple of ways you can check when the latest order of the customer was charged, and if it is still eligible for receiving a refund.
WooCommerce purchase history on the Support Tickets or CRM systems
- Go to the Fluid Checkout website dashboard at https://fluidcheckout.com/wp-admin/
- Go to WP Admin > Fluent Support > Tickets.
- Use the filters to locate the support ticket related to the customer’s refund request.
- Choose to open the support ticket details screen by clicking on the ticket title.
- On the right side of the support ticket, locate the section “WooCommerce Purchases”.
- On the “WooCommerce Purchases” section, check that the customer has at least one order listed in this section, and check that the status of the order is set as “Complete”, and the date of the order is not older than the limit of 30 days for new orders and 5 days for renewals. Leave the pointer over the order status a few seconds to see the order date.
- If the customer does not have an order listed, they have not yet purchased any products with us and they are not entitled to receive any refund.
- If any of the orders listed are set with status “Complete”, it might be that the Support ticket system is having a hard time finding all the orders. In this case, you can also use the customers CRM profile page to check the customer’s purchase history.
- Choose the option related to the customer mailing list subscription status, which is shown right below the customer’s name and email address.
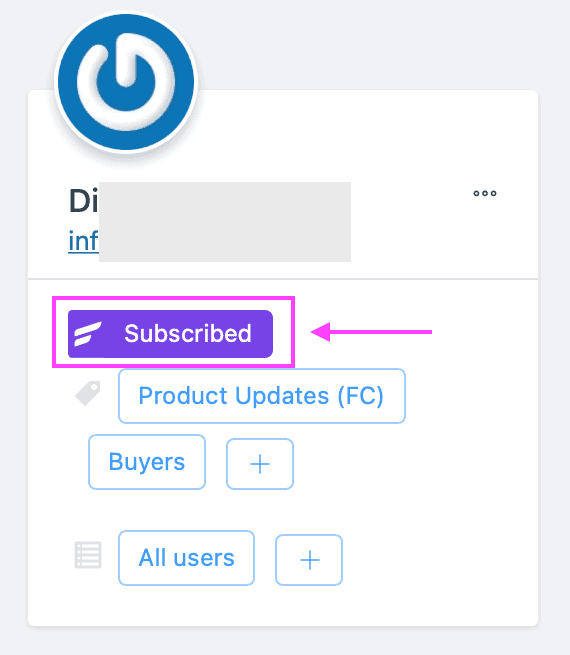
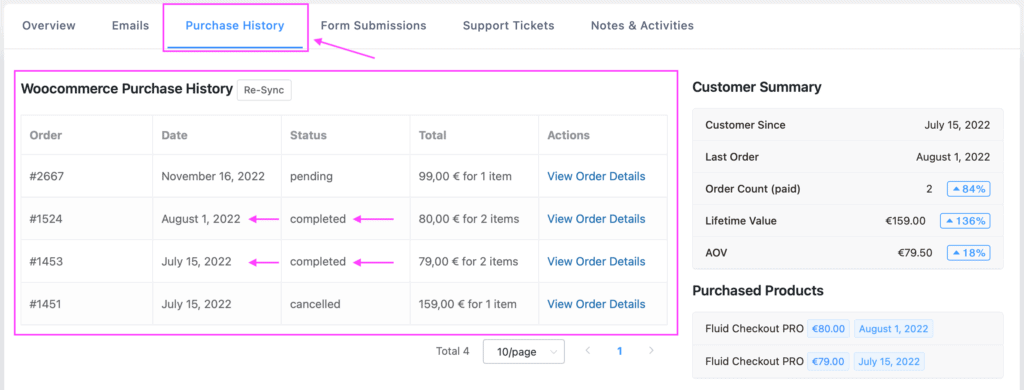
- On the customer’s CRM profile page, change the current tab to “Purchase history”.
- On the “WooCommerce Purchase History” section, check that the customer has at least one order that is eligible for a refund. That is, an order that is set with status “Completed”, and that the purchase date is still under the refunds limit.
WooCommerce purchase history on the WooCommerce orders list
- Go to the Fluid Checkout website dashboard at https://fluidcheckout.com/wp-admin/
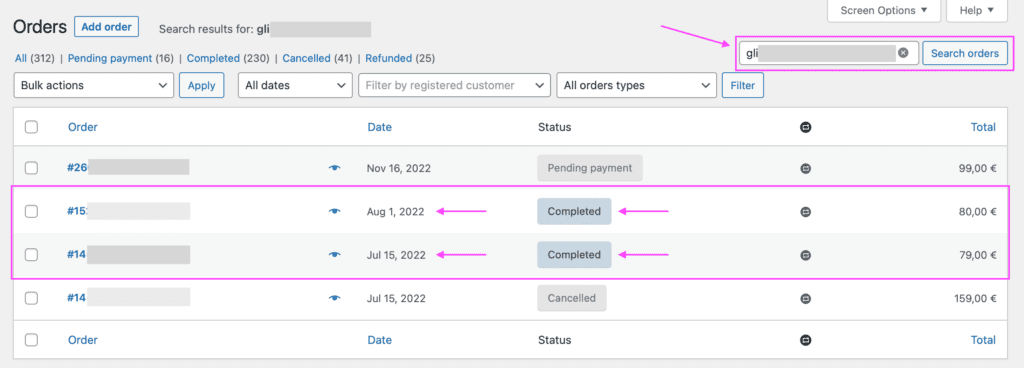
- Go to WP Admin > WooCommerce > Orders.
- Use the search field to find the related order using the customer’s email address.
- Check that the customer has at least one order that is eligible for a refund. That is, an order that is set with status “Completed”, and that the purchase date is still under the refunds limit.
Customer asked for a refund without an explanation
If a customer asks for a refund without an explanation, we’ll proceed as following:
- Send a first reply with a message similar to the one below, using the current “Saved reply/Template”, which might be a little different.
Saved reply / Template: “Refund ask for reasons (first reply)”
Hi Customer,
Thanks for trying out Fluid Checkout.
We are always improving our plugins and every piece of feedback is appreciated.
- Could you tell us what issues you have experienced with the plugin that made you decide > not to use it for your project?
- Is there anything we need to fix or add to the plugin for you to consider using it again?
We’ll process your refund request as soon as we get your response.
Best,
Team member.
- Keep the ticket active on the support system.
- Change the task status on ClickUp to “On hold”.
- Wait for them to reply, and proceed with the refund regardless if their response contains an explanation or not.
Customer provided an explanation about the issues experienced
We’ll proceed with the refund ir the customer creates the refund request ticket already with the explanation of the issues experienced, or after they reply to our first message asking them for an explanation, whether the response was satisfactory or not and regardless if they sadly “just want a refund” without helping us to improve our product.
In this case, just proceed to the section Processing a refund.
Processing a refund
Follow the steps below to process a refund request from a customer after they provided us with an explanation about why they wanted a refund, or in case they sadly “just want a refund” without helping us to improve our product.
Unfortunately, at the time of writing this guide, processing a refund takes quite a lot of steps, which we separate below in sections:
Process refund from Paddle dashboard
- Log into the Paddle dashboard at https://vendors.paddle.com/.
- Go to Menu > Transactions.
- Use the search field to find the related transaction using the customer’s email address. If there is only one transaction, you’ll be redirected to the customer’s transaction details screen, otherwise, click the option “View” related to the transaction they want a refund for.
- If you can’t find any transaction for that email address, make sure to change the filter for the period you are searching. Since there is no option for “Last 30 days” which would be the most useful to us, you can choose “Year to Date”, which will contain any refundable transaction, that is, any transaction that happened in the past 30 days.
- On the transaction details screen, choose the option “Refund” at the top right of the screen.
- On the “Refund Order” popup screen, choose the option “Full refund”.
- Enter the text “30 days money back guarantee” in the field “Refund Reason”, or a enter a relevant text for different situations.
- Check the option “Cancel subscription”, unless for rare situations when we need to refund just one order but the customer wants to keep their subscription.
- Choose the option “Submit Refund” at the bottom of the screen to finish processing the refund for this transaction.
- At this point, the transaction will be marked as refunded, and the associated subscription will have been cancelled on Paddle.
Cancel subscription on Paddle dashboard
- Log into the Paddle dashboard at https://vendors.paddle.com/.
- Go to Menu > Customers > Subscribers.
- Change the selected tab to “All”.
- Use the search field to find the related subscription using the customer’s email address.
- Check that the status of the subscription is “Cancelled”. If so, you can jump to the section: Process refund for WooCommerce order
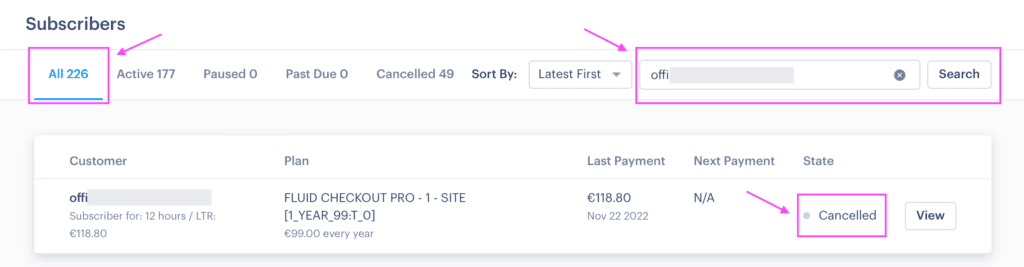
- If the status of the subscription is still “Active”, choose the option “View” related to that subscription.

- On the “Manage Subscription” details screen, choose the option “Cancel Subscription”.
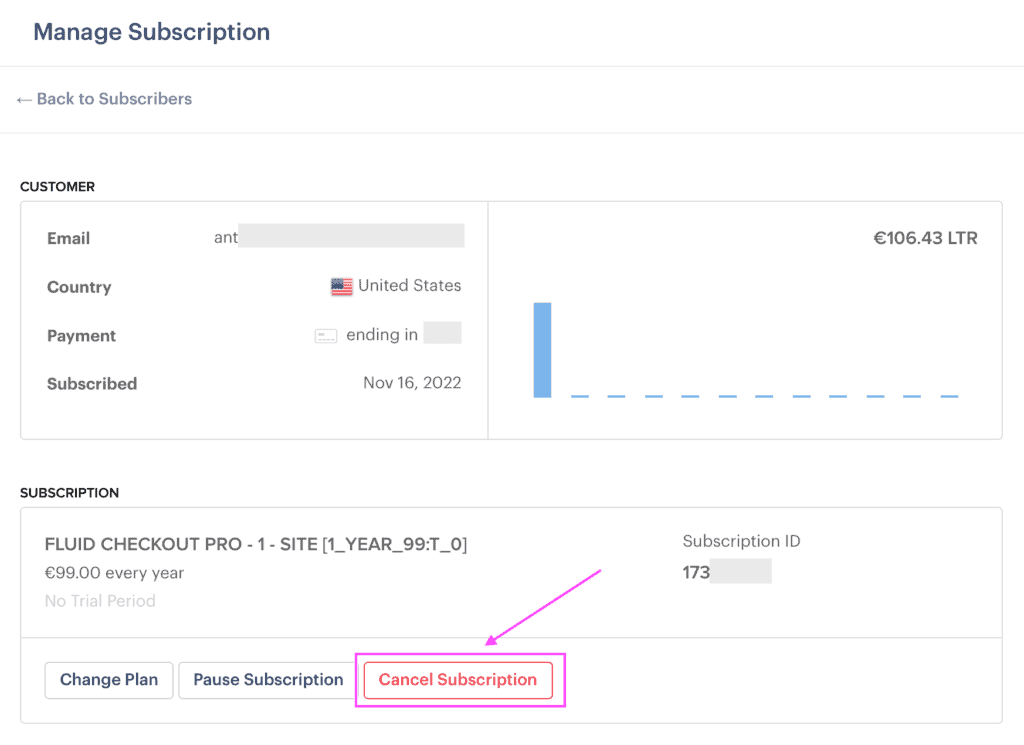
- Confirm that you want to cancel the subscription.
- At this point, the subscription will be cancelled on Paddle, and the corresponding subscription will probably have been set as “Pending cancellation” on the Fluid Checkout WooCommerce Subscriptions.
Process refund for the order on our website dashboard
- Go to the Fluid Checkout website dashboard at https://fluidcheckout.com/wp-admin/.
- Go to WP Admin > WooCommerce > Orders.
- Use the search field to find the related order using the customer’s email address.
- Check that the order is already set as “Refunded”, as Paddle would already have set it on the website via webhooks. If so, you can jump to the section Cancel subscription on WooCommerce order.
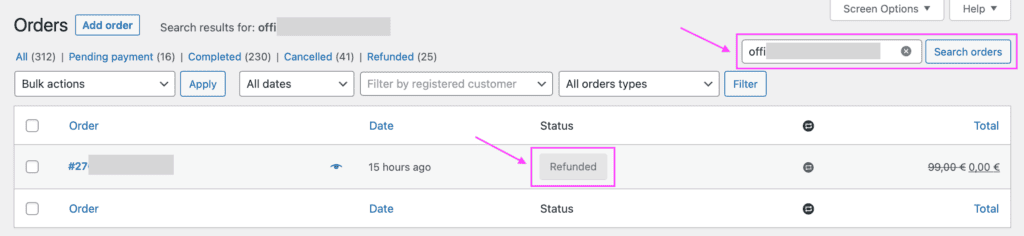
- If the order is still not set as “Refunded”, choose the option to open the order details by clicking on the order number or customer’s name.

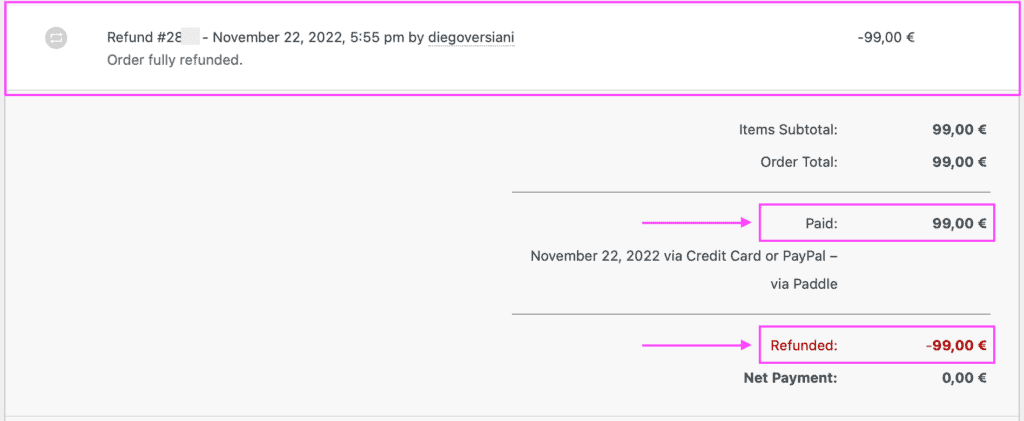
- On the order details screen, scroll to the list of products purchased and choose the option “Refund”.
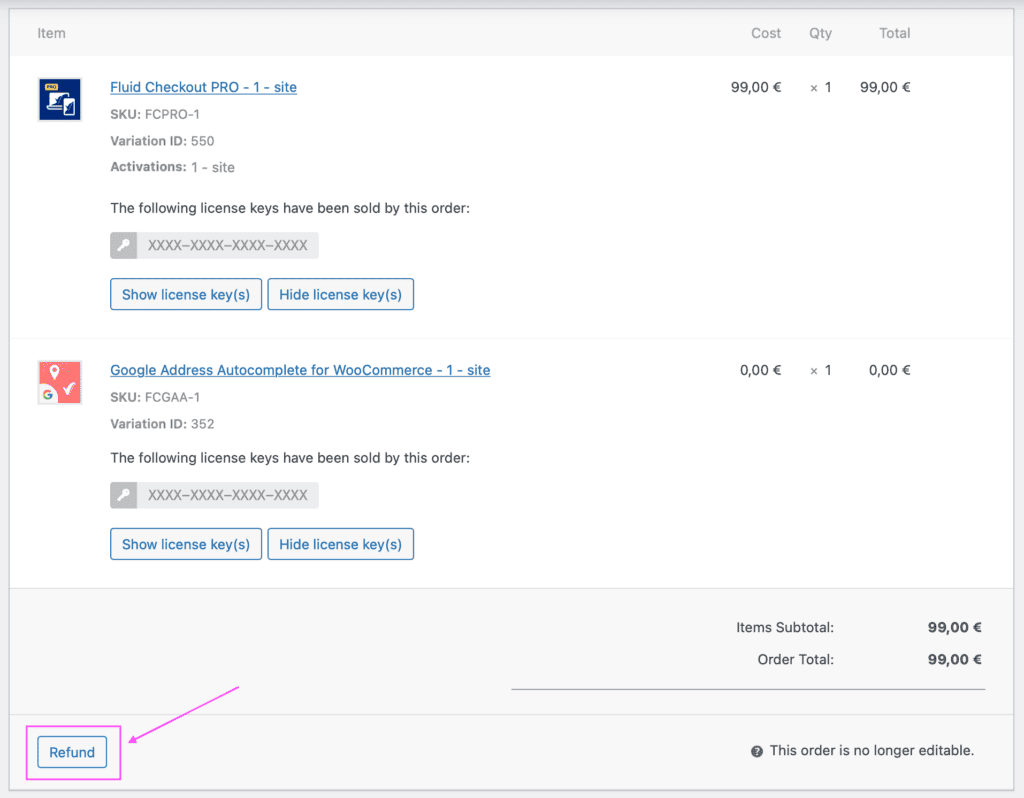
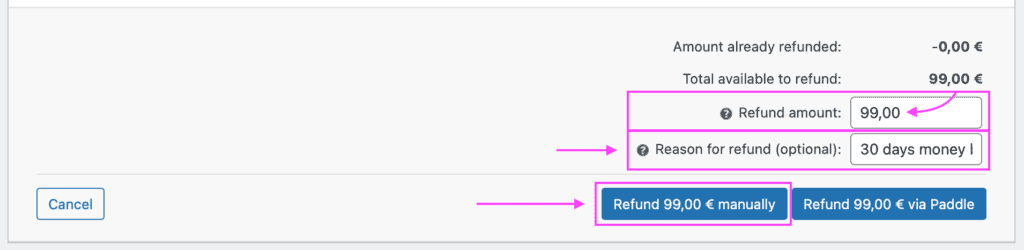
- The order summary section will then turn into the refund form, enter the total amount of the order in the field “Refund amount”.
- Enter the text “30 days money back guarantee” in the field “Refund Reason”, or a enter a relevant text for different situations.
- Choose the option “Refund manually”. Is important to choose the “Manual refund” option at this point, as the amount is likely already refunded on Paddle as explained in the section Process refund from Paddle dashboard.
- Confirm that you want to refund the order manually.
- After processing the manual refund, refresh the page to load any changes to the order details that might have happened in a background process.
- At the top of the order details screen, check that the order status is set to “Refunded”.
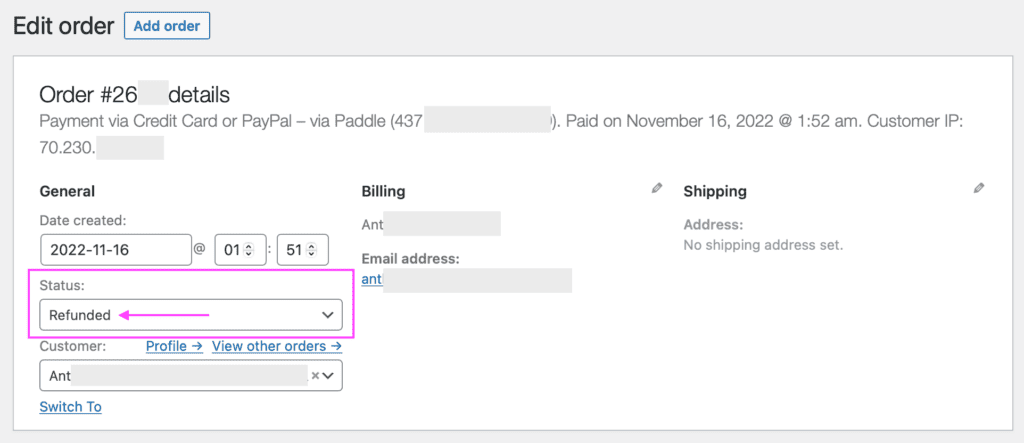
- If the order status is not yet set to “Refunded”, check that the manual refund was processed correctly by scrolling to the list of products purchased and check if a new order item for the refund was added.
- If the refund was processed correctly, set the order status to “Refunded” and choose the option “Update” on the section “Order actions”.
- At this point, the order will be set as “Refunded” for future checks of the customer requests for another refund in the future.
Cancel subscription on our website dashboard
- Go to the Fluid Checkout website dashboard at https://fluidcheckout.com/wp-admin/.
- Go to WP Admin > WooCommerce > Subscriptions.
- Use the search field to find the related subscription using the customer’s email address.
- Check that the subscription is already set as “Cancelled”, as Paddle would already have set it on the website via webhooks. Please do not confuse the “Cancelled” status with “Pending cancellation”, the later which means the cancellation was requested but not effectuated yet.
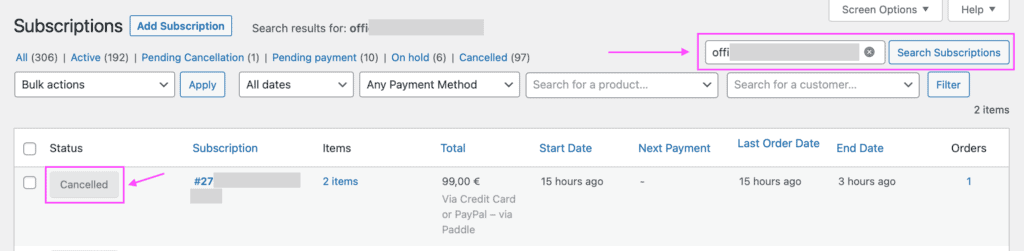
- If the subscription status is already set to “Cancelled”, you can jump to the section Cancel subscription on WooCommerce order.
- If the subscription stautus is not set to “Cancelled”, in which case it would be probably set as “Active” or “Pending Cancellation”, choose the option to open the subscription details by clicking on the subscription number or customer’s name.

- On the Edit Subscription screen, set the subscription status to “Cancelled”.

- Choose the option “Update” on the section “Subscription actions”.
- At this point, the subscription will be set as “Cancelled” and the customer will not have access to the download the plugin files from their account dashboard on our website. The customer will still have access to download updates from their website dashboard until we cancel their license keys, which is explained in the section Cancel license keys.
Cancel license keys
- Go to the Fluid Checkout website dashboard at https://fluidcheckout.com/wp-admin/.
- Go to WP Admin > License Manager > License keys.
- Use the field “Filter by user” to find the related license keys using the customer’s email address, then choose the option “Filter”.

- You’ll notice that the related license keys have the status “Disabled”, which means that at the time of expiration these license keys will stop working. The status “Disabled” is fine for license keys associated with subscriptions that were cancelled, but which the related order was not refunded. For refunded orders, we need to set the status “Cancelled”, as it will prevent the license key from being used to download updates of the plugins from the customer’s website dashboard.
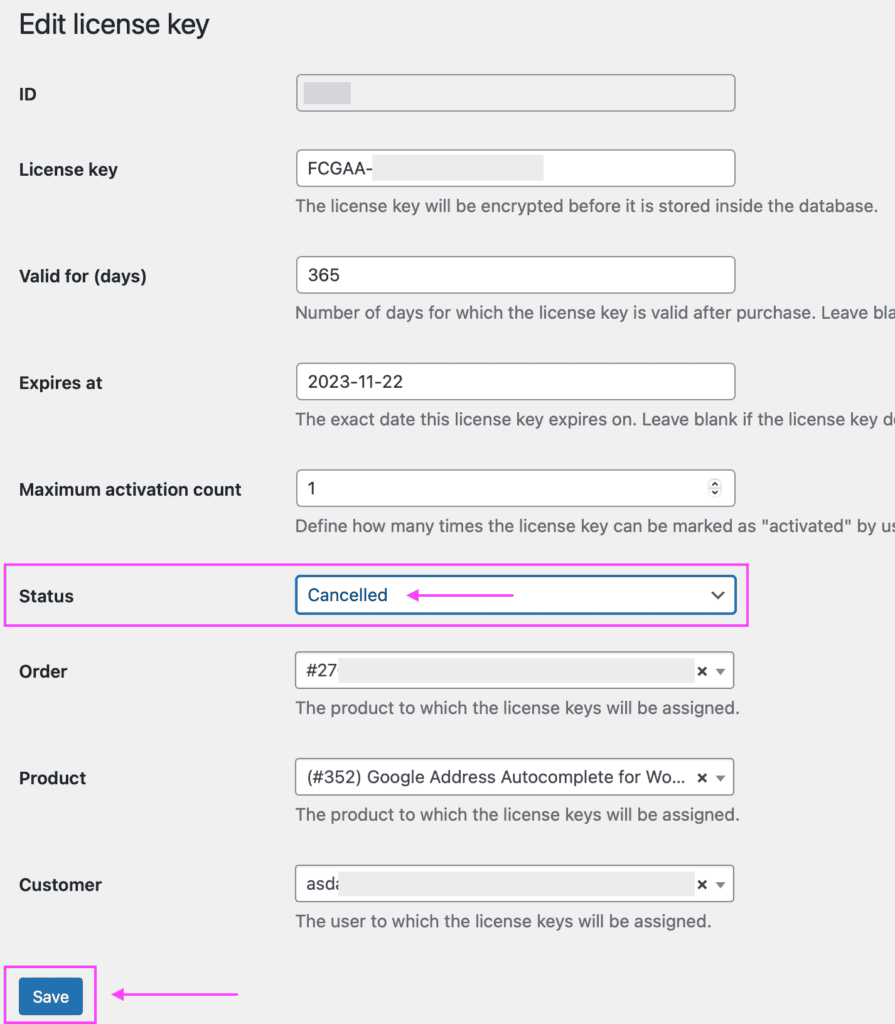
- For each license key associated with the order that was refunded and the subscription that was cancelled, open the license key details screen by clicking on the “Edit” option after hovering the pointer over the license key item. It is recommended to open each license key details screen on a separate tab, as you usually need to do it for multiple license keys.
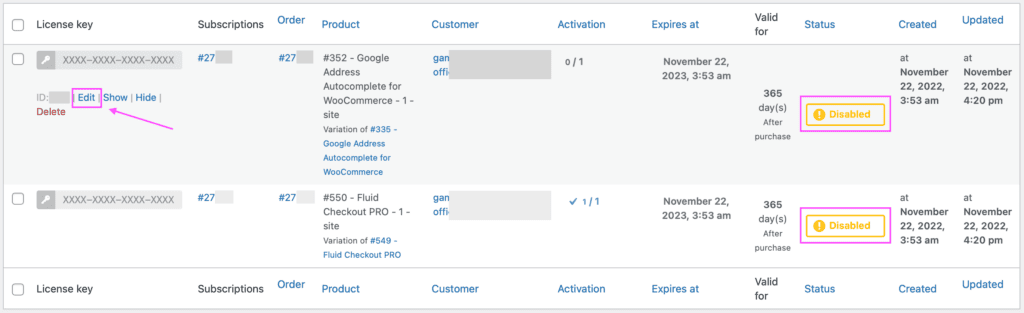
- For each license key, on the Edit license screen, change the status of the license to “Cancelled” then choose the option “Save” at the bottom of the screen.
- Remember to repeat steps 5 and 6 for each license key related to the order that was refunded and the subscription that was cancelled.
- Back to the License keys list screen, use the field “Filter by user” to find the related license keys using the customer’s email address, then choose the option “Filter” to reload the license keys data.
- Check that all license keys related to the order that was refunded and the subscription that was cancelled are now set with status “Cancelled”.
- At this point, the customer will not have any access to download the plugins being it from their account dashboard on our website or from their website dashboard as an automatic update — which is the intended result.
Send final message for refund confirmed
After processing the refund, we will communicate the changes to the customer:
- Send reply to the customer’s support ticket with a message similar to the one below, using the current saved reply (response template), which might be a little different.
Saved reply / response template: “Refund processed”
Hi Customer,
As per your request, your refund has been processed from our side. You have probably already received a confirmation from Paddle, our payments partner.
You should receive your money back within the next 7-21 days depending on how much time your financial institution needs to process it on their side.
Your subscription and license keys have been cancelled as well, meaning you won’t be charged again at the time of expiration and that you won’t be able to activate the plugin on another website or receive updates and support.
Best,
Team member.
- Close the ticket on the support system.
- Change the task status on ClickUp to “Completed”.