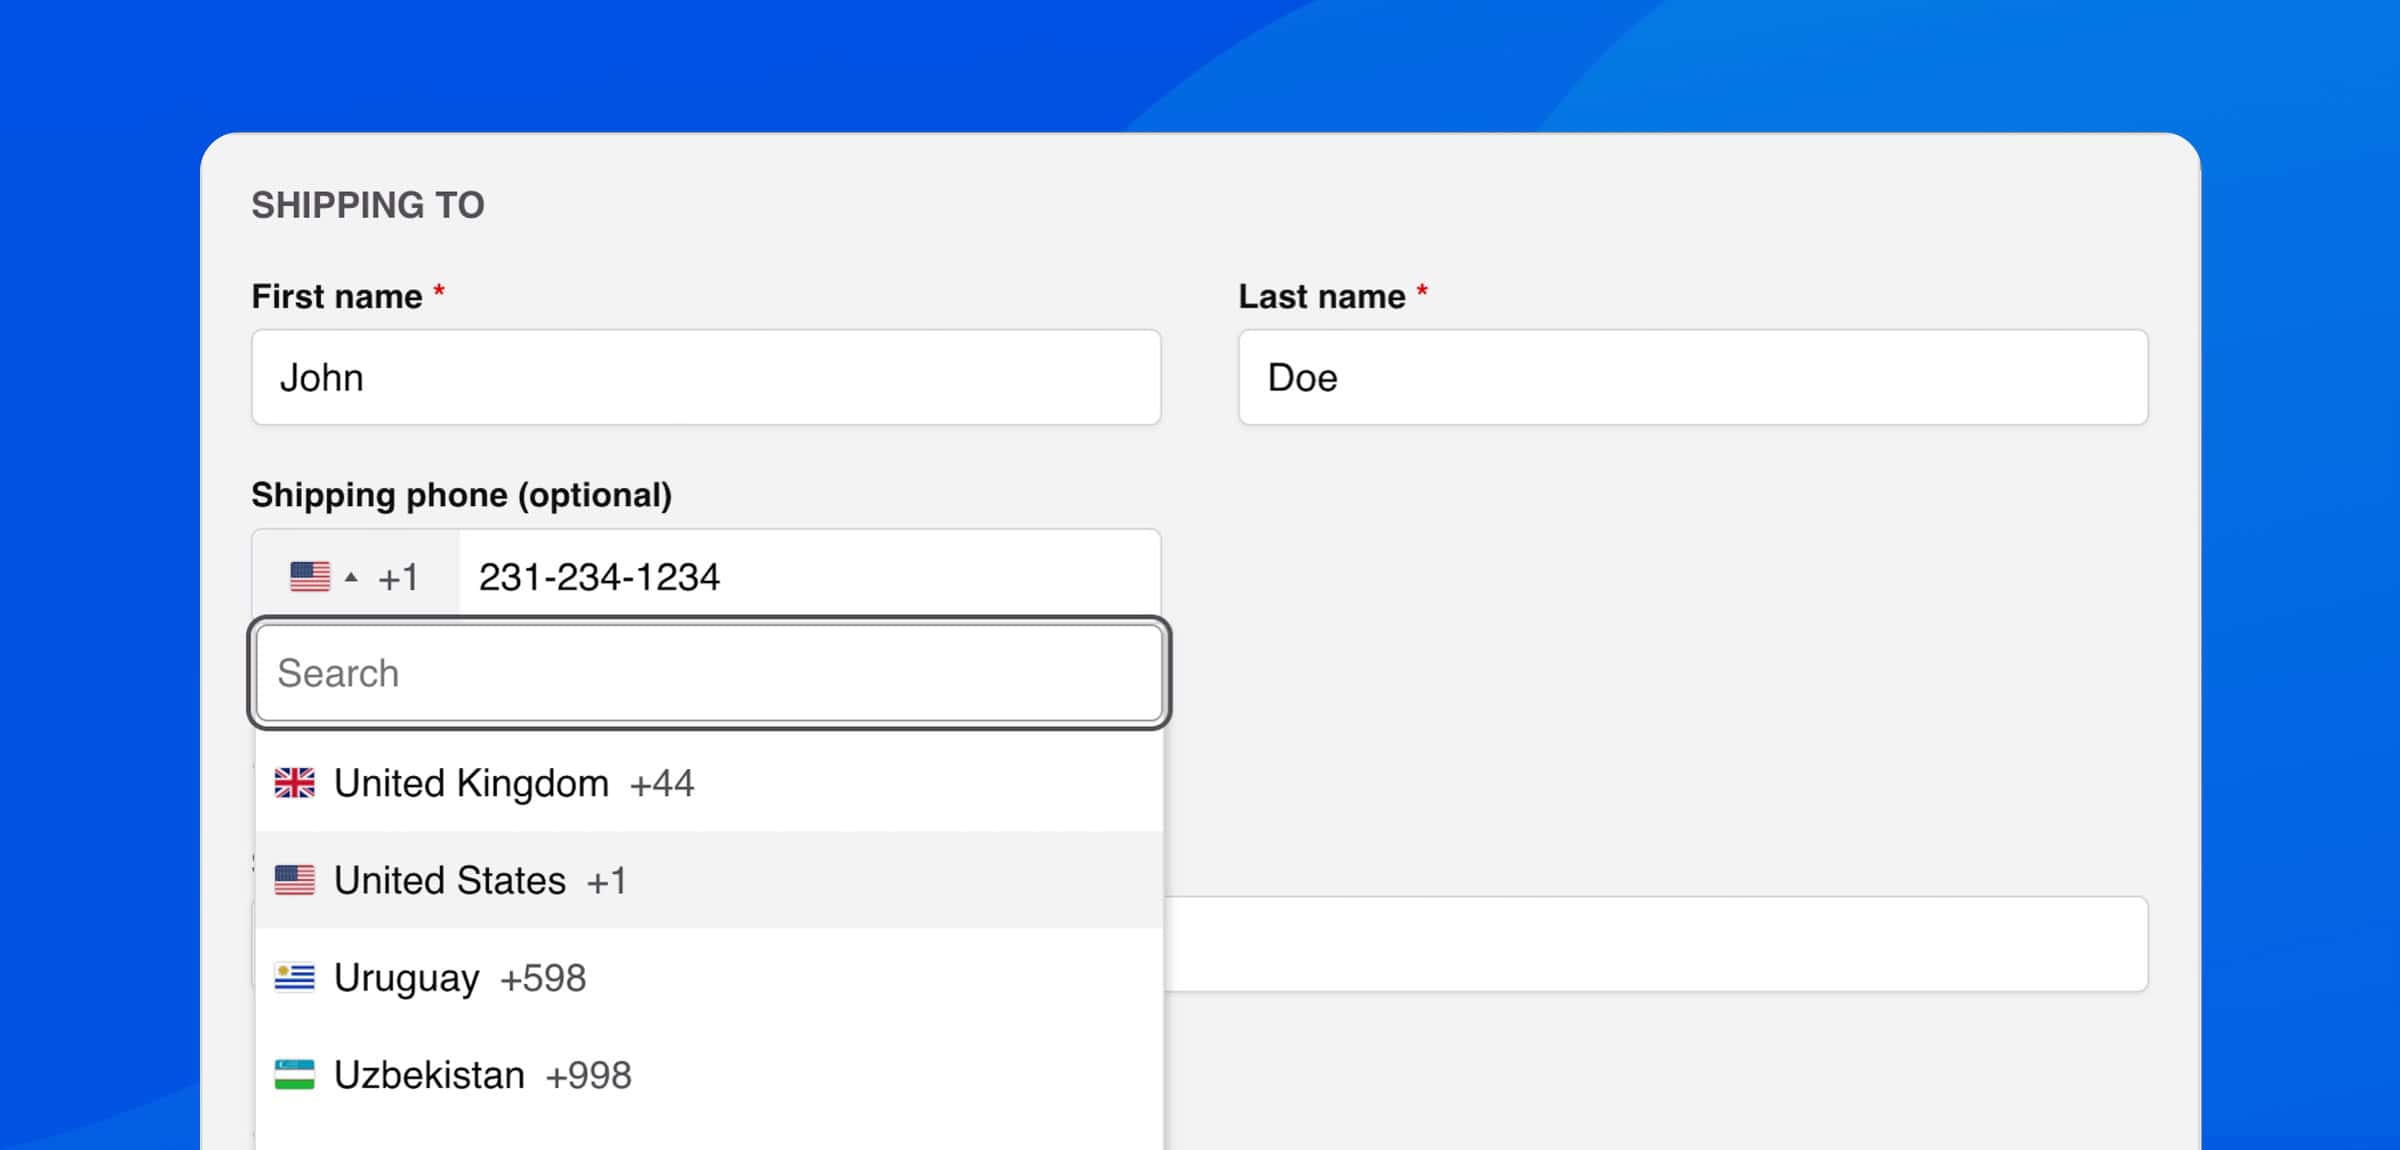
Whether you sell to customers abroad or not, the international phone number formatted fields will help your customers avoid mistakes, and ensure you collect the right phone numbers in a format that cannot be misinterpreted.
Fluid Checkout PRO will validate the phone number based on the rules for each country and region and by add a drop-down field for the country code and flag to each phone number on the checkout page, including custom fields.
Enable International Phone Number features #
Follow the steps below to enable WooCommerce phone number format for international phone number fields:
- Go to the plugin settings at WP Admin > WooCommerce > Settings > Fluid Checkout > Checkout.
- Locate the section “International phone numbers”.
- Check the option “Enable international phone number fields”.
- Check the option “Enable phone number validation based on country rules” to enable validation for phone fields.
- Check the option “Use precise phone number validation” if you want to restrict not only phone number format and basic rules, but also more specific rules. See below for more details.
- Check the option “Show country code beside the flag” if you also want to display the country code (i.e.
+39for Italian phone numbers and+44for phone numbers in the United Kingdom). Otherwise, only the country flag will be displayed. - Select one option for how placeholder text on the phone fields should be displayed.
- With the default option “Do not change placeholders”, the text inside the fields will not be changed when the field does not have a value yet, preserving the placeholder text that was already defined for that field.
- With the other two options will display the phone field placeholder with an example of a valid phone number for the selected country.
- Choose the option “Save changes” at the bottom of the settings page.

Precise phone number validation #
Since Fluid Checkout PRO 3.2.0, it is possible to validate phone numbers more with specific rules. For example, it is possible to restrict the validation to only accept mobile phones or only landline (fixed line) numbers.
Follow the steps below to enable precise phone number validation:
- Go to the plugin settings at WP Admin > WooCommerce > Settings > Fluid Checkout > Checkout.
- Locate the section “International phone numbers”.
- Make sure the option “Enable phone number validation based on country rules” is checked, to enable phone number validation.
- Check the option “Use precise phone number validation”.
- Choose the types of phone numbers to allow on all phone number fields.
- Choose the option “Save changes” at the bottom of the settings page.
It is also possible to restrict specific fields to only accept mobile or landline/fixed line numbers by adding the class js-phone-field--MOBILE or js-phone-field--FIXED_LINE to the checkout field arguments either via code or using a 3rd-party checkout fields customization plugin.
Disable filter for allowed countries #
When this filter is enabled, only countries allowed for shipping will be available in the shipping phone field, and only countries allowed for billing will be available for the billing phone field. The list of allowed countries is defined in the WooCommerce General settings for the options “Selling locations” and “Shipping locations” respectively for billing and for shipping. Custom phone number fields will always display all countries.
By default, this option is enabled. It is possible to disable this filter in the plugin settings and show all countries instead.
Follow the steps below to disable filter for only allowed countries:
- Go to the plugin settings at WP Admin > WooCommerce > Settings > Fluid Checkout > Checkout.
- Locate the section “International phone numbers”.
- Uncheck the option “Only show allowed countries for shipping or billing”.
- Choose the option “Save changes” at the bottom of the settings page.
Adding custom phone number fields with International Phone Number validation and formatting #
When adding custom phone number fields to your checkout form, make sure that:
- The field is defined with type
tel; - The class
js-phone-fieldis added to the field, so that the feature can detect and optimize it; - The validation type is set to
phoneortel, depending on the method or plugin used to add the custom field. - By adding the class
js-phone-field--MOBILEorjs-phone-field--FIXED_LINEit is possible to restrict the field to only accept that specific phone number type, when precise validation is enabled.
Using a checkout field editor plugin #
Fluid Checkout works with many checkout field customization plugins. We recommend using this method to add custom fields as it is the easiest way to manage your checkout form fields.
On this section, we’ll walk you through setting up a custom phone field using the plugin Checkout Field Editor by Themehigh, although, other plugins might also be used.
- Make sure you have the plugin Checkout Field Editor by Themehigh installed and activated.
- Go to WP Admin > WooCommerce > Checkout Form.
- Select the tab related to the checkout section you want to add the custom field to, this would be usually “Billing fields”, “Shipping fields” or “Additional fields”.
- Choose the option “Add field”.
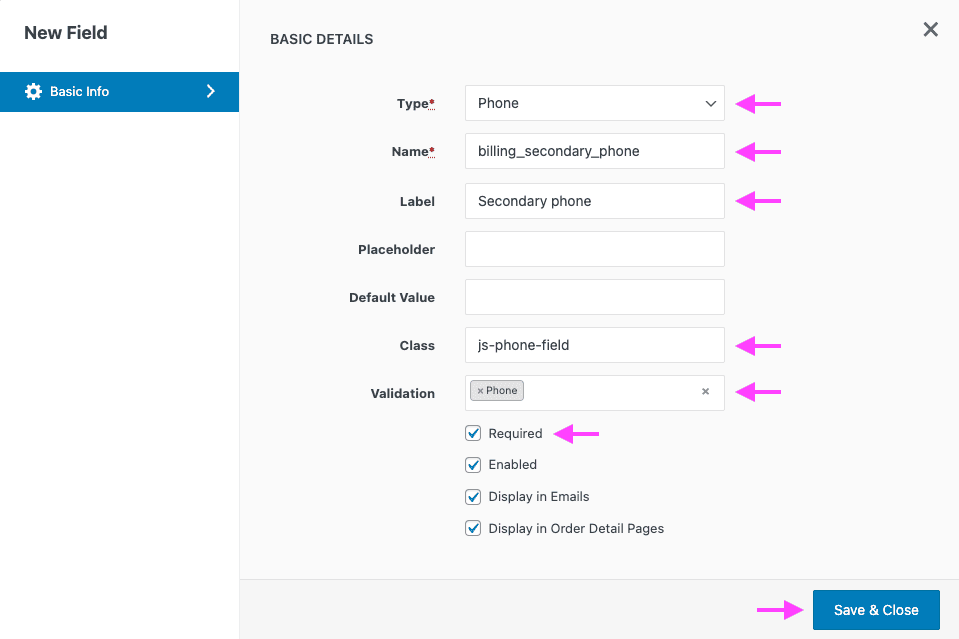
- On the New Field popup, choose the field type as “Phone”.
- Set the name of the field used for identifying the field. This is not the label for the field, which is the next attribute.
- Set the display label for the field. This is the name for the field that will be displayed on the checkout page.
- In the Class attribute, add the class
js-phone-field, separating it with commas (,) from other classes. - Set the validation attribute as
Phone. - Check the option
Requiredto make the field required on the checkout page, or uncheck that option to make the field optional. - Optionally, you can set other attributes for your new custom phone field.
- Choose the option “Save & Close” to save the field and close the popup.
- Move the new field to the desired position on the fields list, then choose the option “Save changes” on the bottom right of the fields list section.

For more details on how to add and manage custom fields, see our documentation Customizing checkout fields and adding custom checkout fields.
Using custom code #
Although we recommend adding custom fields using a checkout field editor plugin, you can also add your new phone field via custom PHP code. Below is a code snippet with an example of the field attributes you need to pass to register your custom phone number fields with:
/**
 * Adds custom phone fields to the checkout form.
 *
 * @param  array  $field_groups  The checkout field groups.
 */
function fluidcheckout_add_custom_phone_fields( $field_groups ) {
    $field_args = array(
        'label'        => __( 'Secondary phone number', 'your-text-domain' ),
        'description'  => __( 'Used in case we cannot contact you on your main phone.', 'your-text-domain' ),
        'class'        => array( 'form-row-first', 'js-phone-field' ), // Class `js-phone-field` is needed to detect which fields to optimize.
        'priority'     => 25,
        'clear'        => true,
        'required'     => true, // To make the field optional, set this value to `false`.
        'validate'     => array( 'phone' ), // Define validation type, required for validating the field as a phone number.
        'autocomplete' => 'tel',
        'type'         => 'tel', // Tell the browser to display numeric keyboard on mobile devices when typing on this field.
    );

    // Add field to the shipping section
    $field_groups[ 'shipping' ][ 'shipping_secondary_phone' ] = $field_args;

    // Add field to the billing section
    $field_groups[ 'billing' ][ 'billing_secondary_phone' ] = $field_args;

    return $field_groups;
}
add_filter( 'woocommerce_checkout_fields', 'fluidcheckout_add_custom_phone_fields', 10 );
If you are unsure about how to add the code snippet to your website, check our article:
How to safely add code snippets to your WooCommerce website
