Skip to content
Fluid Checkout
  • Features
  • Demo
  • Pricing PRO
  • Docs
  • Support
  • My account
0,00 € 0 items
Home / Docs / Move the “Phone” field to the first step (contact step)

How can we help?

Getting started

  • Do I need to uninstall the free version, or is Fluid Checkout Lite required?
  • How to translate Fluid Checkout plugins into your language

Account & Purchases

  • Can I get a refund for my purchase?
  • Finding my invoice, adding billing details and VAT number

Customizations

  • Configure cart quantity fields for decimal quantities
  • Move the “Phone” field to the first step (contact step)
  • How to change the icon or icon color for the cart button on mobile
  • Customizing checkout fields and adding custom checkout fields
  • How to customize WooCommerce or Fluid Checkout template files
  • How to add a new house number field and make it required
  • How to safely add code snippets to your WooCommerce website

Licenses

  • New versions updates are not appearing on my website

Features

  • Local Pickup — Hide shipping address when local pickup is selected
  • Trust symbols — add security badges, trust seals and other trust symbols to strategic places on the checkout, cart and order received pages
  • International phone numbers — formatting and validation for phone numbers based on country rules
  • Edit cart at checkout — change quantity or remove items from the cart directly at the checkout page
  • Express checkout — quick payment buttons for Google Pay, Apple Pay and other payment methods

Development

  • Troubleshoot – Trust symbols widgets randomly moving to other areas when switching themes
  • Changelog format and semantic version numbers
  • Changelog – Fluid Checkout PRO & Lite

Move the “Phone” field to the first step (contact step)

Table of Contents
  • Enable phone fields and move them to the "contact" step

In this article, you are going to learn how to move the “Phone” field to the first step of the checkout process, the “Contact” step.

When moving those phone fields to the contact step, they will appear right after the email field and it can be set as optional or required. You can move the “Shipping phone” field, “Billing phone” field, or both.

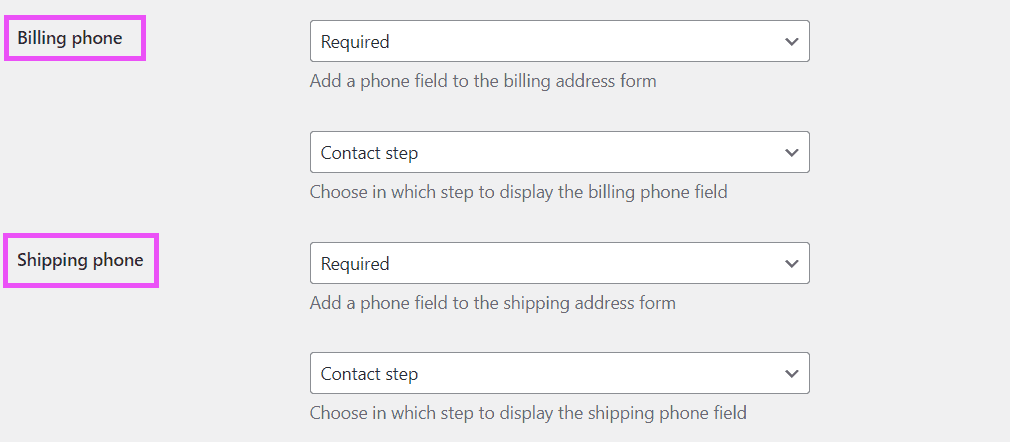
Enable phone fields and move them to the “contact” step #

  1. Go to the plugin settings at WP Admin > WooCommerce > Settings > Fluid Checkout.
  2. Locate the settings for “Billing phone” and “Shipping phone”.
  3. Set the desired phone field (billing or shipping) to be added to the checkout as either “Optional” or “Required”. You can also choose to remove the field by setting it as “Hidden”.
  4. Set the position of the desired phone field (billing or shipping) to “Contact step”.
  5. Click on “Save changes” at the bottom of the page.

What are your Feelings
Still stuck? How can we help?

How can we help?

Updated on March 21, 2023
Configure cart quantity fields for decimal quantitiesHow to change the icon or icon color for the cart button on mobile
Table of Contents
  • Enable phone fields and move them to the "contact" step
Fluid Checkout

Frictionless Multi-step Checkout for WooCommerce

© 2021-2023 Fluidweb OÜ

Terms | Refunds | Privacy Policy | Cookies | Affiliates

Products
  • All products
  • Fluid Checkout PRO
  • Fluid Checkout Lite
  • Google Address Autocomplete for WooCommerce
Company
  • Support
  • My account
  • About
  • Home
  • Home
  • Features
  • Pricing PRO
  • Demo
  • Docs
  • Support
  • My account