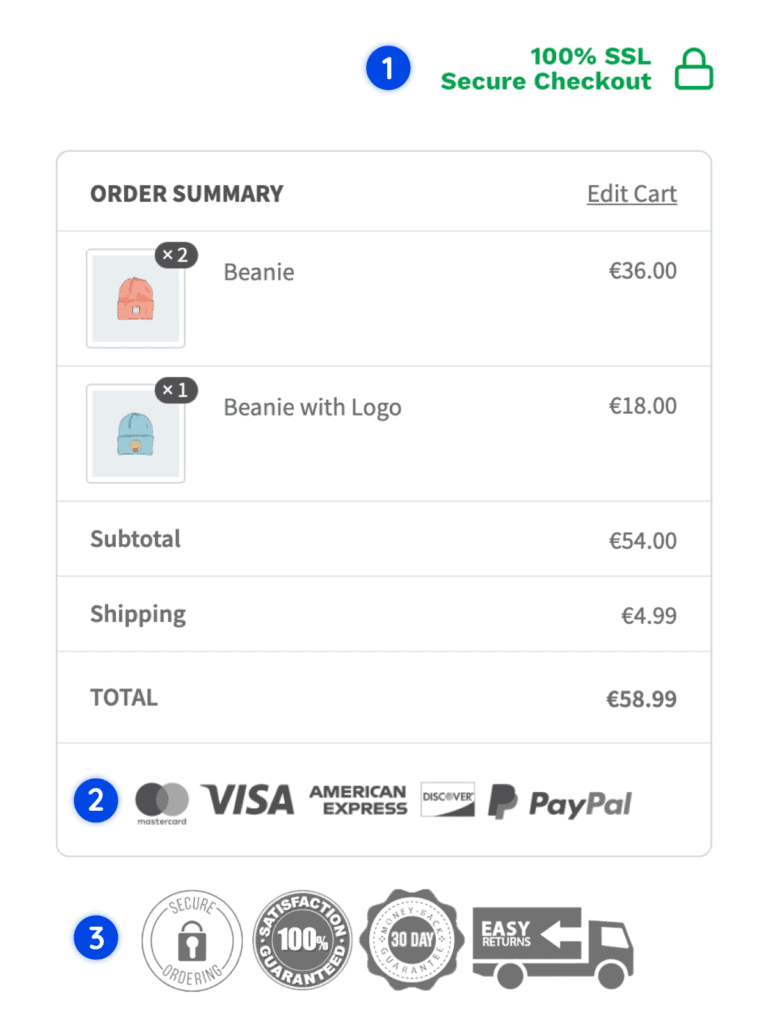
Trust symbols (aka. trust badges, trust seals or security badges) are visual cues that indicate to customers that an e-commerce website is safe and secure to use. They can be any badges, images, icons or text placed on strategic places on the website, usually displayed alongside the product descriptions, on cart and checkout pages, and site header and footer.
Incorporating trust symbols on the checkout page can increase customer confidence and reduce cart abandonment rates, resulting in higher conversion rates and revenue.
While Fluid Checkout provides de widget areas on the checkout, cart and order received pages, you have to provide the content yourself. Remember that the most effective trust symbols will vary depending on your business and your customers. Focus on displaying symbols that are relevant to your audience and that will best establish trust and credibility for your brand.
In this article you will learn how to add any trust symbol to the checkout page.
With Fluid Checkout PRO, you can also add trust symbols to the cart page, on the order pay page, and on the order received (thank you) pages via similar widget areas.
Examples of trust symbols and badges #
Here are some examples of trust symbols that can be added to the checkout page use the provided widget areas:
- Security badges:Trust badges are logos or symbols that represent third-party security services such as Norton Secured, McAfee Secure, TRUSTe, or VeriSign. These badges verify the website’s security and privacy practices.
- SSL certificate: A Secure Sockets Layer (SSL) certificate is a digital certificate that authenticates the identity of a website and encrypts data transmitted between the website and the customer’s browser.
- Payment gateway logos: Displaying logos of popular payment gateways that you offer like PayPal, Visa, Mastercard, or American Express can add credibility to the website and make customers feel more secure when making purchases.
- Customer reviews and ratings: Displaying customer reviews and ratings on the checkout page can build trust in the brand, product, and service quality.
- Social proof: Similarly to customer reviews, social proof symbols such as social media icons, follower count, or testimonials from influencers or industry experts can increase customer confidence and your credibility.
- Money-back guarantee: Displaying a money-back guarantee badge or logo can reassure customers that they can return a product if they are not satisfied with their purchase.
- Rewards programs: Displaying loyalty or rewards program badges can motivate customers to complete their purchase by offering incentives such as discounts, points, or exclusive perks.
- Contact information: Providing contact information such as a phone number, email address, and physical address can reassure customers that they can contact the company if they have any questions or concerns.
- Live chat support: Offering live chat support can provide customers with instant assistance and support, making them feel more comfortable and confident in their purchase.
Trust symbols on the checkout page #
Widget areas placement on the checkout page #
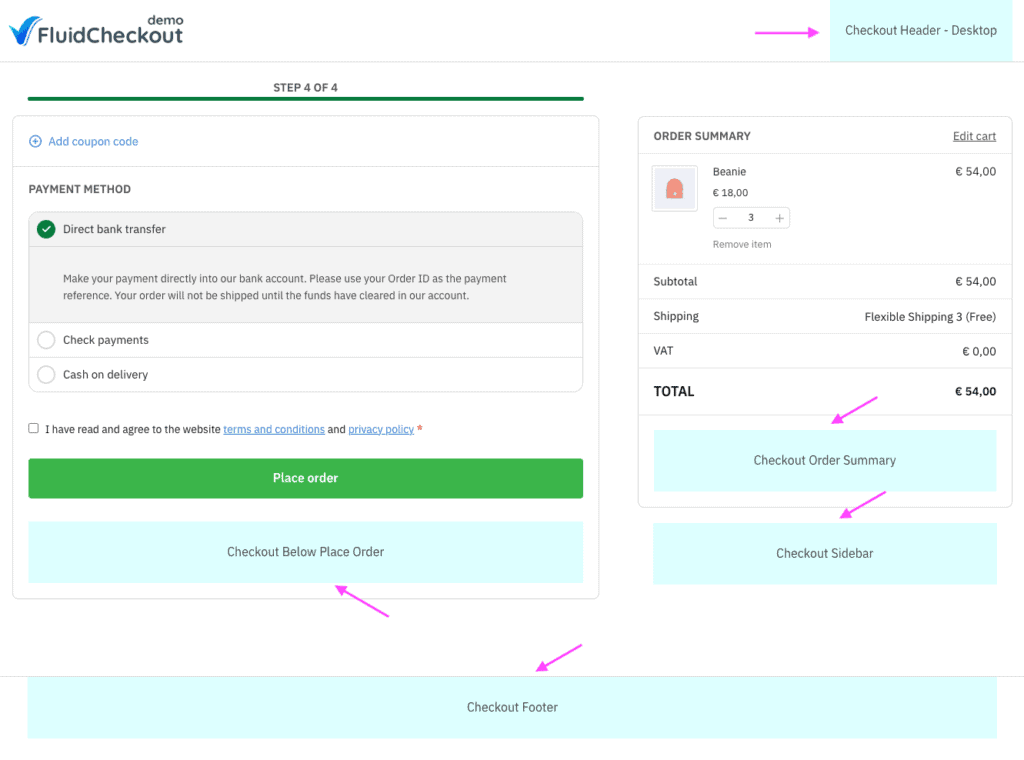
Fluid Checkout provides the following widget areas for the checkout page:
- Checkout Header – Desktop: displayed at the checkout header — only displayed on desktop devices and when using the distraction-free header and footer templates. Widget added to this area will appear on both the checkout and the order pay pages.
- Checkout Header – Mobile: displayed at the top of the page, right below the checkout header — only displayed on mobile devices and when using the distraction-free header and footer templates. Widget added to this area will appear on both the checkout and the order pay pages.
- Checkout Sidebar: displayed on the sidebar, outside and below the order summary section.
- Checkout Order Summary: displayed at the bottom of the order summary section, below the order details and the place order button when present.
- Checkout Below Place Order: displayed below the place order buttons on the payment step, or inside the order summary section when the place order button is present. Widget added to this area will appear on both the checkout and the order pay pages.
- Checkout Footer: displayed at the bottom of the checkout page in the checkout footer section. Widget added to this area will appear on both the checkout and the order pay pages.
Enabling checkout widget areas #
- Go to the plugin settings at WP Admin > WooCommerce > Settings > Fluid Checkout.
- Locate the section “Features > Checkout widget areas”.

- Check the option “Add widget areas to the checkout page”.
- Optionally, choose whether you want to display the checkout sidebar widgets only when viewing the last checkout step while on mobile devices. If so, check the option “Only display checkout sidebar widgets when at the last checkout step on mobile devices”.
- Click on “Save changes” at the bottom of the settings page.
Adding trust symbols to the checkout page #
Appearance > Widgets #
To add trust symbols to the checkout page using the designated widget areas, you can follow these steps:
- Go to WP Admin > Appearance > Widgets.
- You will see a list of available widgets on the left side, and on the right side, you will see a list of available widget areas. Use any of the widget areas for the checkout page as shown above.
- Drag and drop the widget you want to use from the left side on the widget area you want to use.
- Configure the widget by entering any necessary settings or content. For example, if you are adding a text widget, you can enter your text content directly in the widget settings.
- Once you have configured the widget, click the “Save” button to save your changes.
- You can preview your changes by visiting your website and checking the widget area where you added the new content.
Repeat these steps as needed for any additional trust symbols you want to add to other widget areas on your checkout page.
Appearance > Customize #
You can use the Customizer feature to add new trust symbols and live-preview how it will look like on the checkout page:
- Go to WP Admin > Appearance > Customize.
- You will see a list of available customization options on the left side, and on the right side, you will see a live preview of your website.
- Navigate to your checkout page on the live preview on the right side of the page.
- Click on the “Widgets” option in the left side menu.
- You will see a list of available widget areas for the checkout page. Click on the widget area where you want to add content. Use any of the widget areas for the checkout page as shown above.
- Click on the button “Add a Widget” to see a list of available widgets.
- Select the widget you want to use and add it to the chosen widget area.
- Configure the widget by entering any necessary settings or content. For example, if you are adding a text widget, you can enter your text content directly in the widget settings.
- Once you have configured the widget, click the button “Publish” at the top left part of the page to save your changes.
- You can preview your changes by looking at the live preview on the right side. After publishing your changes, you can the new content you added by visiting the checkout page.
Repeat these steps as needed for any additional trust symbols you want to add to other widget areas on your website.
Trust symbols on the cart page PRO #
With Fluid Checkout PRO, and similarly to the checkout page widget areas, you can also add trust symbols to the cart page on your website.
Widget areas placement on the cart page #
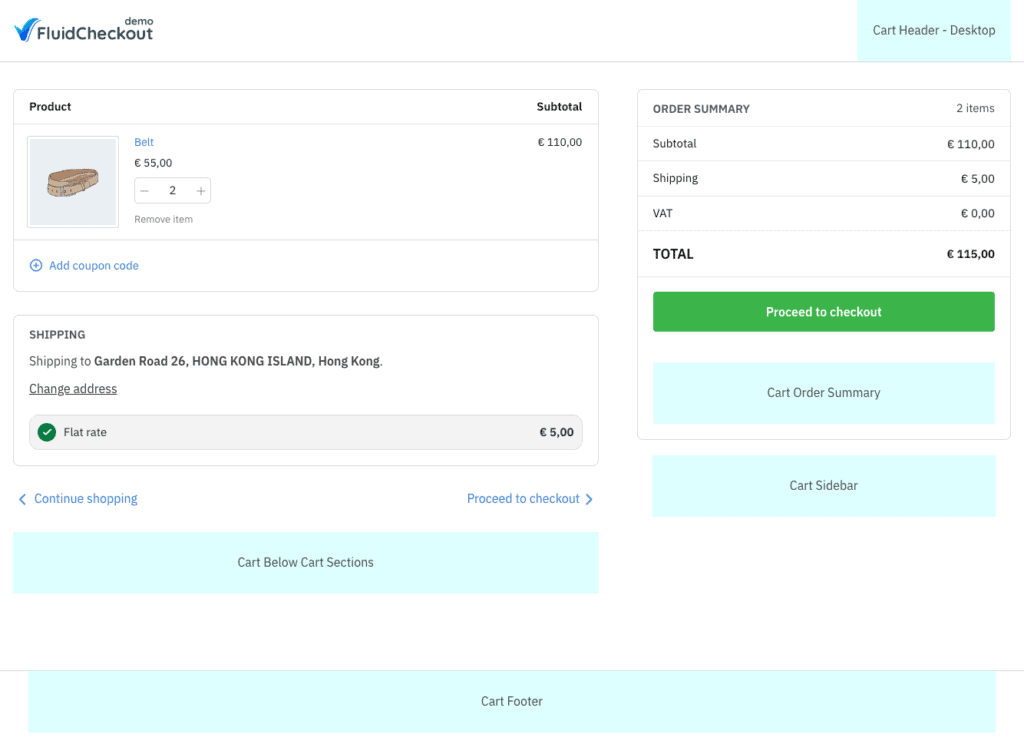
Fluid Checkout PRO provides the following widget areas for the cart page:
- Cart Header – Desktop: displayed at the cart header — only displayed on desktop devices and when using the plugin’s header and footer templates.
- Cart Header – Mobile: displayed at the top of the page, right below the cart header — only displayed on mobile devices and when using the plugin’s header and footer templates.
- Cart Below Cart Sections: displayed after the cart sections on the left side of the cart page.
- Cart Sidebar: displayed on the sidebar, outside and below the order summary section.
- Cart Order Summary: displayed at the bottom of the order summary section.
- Cart Footer: displayed at the bottom of the cart page in the cart footer section.
Enabling cart widget areas #
- Go to the plugin settings at WP Admin > WooCommerce > Settings > Fluid Checkout > Cart.
- Locate the section “Features > Cart widget areas”.

- Check the option “Add widget areas to the cart page”.
- Click on “Save changes” at the bottom of the settings page.
Adding trust symbols to the cart page #
Appearance > Widgets #
To add trust symbols to the cart page using the designated widget areas, you can follow these steps:
- Go to WP Admin > Appearance > Widgets.
- You will see a list of available widgets on the left side, and on the right side, you will see a list of available widget areas. Use any of the widget areas for the cart page as shown above.
- Drag and drop the widget you want to use from the left side on the widget area you want to use.
- Configure the widget by entering any necessary settings or content. For example, if you are adding a text widget, you can enter your text content directly in the widget settings.
- Once you have configured the widget, click the “Save” button to save your changes.
- You can preview your changes by visiting your website and checking the widget area where you added the new content.
Repeat these steps as needed for any additional trust symbols you want to add to other widget areas on your cart page.
Appearance > Customize #
You can use the Customizer feature to add new trust symbols and live-preview how it will look like on the cart page:
- Go to WP Admin > Appearance > Customize.
- You will see a list of available customization options on the left side, and on the right side, you will see a live preview of your website.
- Navigate to your cart page on the live preview on the right side of the page.
- Click on the “Widgets” option in the left side menu.
- You will see a list of available widget areas for the cart page. Click on the widget area where you want to add content. Use any of the widget areas for the cart page as shown above.
- Click on the button “Add a Widget” to see a list of available widgets.
- Select the widget you want to use and add it to the chosen widget area.
- Configure the widget by entering any necessary settings or content. For example, if you are adding a text widget, you can enter your text content directly in the widget settings.
- Once you have configured the widget, click the button “Publish” at the top left part of the page to save your changes.
- You can preview your changes by looking at the live preview on the right side. After publishing your changes, you can the new content you added by visiting the cart page.
Repeat these steps as needed for any additional trust symbols you want to add to other widget areas on your website.
Trust symbols on the order received (thank you) page PRO #
With Fluid Checkout PRO, and similarly to the checkout page widget areas, you can also add trust symbols to the order received (thank you) page on your website.
Widget areas placement on the order received (thank you) page #
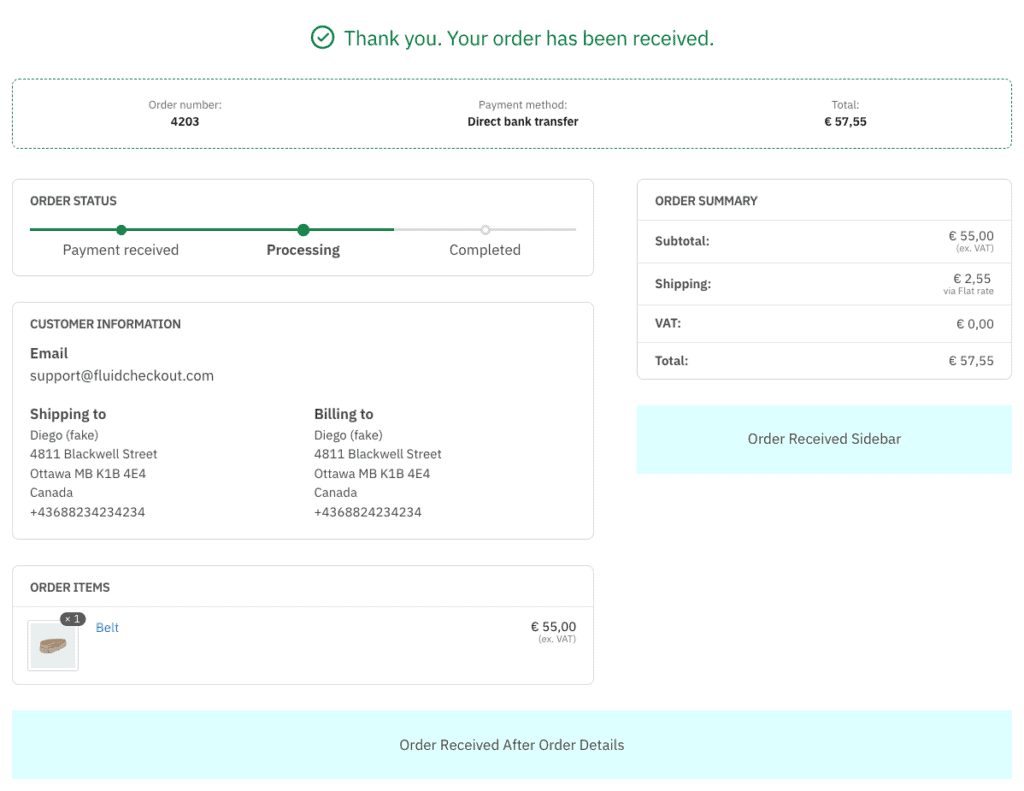
Fluid Checkout PRO provides the following widget areas for the order received (thank you) page:
- Order Received Sidebar: displayed on the sidebar of the order confirmation page. Adding widgets to this area will add the sidebar section if it does not exist yet.
- Order Received After Order Details: displayed on order confirmation page after the order details sections and the sidebar.
Enabling order received (thank you) widget areas #
- Go to the plugin settings at WP Admin > WooCommerce > Settings > Fluid Checkout > Cart.
- Locate the section “Features > Cart widget areas”.

- Check the option “Add widget areas to the cart page”.
- Click on “Save changes” at the bottom of the settings page.
Adding trust symbols to the order received (thank you) page #
Appearance > Widgets #
To add trust symbols to the order received page using the designated widget areas, you can follow these steps:
- Go to WP Admin > Appearance > Widgets.
- You will see a list of available widgets on the left side, and on the right side, you will see a list of available widget areas. Use any of the [widget areas for the order received page](#widget-areas-order received) as shown above.
- Drag and drop the widget you want to use from the left side on the widget area you want to use.
- Configure the widget by entering any necessary settings or content. For example, if you are adding a text widget, you can enter your text content directly in the widget settings.
- Once you have configured the widget, click the “Save” button to save your changes.
- You can preview your changes by visiting your website and checking the widget area where you added the new content.
Repeat these steps as needed for any additional trust symbols you want to add to other widget areas on your order received page.
Appearance > Customize #
You can use the Customizer feature to add new trust symbols and live-preview how it will look like on the order received page:
- Go to WP Admin > Appearance > Customize.
- You will see a list of available customization options on the left side, and on the right side, you will see a live preview of your website.
- Navigate to your order received page on the live preview on the right side of the page.
- Click on the “Widgets” option in the left side menu.
- You will see a list of available widget areas for the order received page. Click on the widget area where you want to add content. Use any of the widget areas for the order received page as shown above.
- Click on the button “Add a Widget” to see a list of available widgets.
- Select the widget you want to use and add it to the chosen widget area.
- Configure the widget by entering any necessary settings or content. For example, if you are adding a text widget, you can enter your text content directly in the widget settings.
- Once you have configured the widget, click the button “Publish” at the top left part of the page to save your changes.
- You can preview your changes by looking at the live preview on the right side. After publishing your changes, you can the new content you added by visiting the order received page.
Repeat these steps as needed for any additional trust symbols you want to add to other widget areas on your website.
Trust symbols on the order pay page PRO #
With Fluid Checkout PRO, and similarly to the checkout page widget areas, you can also add trust symbols to the order pay page on your website.
Widget areas placement on the order pay page #
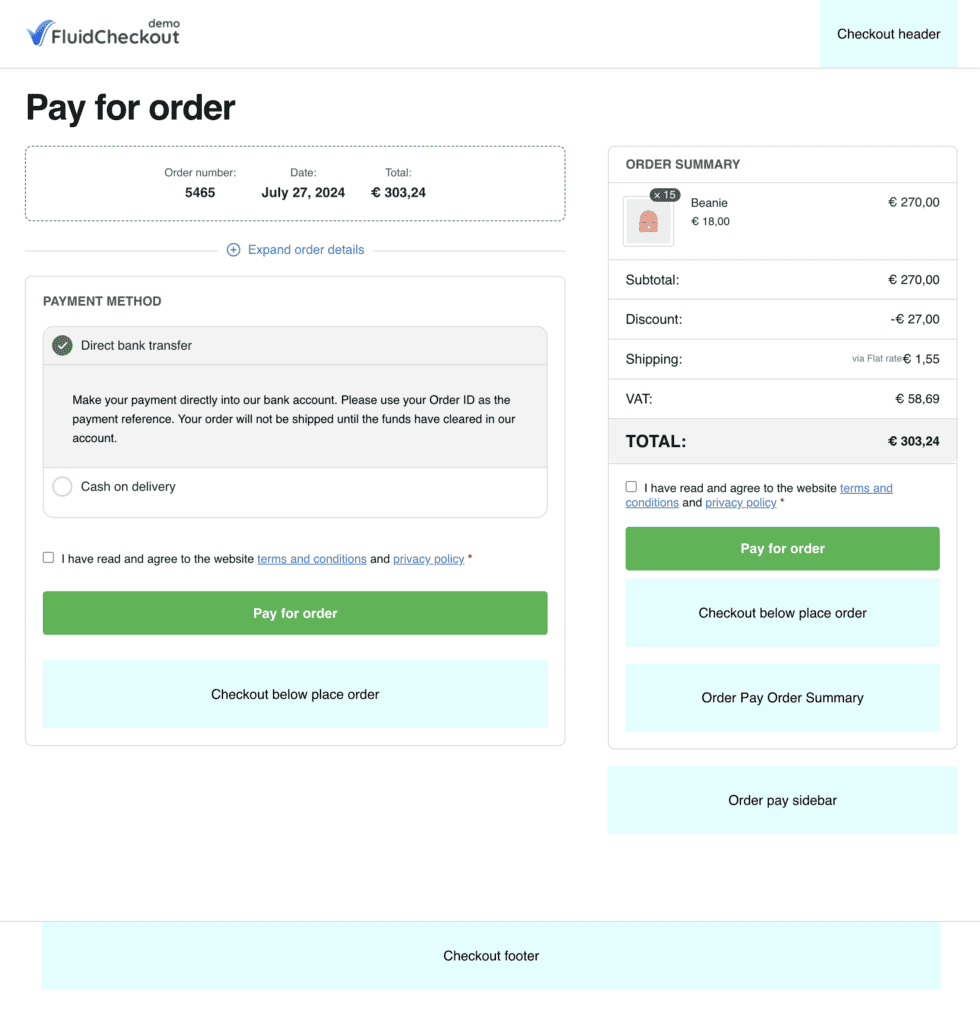
Fluid Checkout PRO provides the following widget areas for the order pay page:
- Checkout Header – Desktop: displayed at the checkout header — only displayed on desktop devices and when using the distraction-free header and footer templates. Widget added to this area will appear on both the checkout and the order pay pages.
- Checkout Header – Mobile: displayed at the top of the page, right below the checkout header — only displayed on mobile devices and when using the distraction-free header and footer templates. Widget added to this area will appear on both the checkout and the order pay pages.
- Order Pay Sidebar: displayed on the sidebar, outside and below the order summary section.
- Order Pay Order Summary: displayed at the bottom of the order summary section, below the order details and the place order button when present.
- Checkout Below Place Order: displayed below the place order buttons on the payment step, or inside the order summary section when the place order button is present. Widget added to this area will appear on both the checkout and the order pay pages.
- Checkout Footer: displayed at the bottom of the checkout page in the checkout footer section. Widget added to this area will appear on both the checkout and the order pay pages.
Enabling order pay widget areas #
- Go to the plugin settings at WP Admin > WooCommerce > Settings > Fluid Checkout > Order pay.
- Locate the section “Order pay > Trust symbols & Badges”.
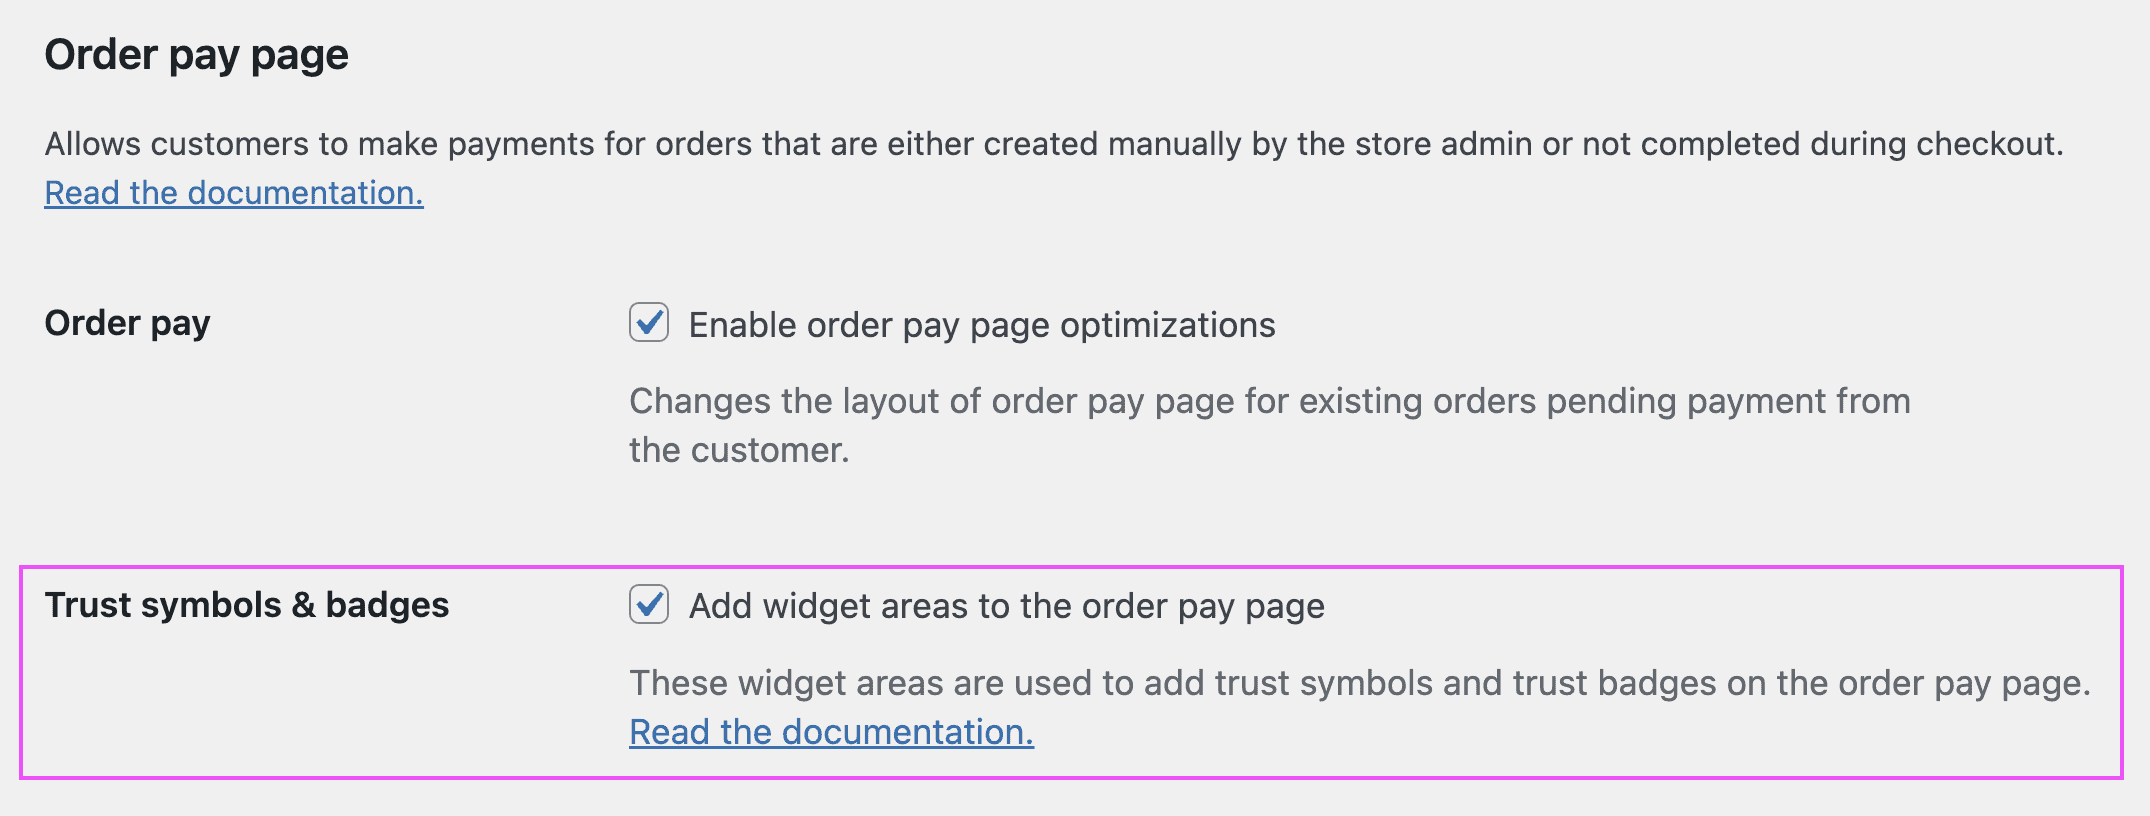
- Check the option “Add widget areas to the order pay page”.
- Click on “Save changes” at the bottom of the settings page.
Adding trust symbols to the order pay page #
Appearance > Widgets #
To add trust symbols to the order pay page using the designated widget areas, you can follow these steps:
- Go to WP Admin > Appearance > Widgets.
- You will see a list of available widgets on the left side, and on the right side, you will see a list of available widget areas. Use any of the widget areas for the order pay page as shown above.
- Drag and drop the widget you want to use from the left side on the widget area you want to use.
- Configure the widget by entering any necessary settings or content. For example, if you are adding a text widget, you can enter your text content directly in the widget settings.
- Once you have configured the widget, click the “Save” button to save your changes.
- You can preview your changes by visiting your website and checking the widget area where you added the new content.
Repeat these steps as needed for any additional trust symbols you want to add to other widget areas on your order pay page.
Appearance > Customize #
You can use the Customizer feature to add new trust symbols and live-preview how it will look like on the order pay page:
- Go to WP Admin > Appearance > Customize.
- You will see a list of available customization options on the left side, and on the right side, you will see a live preview of your website.
- Navigate to your order pay page on the live preview on the right side of the page.
- Click on the “Widgets” option in the left side menu.
- You will see a list of available widget areas for the order pay page. Click on the widget area where you want to add content. Use any of the widget areas for the order pay page as shown above.
- Click on the button “Add a Widget” to see a list of available widgets.
- Select the widget you want to use and add it to the chosen widget area.
- Configure the widget by entering any necessary settings or content. For example, if you are adding a text widget, you can enter your text content directly in the widget settings.
- Once you have configured the widget, click the button “Publish” at the top left part of the page to save your changes.
- You can preview your changes by looking at the live preview on the right side. After publishing your changes, you can the new content you added by visiting the order pay page.
Repeat these steps as needed for any additional trust symbols you want to add to other widget areas on your website.
Troubleshoot #
Trust symbols widgets randomly moving to other areas when switching themes #
WordPress has a known bug that will move some widgets to a random widget area when you switch your theme, to fix this, you’ll have to manually remove these widgets from the checkout widget areas, check out our article Troubleshoot – Trust symbols widgets randomly moving to other areas when switching themes.
