You are just a few steps away from helping your customers complete the checkout form even faster with Google Address Autocomplete for WooCommerce.
We know that setting up the Google Places API can be a challenge. That’s why we gathered the information below to help you set it up and get using your the plugin in no time.
In this guide, we’ll walk you through the necessary steps to set up of your Google Cloud Console project and Google API key, and enabling the Google Address Autocomplete feature in the plugin settings.
To get the Google API Key ready to use with the plugin Google Address Autocomplete, you will need to:
- Set up an account at Google Cloud Console
- Create a project on Google Cloud Console for your website
- Enable billing for your Google Cloud Console account and project
- Create your Google API Key credential for your project
- Authorize your Google API Key to access specific Google Libraries (APIs)
- Configure your Google API Key to restrict access only for your website
Then, you’ll need to enable the Google Address Autocomplete plugin features on the plugin settings:
- Enable Google Address Autocomplete feature on the plugin settings
- Enable Autocomplete from CEP field for Brazilian websites on the plugin settings
If you want to migrate to use the Google Places API (New):
When troubleshooting, you might want to enable the debug mode on the plugin settings:
- Enable debug mode; and see our documentation
- Troubleshooting – Google Addresses Autocomplete not working despite following installation guide
Get your Google API Key ready #
Set up an account at Google Cloud Console #
- Go to the Google Cloud website at https://cloud.google.com/.
- Choose the option “Sign in” or “Start free” at the top right part of the screen. If you are already logged in, you can use the option “Console” instead.
- Once you create your account and/or sign in with your Google account, go to the Google Cloud Console platform at https://console.cloud.google.com/
Create a project on Google Cloud Console for your website #
- At the Google Cloud Console platform homepage, choose the option “Select a project” at the top of the screen.

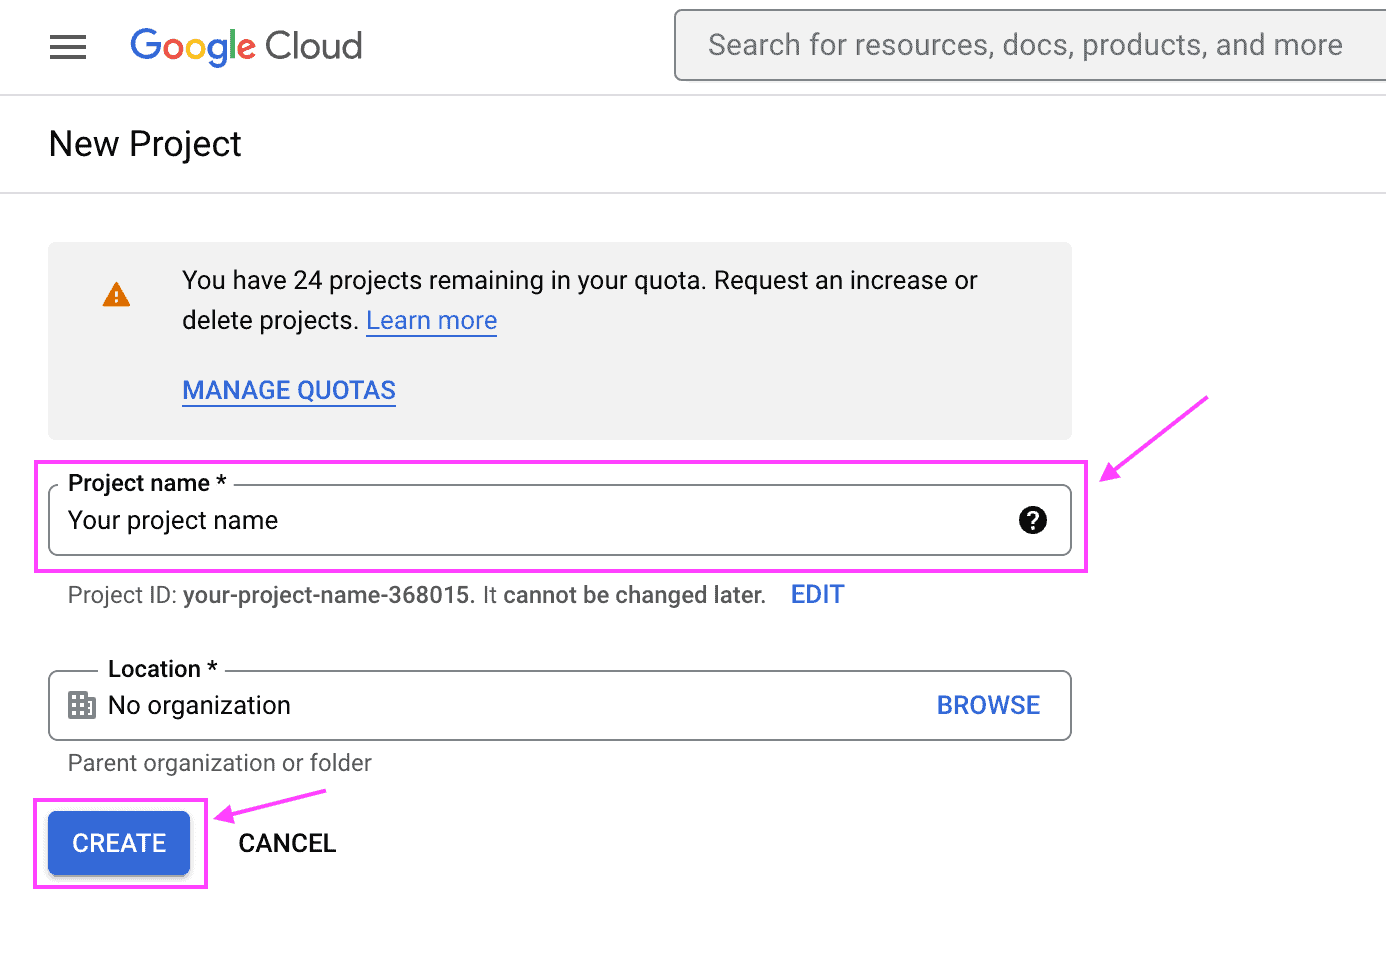
- On the projects list screen, choose the option “New project” at the top right of the popup screen.

- On the “New project” form screen, fill in the required information:
- Enter your project name in the field “Project name”, you can use any name that would be easy for you to recognize in the future. We recommend using your website name here.
- Select your organization in the field “Location“. If you have an organization set up in your Google Cloud account that you want to link your project to, click Browse and select it; otherwise, choose “No organization”.
- (optional) Select a billing account for the project. If you have not set up a billing account or only have one billing account, you will not see this option.
- Review the information entered and choose the option “Create” at the bottom of the “New project” form screen.
- Wait until the project creation is completed and proceed to the next step: Enable billing for your Google Cloud Console account.
Enable billing for your Google Cloud Console account and project #
Important: Depending on your usage, charges from Google might be incurred.
At the time of writing this guide, Google gives you 10k free requests for each service categorized as Essentials, these include 10k “Autocomplete Requests” used for searching for addresses, and another 10k “Places API Place Details Essentials” used to get the detailed address information when an address suggestion is selected to autofill the address fields.
This should be enough for customers to use Address Autocomplete for at least 5k orders, but usually close to 10k orders if your customers use the same address for shipping and billing. After the limit of each service is reached, Google will charge you according to their pricing and your usage of their services

See more about Google Maps Platform pricing.
Session tokens
Our plugin will automatically manage autocomplete sessions tokens to avoid overcharging for multiple Autocomplete Requests. An Autocomplete Session is a discrete way to group the address query and selection phases for billing purposes.
Even though in the autocomplete query phase multiple Autocomplete Request are made. Usually Google will count towards billing up to 12 requests for address suggestions search and 1 request for the place details. Our plugin will try to use cached responses to avoid sending new requests for data that we already know the responses and saved them in memory. For more information about how Google charges for these services can be found at:
More information on setting up your Google Console account, billing budget and alerts can be found on the guide Set Up in the Google Cloud Console from Google’s documentation.
- Go to the Google Cloud Console platform at https://console.cloud.google.com/ — and sign in with your Google Account.
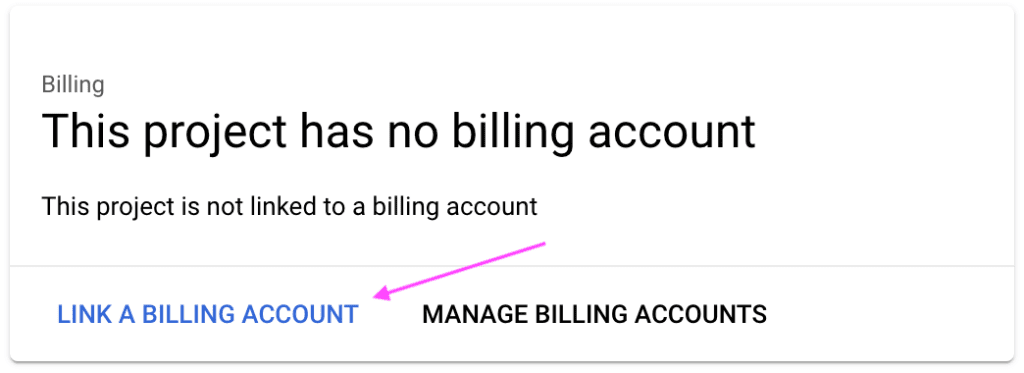
- At the Google Cloud Console platform, choose the option “Menu” at the top of the screen and then choose the option “More products > Billing”.

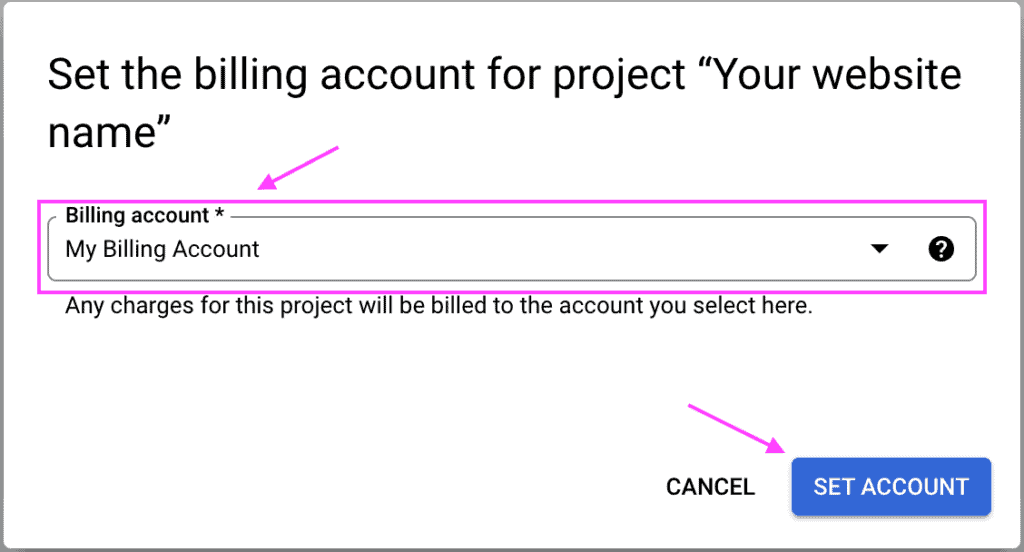
- At the Billing screen, choose the option “Link a billing account”.
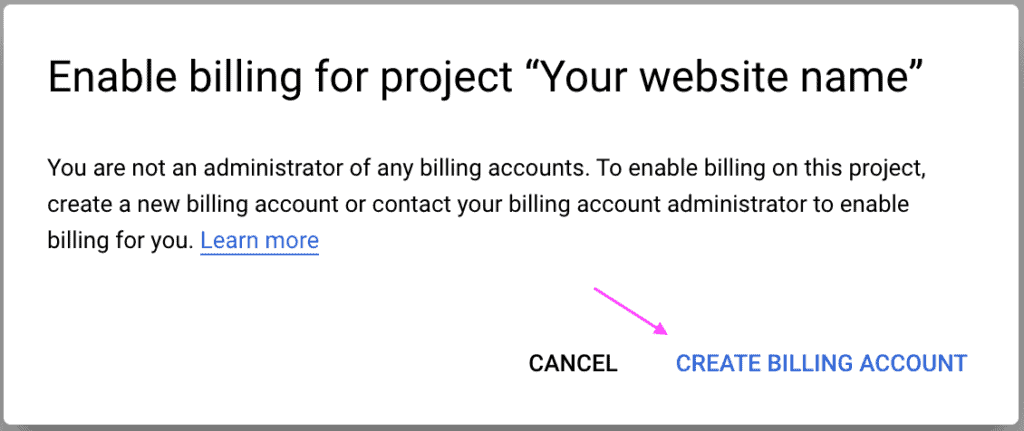
- If you do not have a billing account created yet, choose the option “Create billing account” and follow the steps on the screen to create your billing account. Once you complete creating your billing account, that billing account will be automatically linked to your project.
- If you already have a billing account created, you will be prompted to select a billing account for the project. Select your billing account and choose the option “Set account” at the bottom right of the popup screen.
Create and configure your Google Places API Key #
Create your Google API Key credentials #
- Go to the Google Cloud Console platform at https://console.cloud.google.com/ — and sign in with your Google Account.
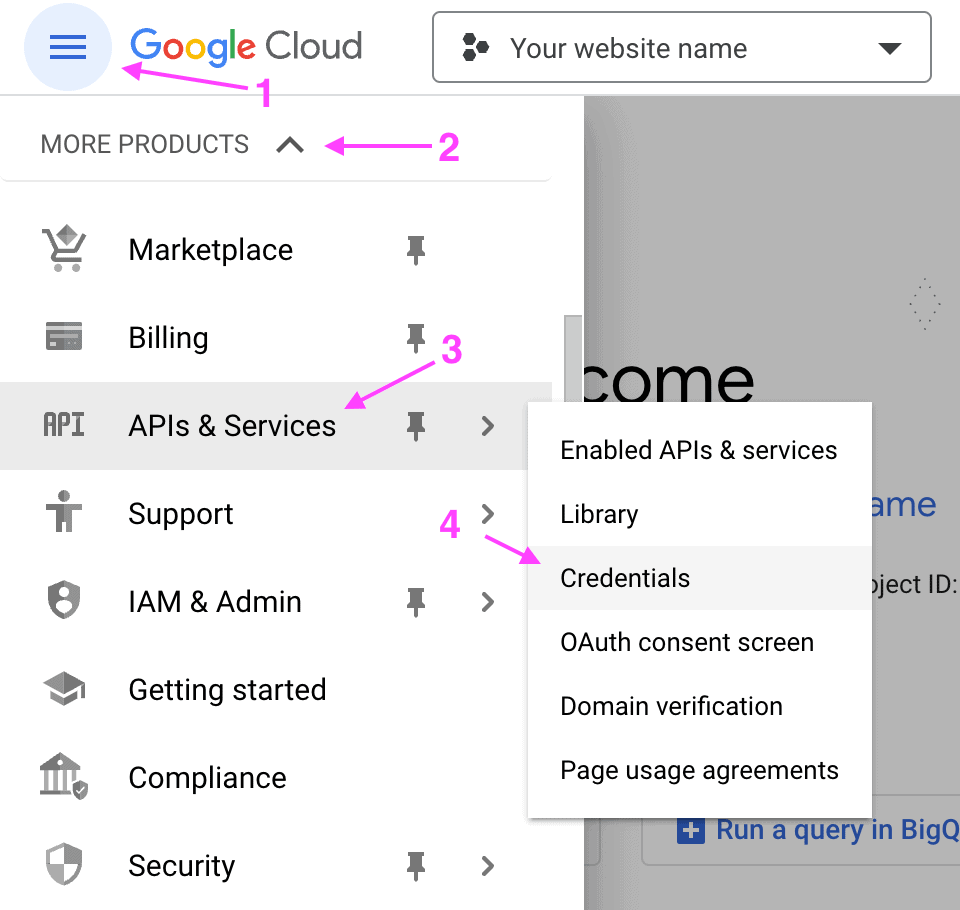
- At the Google Cloud Console platform, choose the option “Menu” at the top of the screen and then choose the option “More products > APIs & Services > Credentials”.
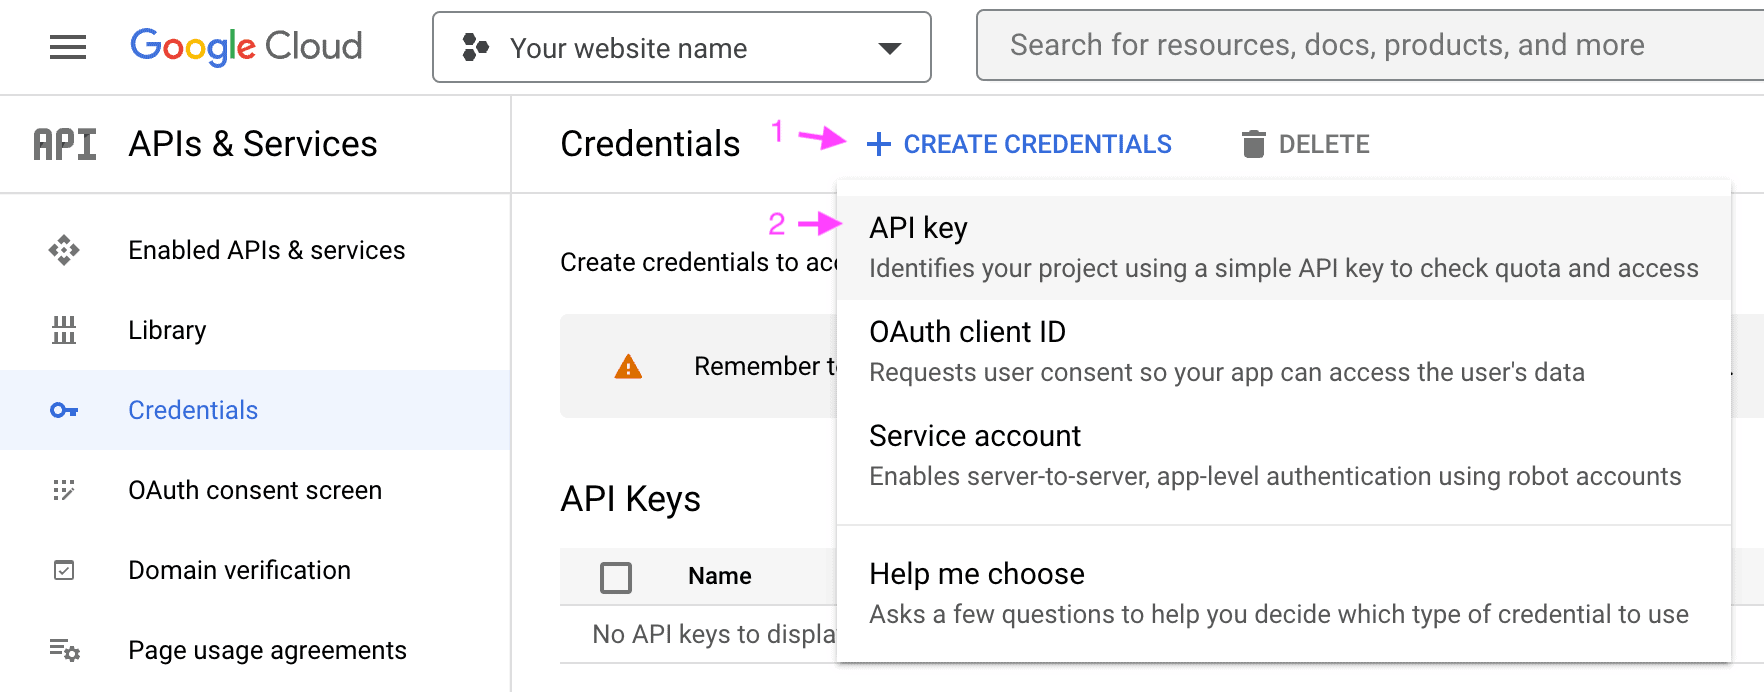
- At the APIs & Services page, choose the option “Create credentials” at the top of the page, then “API key” on the dropdown menu shown.
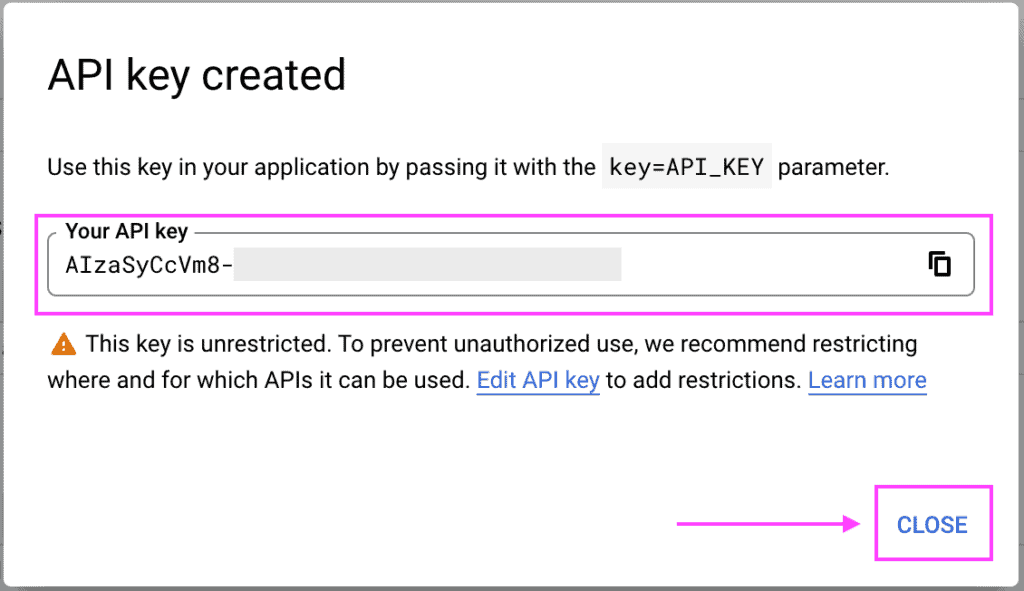
- Wait for the API key to be created, the API key will be shown once the process is completed. Choose the option “Close” at the bottom right of the popup screen.
- Back to the Credentials and API Keys list, choose the option with “three dots” related to your recently created API Key, then choose the option “Edit API key”.
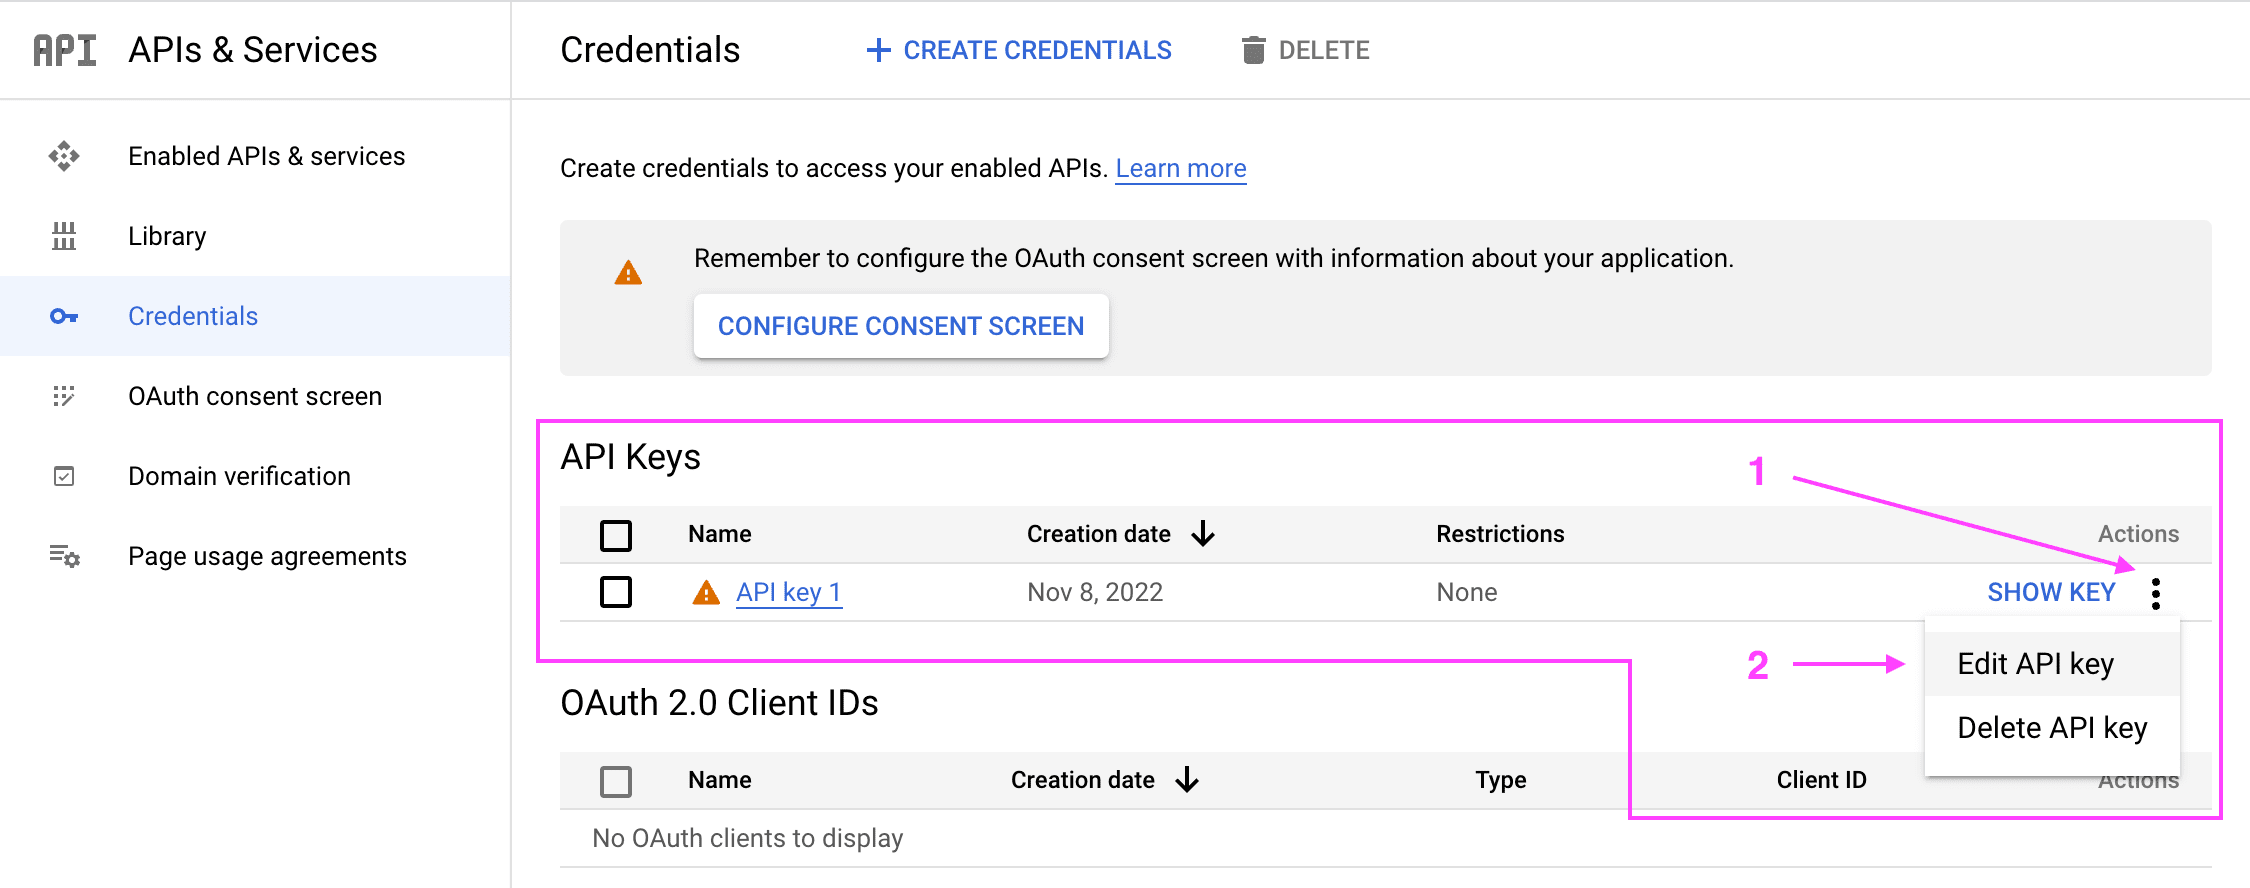
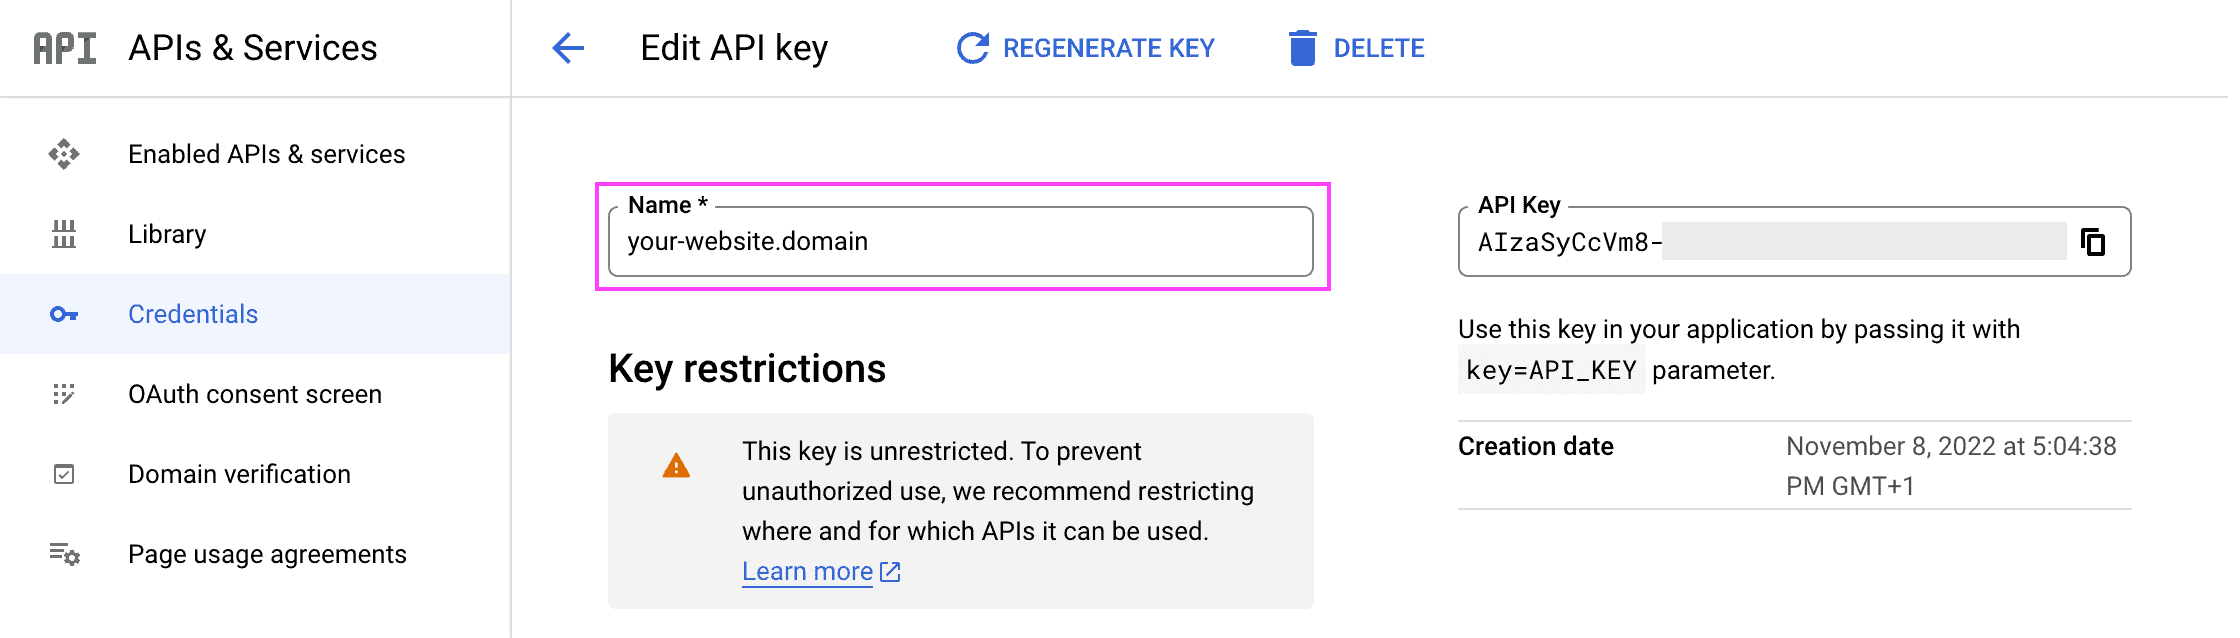
- On the API Key edit screen, give your API key a name that would be easy to recognize in the future. We recommend using your website domain name here (in our case, it would be “fluidcheckout.com”).
- Scroll to the bottom of the API Key edit screen and choose the option “Save” at the bottom of the page.
- You can safely skip the API restrictions options as you will be configuring it later on the step: Configure your Google API Key to restrict access only for your website. Before that, you’ll need to enable the access to the APIs as explained in the next step: Authorize your Google API Key to access specific Google Libraries (APIs).
Authorize your Google API Key to access specific Google Libraries (APIs) #
The Google Address Autocomplete plugin makes use of the following APIs depending on your configuration and needs. You’ll need to enable access for each of the required APIs listed below:
Follow the instructions below to enable access to each API.
Places API (New) (required) #
- Go to the Google Cloud Console platform at https://console.cloud.google.com/ — and sign in with your Google Account.
- At the Google Cloud Console platform, choose the option “Menu” at the top of the screen and then choose the option “More products > APIs & Services > Library”.
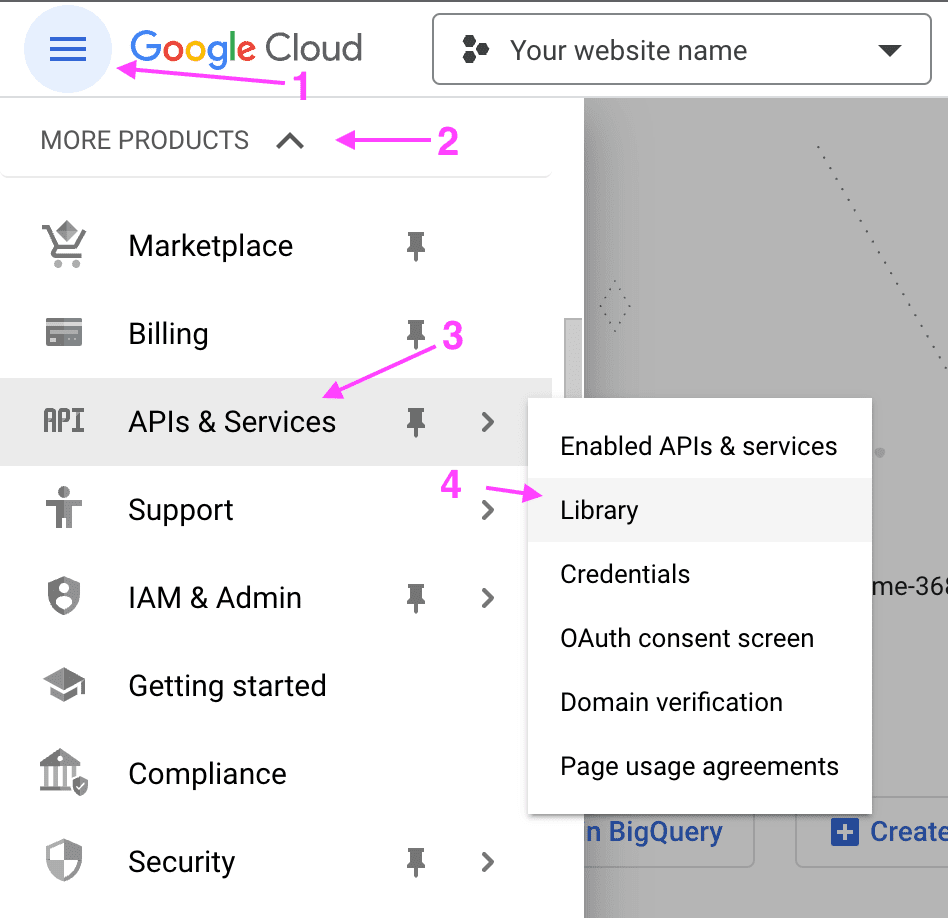
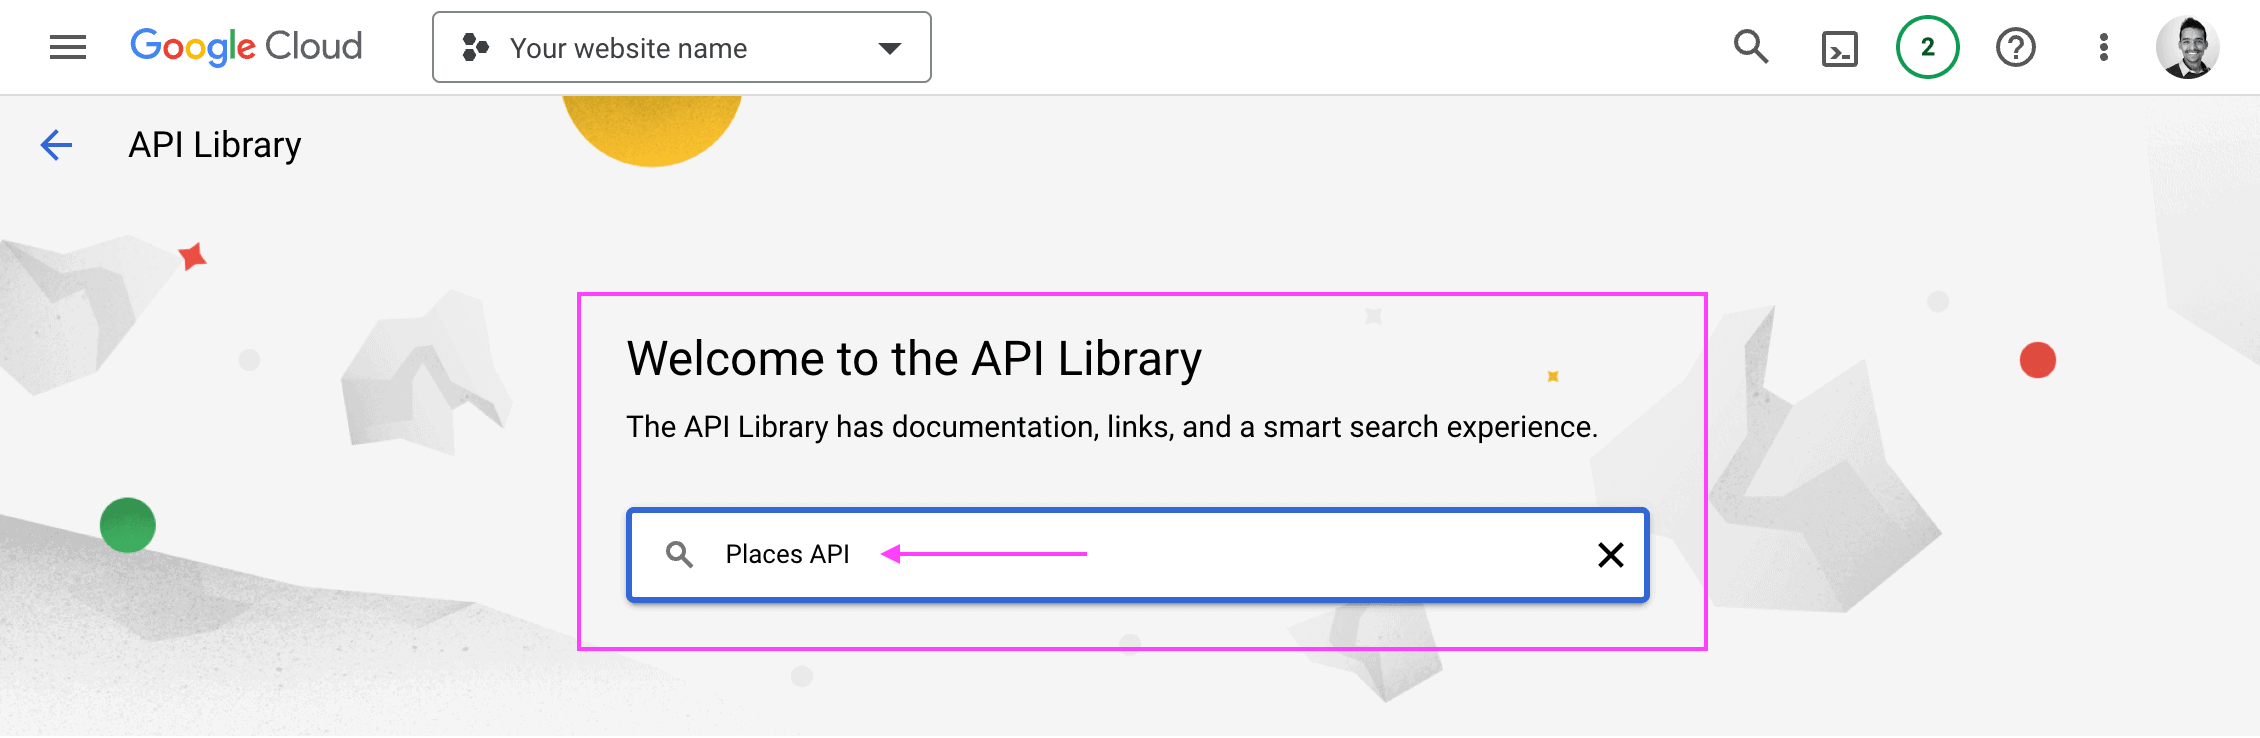
- At the Libraries search screen, enter the term “Places API” and press the “ENTER” key to search for the API.
- Choose the option “Places API (New)” in the search results to open the API details page. If you have used the previous version of the Places API, another similar option named “Places API” might appear, please ensure you choose the option “Places API (New)” instead.
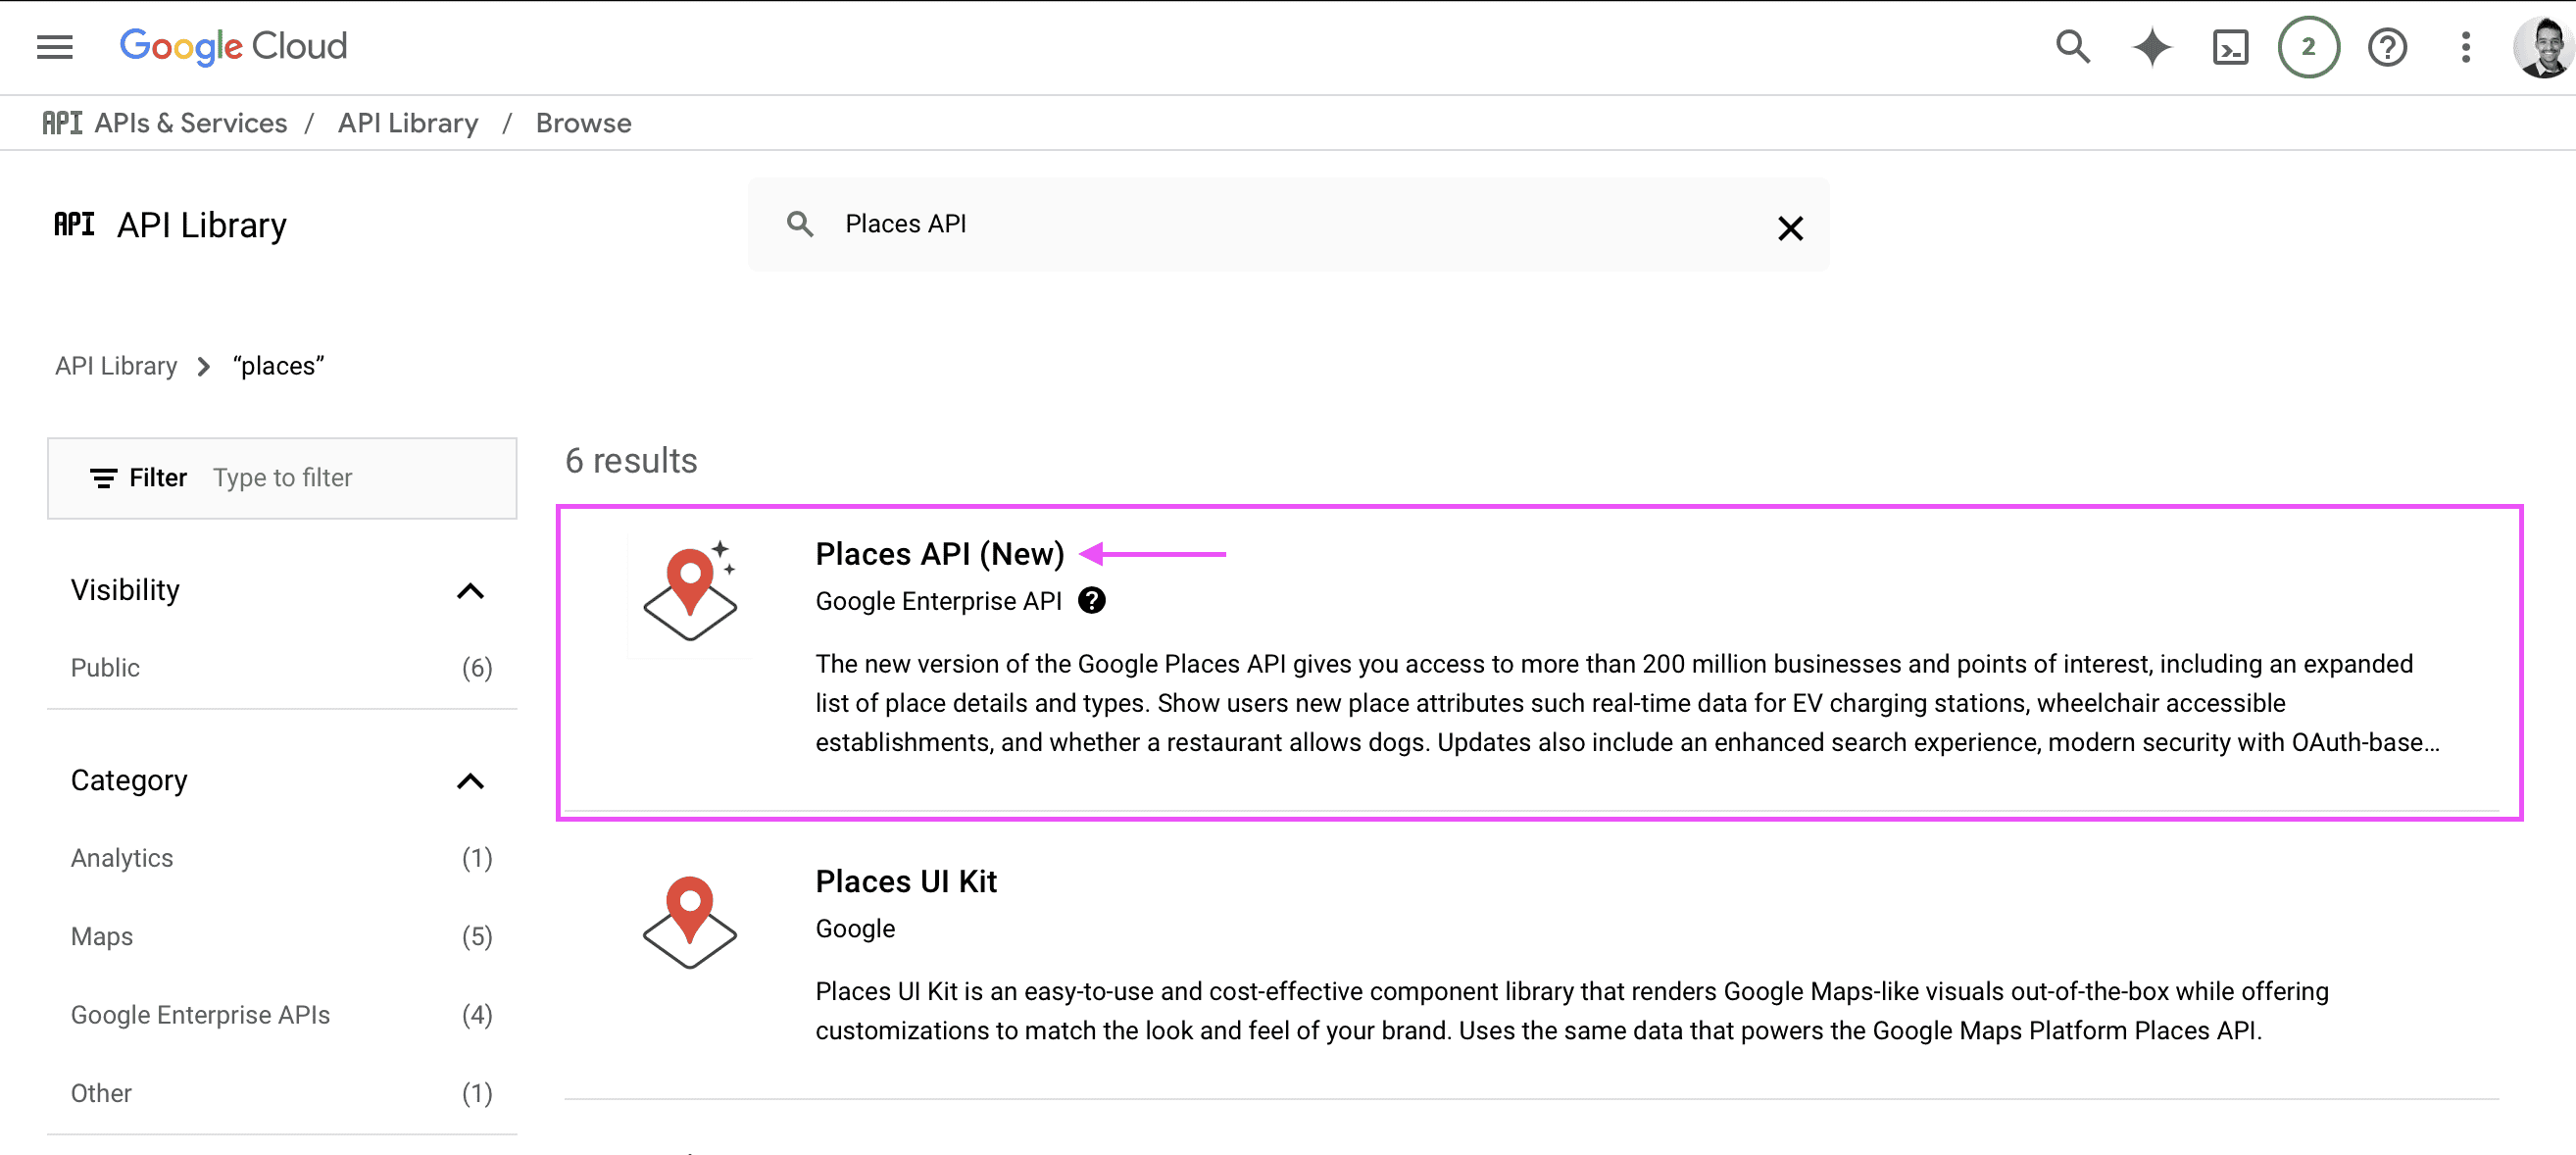
- On the API details page for the “Places API (New)”, choose the option “Enable” to enable its use on your project.
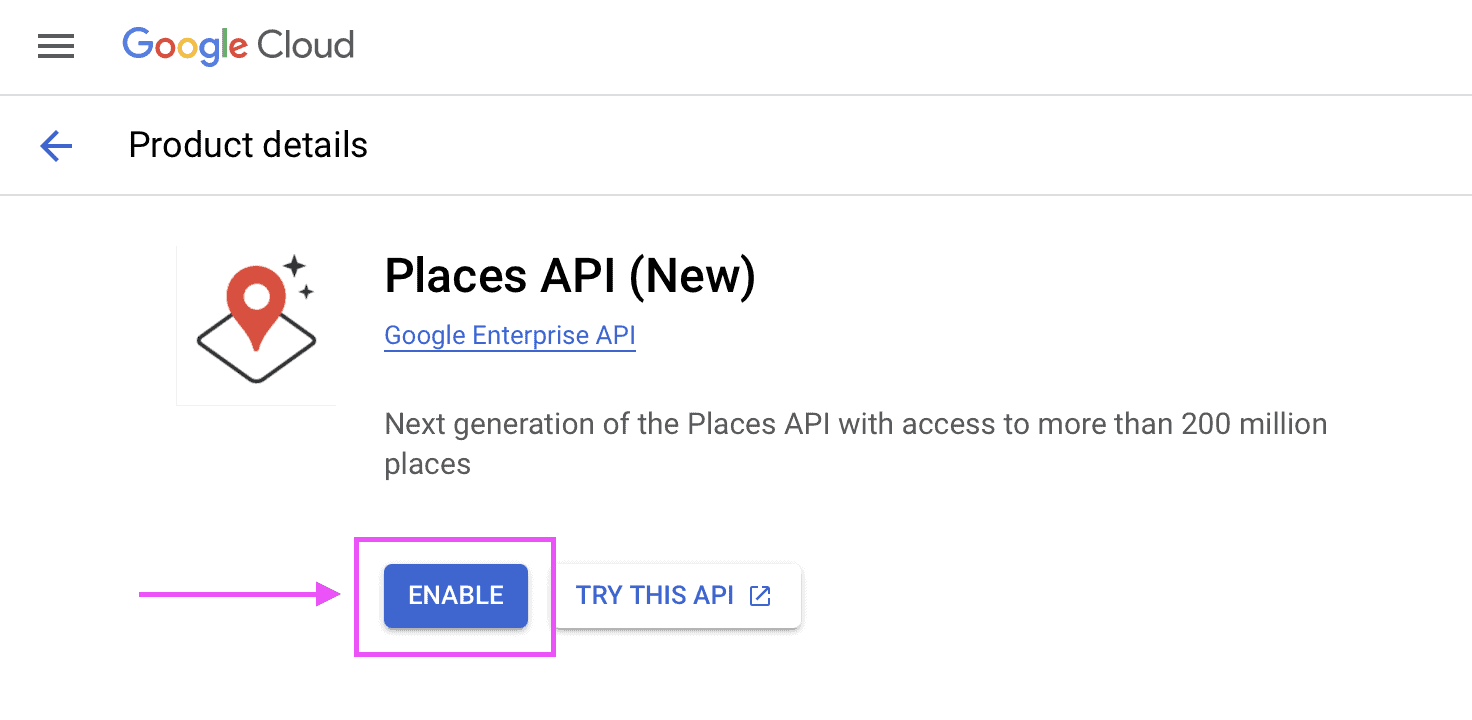
- If the option “Enable” is not available, and instead the option “Manage” is displayed along with the text “API Enabled”, you can safely skip to the next step: Maps JavaScript API.
Maps JavaScript API (required) #
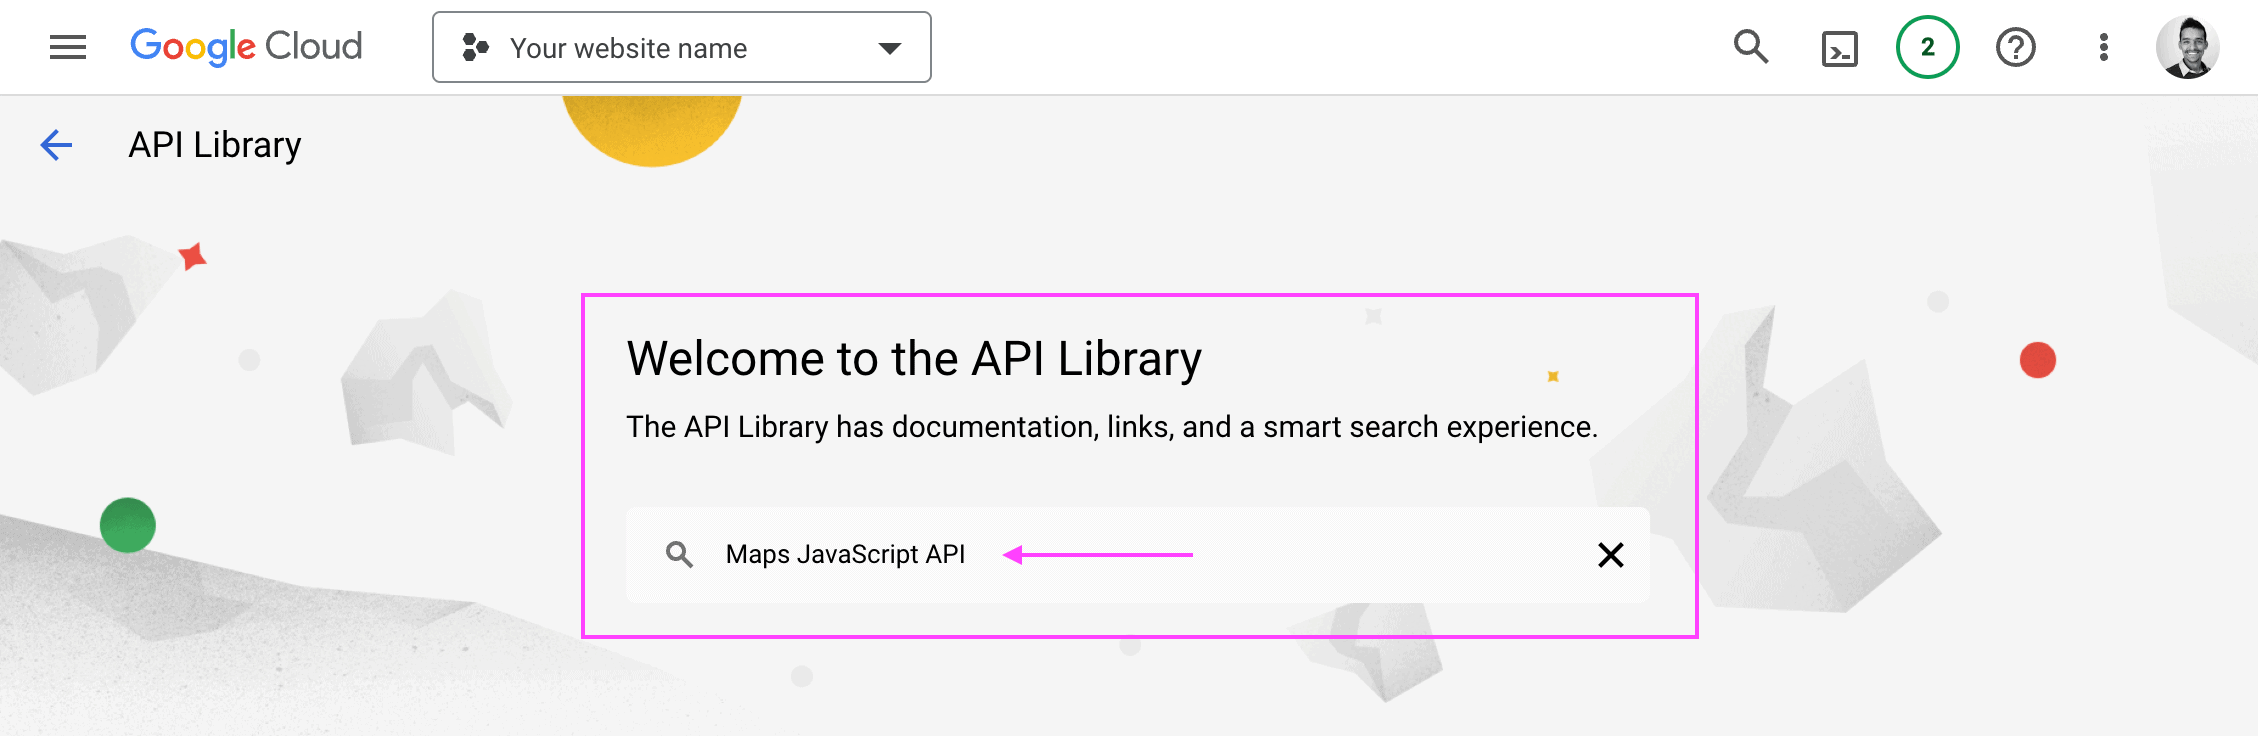
- Go to the Google Cloud Console platform at https://console.cloud.google.com/ — and sign in with your Google Account.
- At the Google Cloud Console platform, choose the option “Menu” at the top of the screen and then choose the option “More products > APIs & Services > Library”.
- At the Libraries search screen, enter the term “Maps JavaScript API” and press the “ENTER” key to search for the API.
- Choose the option “Maps JavaScript API” in the search results to open the API details page.
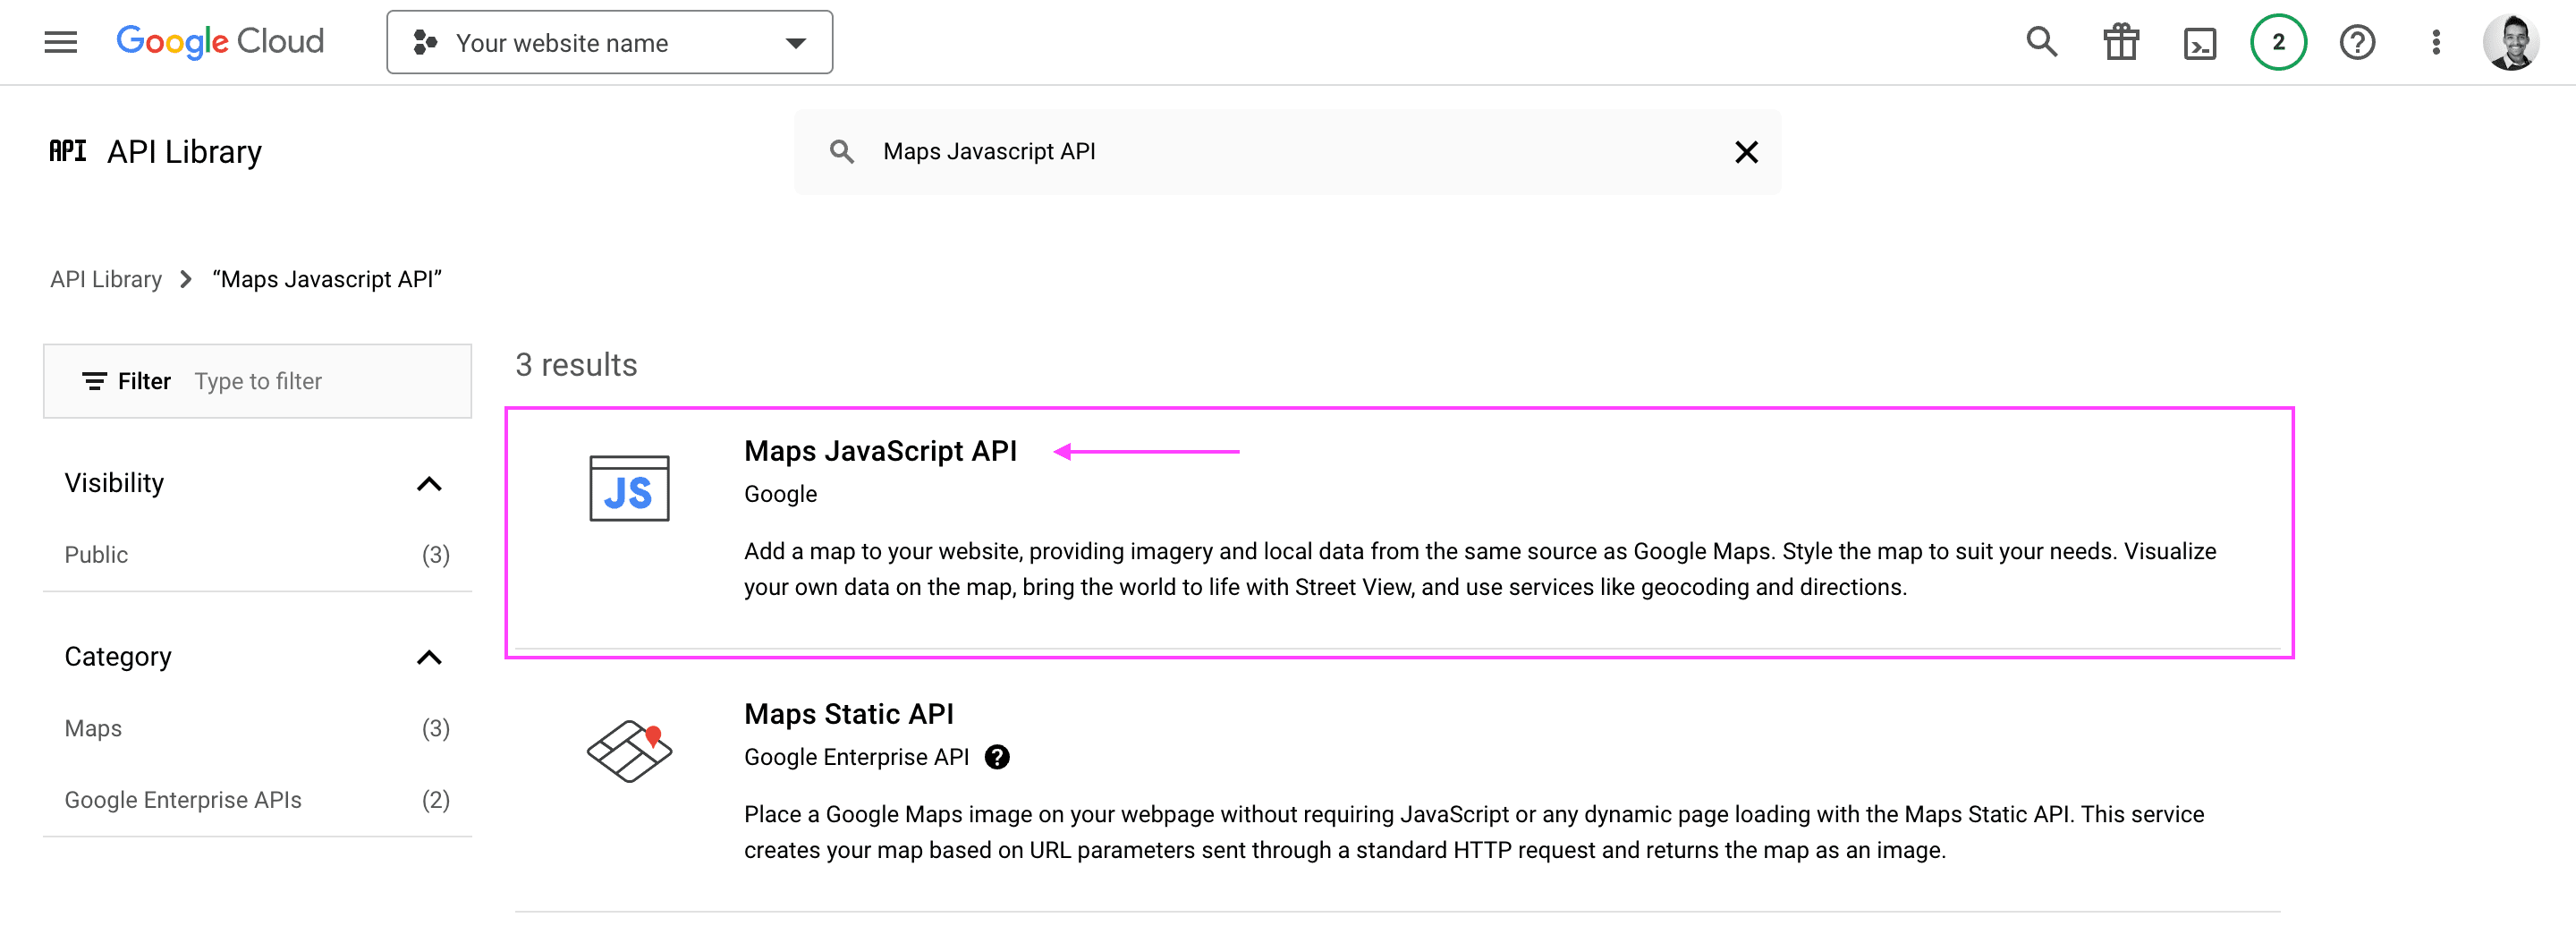
- On the API details page for the “Maps JavaScript API”, choose the option “Enable” to enable its use on your project.

- If the option “Enable” is not available, and instead the option “Manage” is displayed along with the text “API Enabled”, you can safely skip to the next step: Configure your Google API Key to restrict access only for your website.
Configure your Google API Key to restrict access only for your website #
Adding these restrictions below is important to make sure only your websites can use the API key, avoiding extra charges from unauthorized use of your API key.
- Go to the Google Cloud Console platform at https://console.cloud.google.com/ — and sign in with your Google Account.
- At the Google Cloud Console platform, choose the option “Menu” at the top of the screen and then choose the option “More products > APIs & Services > Credentials”.
- At the Credentials and API Keys list, choose the option with “three dots” related to your recently created API Key, then choose the option “Edit API key”.
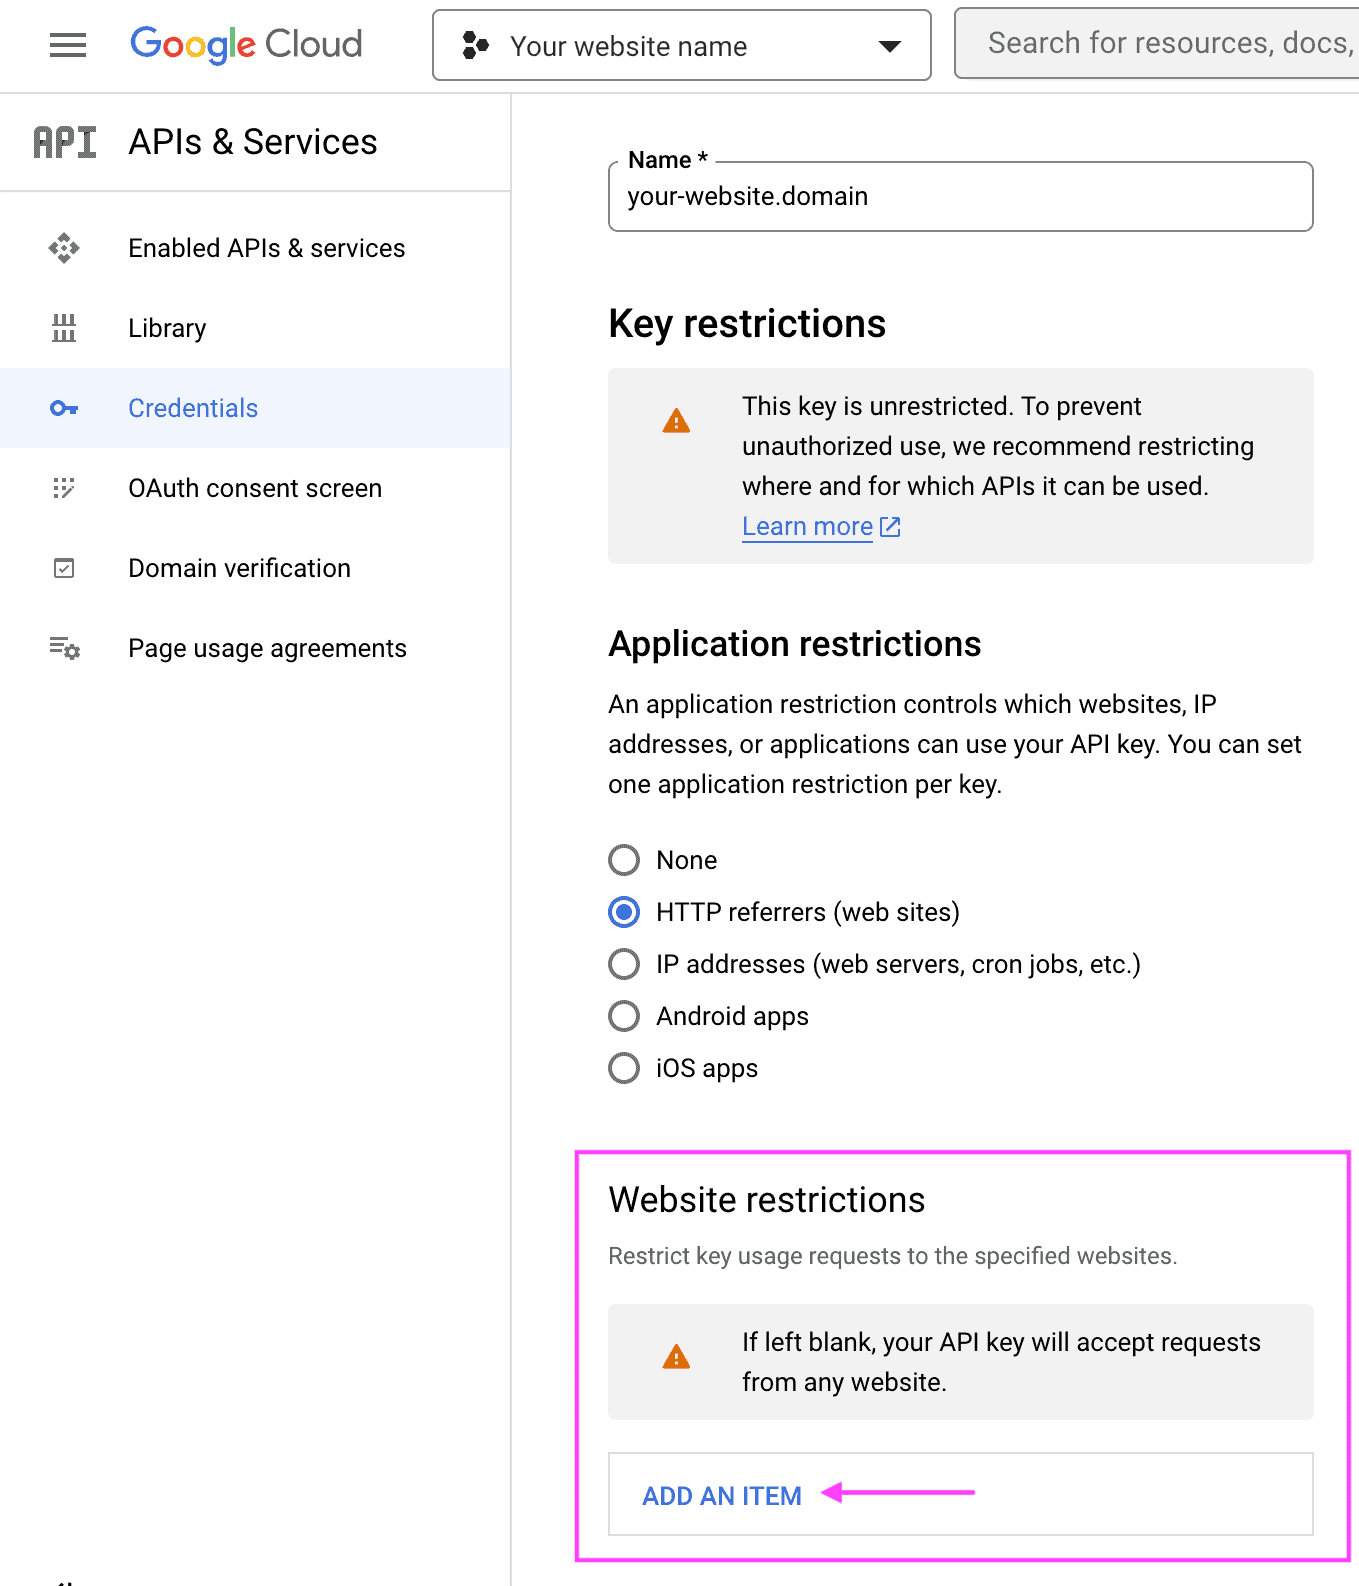
- On the API Key edit screen, select the option “HTTP referrers (web sites)” on the “Application restrictions” section.

- A new section “Website restrictions” will be displayed below the “Applications restrictions” section. Choose the option “Add an item” in the “Website restrictions” section.
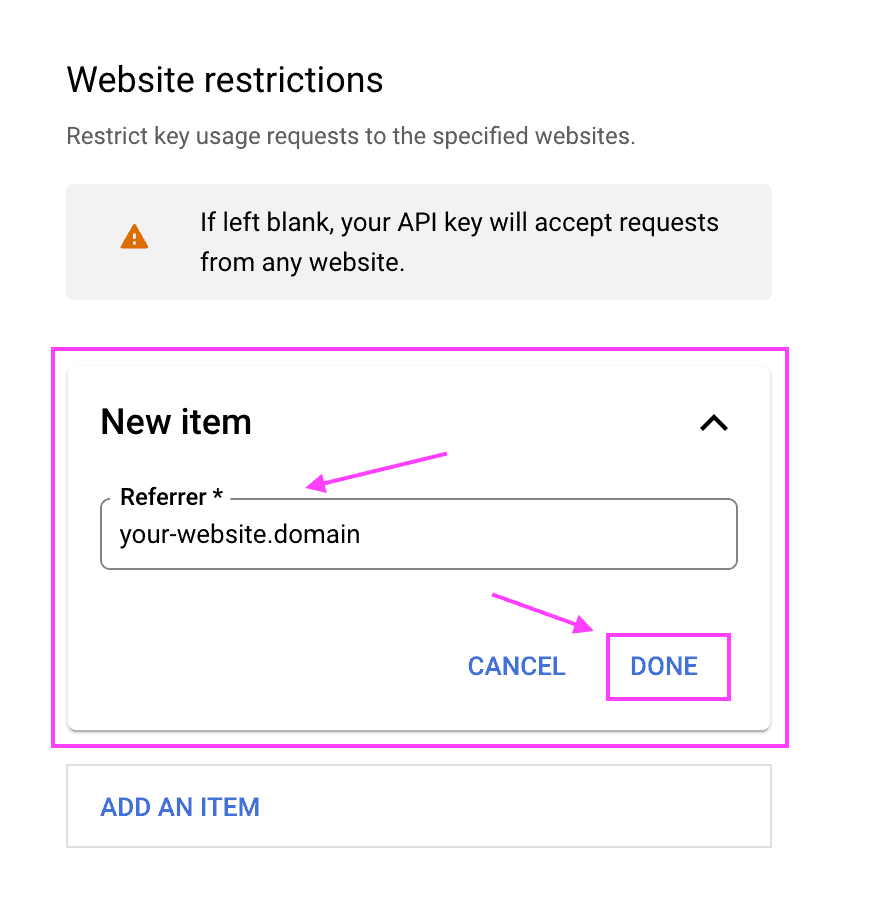
- In the “New item” form section, enter your website referrer string. We recommend using your website domain name here (in our case, it would be “fluidcheckout.com”). Then choose the option “Done” on the right bottom part of the “New item” form section.
- Repeat step 6 for each domain and subdomain you will be using this API Key on. Although, we recommend creating a separate API Key for each different website.
- Back to the API Key edit screen, select the option “Restrict key” on the “API restrictions” section.
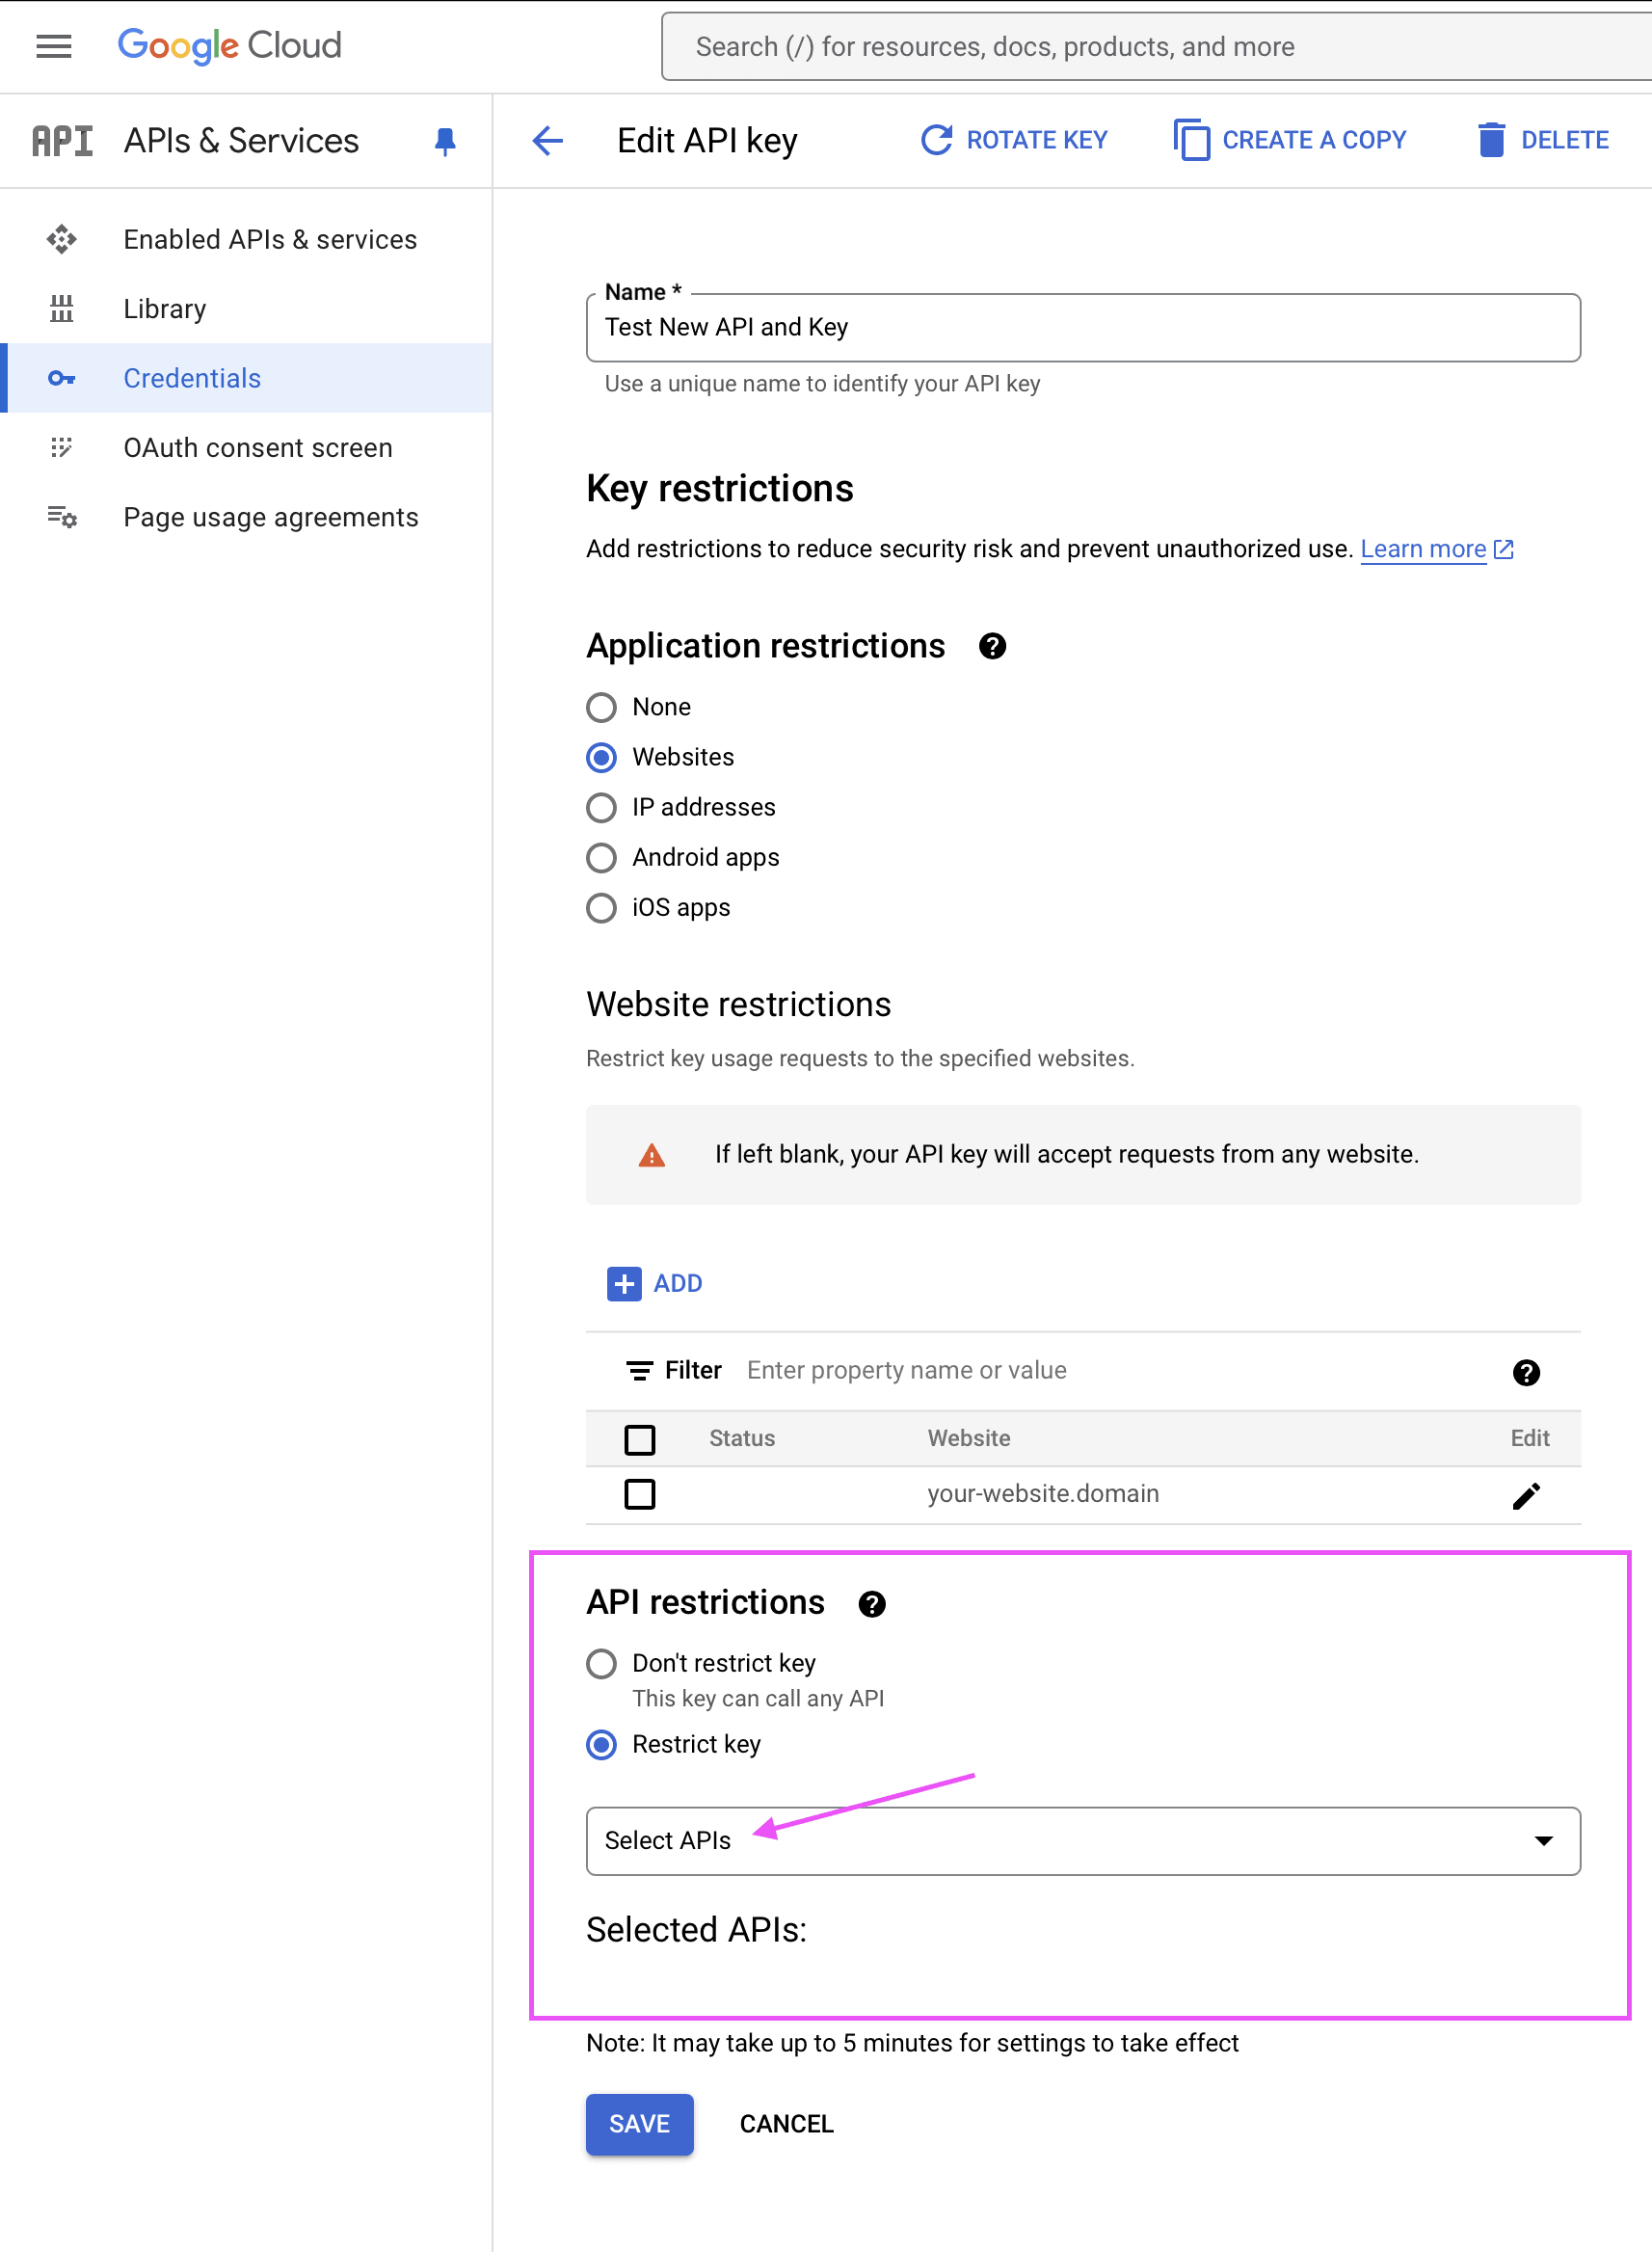
- Choose the option “Select APIs”. This will open the list of the Google APIs enabled for your project.
- Check in the list the APIs “Places API (New)” and “Maps JavaScript API”.
- Choose the option “OK” on the bottom right part of the dropdown list popup section.
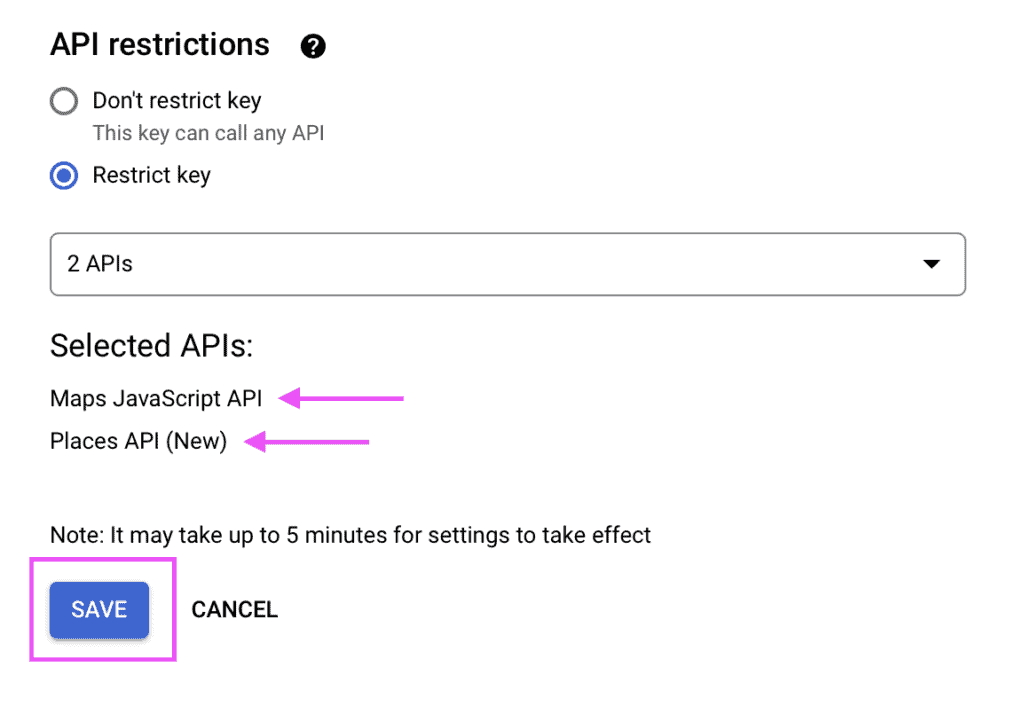
- Finally, double check that you have both “Places API (New)” and “Maps JavaScript API” in the “Selected APIs” list, then choose the option “Save” at the bottom of the page.
At this point, your Google API Key should be authorized to be used on your website to enable the Google Address Autocomplete features, and for use by other plugins to display a map on your website.
Additionally, if you need to use Geolocation or Geocoding features on other plugins on your website, you may want to repeat these steps and also enable and select the “Geolocation API” and “Geocoding API” as explained in this section of the guide.
Please make sure to follow the instructions to also Authorize your Google API Key to access specific Google Libraries (APIs) (previous section).
License key activation #
After installing the Google Address Autocomplete plugin, you need to activate your license key to receive automatic updates and support.
Follow the steps below to activate your license key for the Google Address Autocomplete plugin:
- Go to WP Admin > WooCommerce > Settings > Fluid Checkout > License keys.
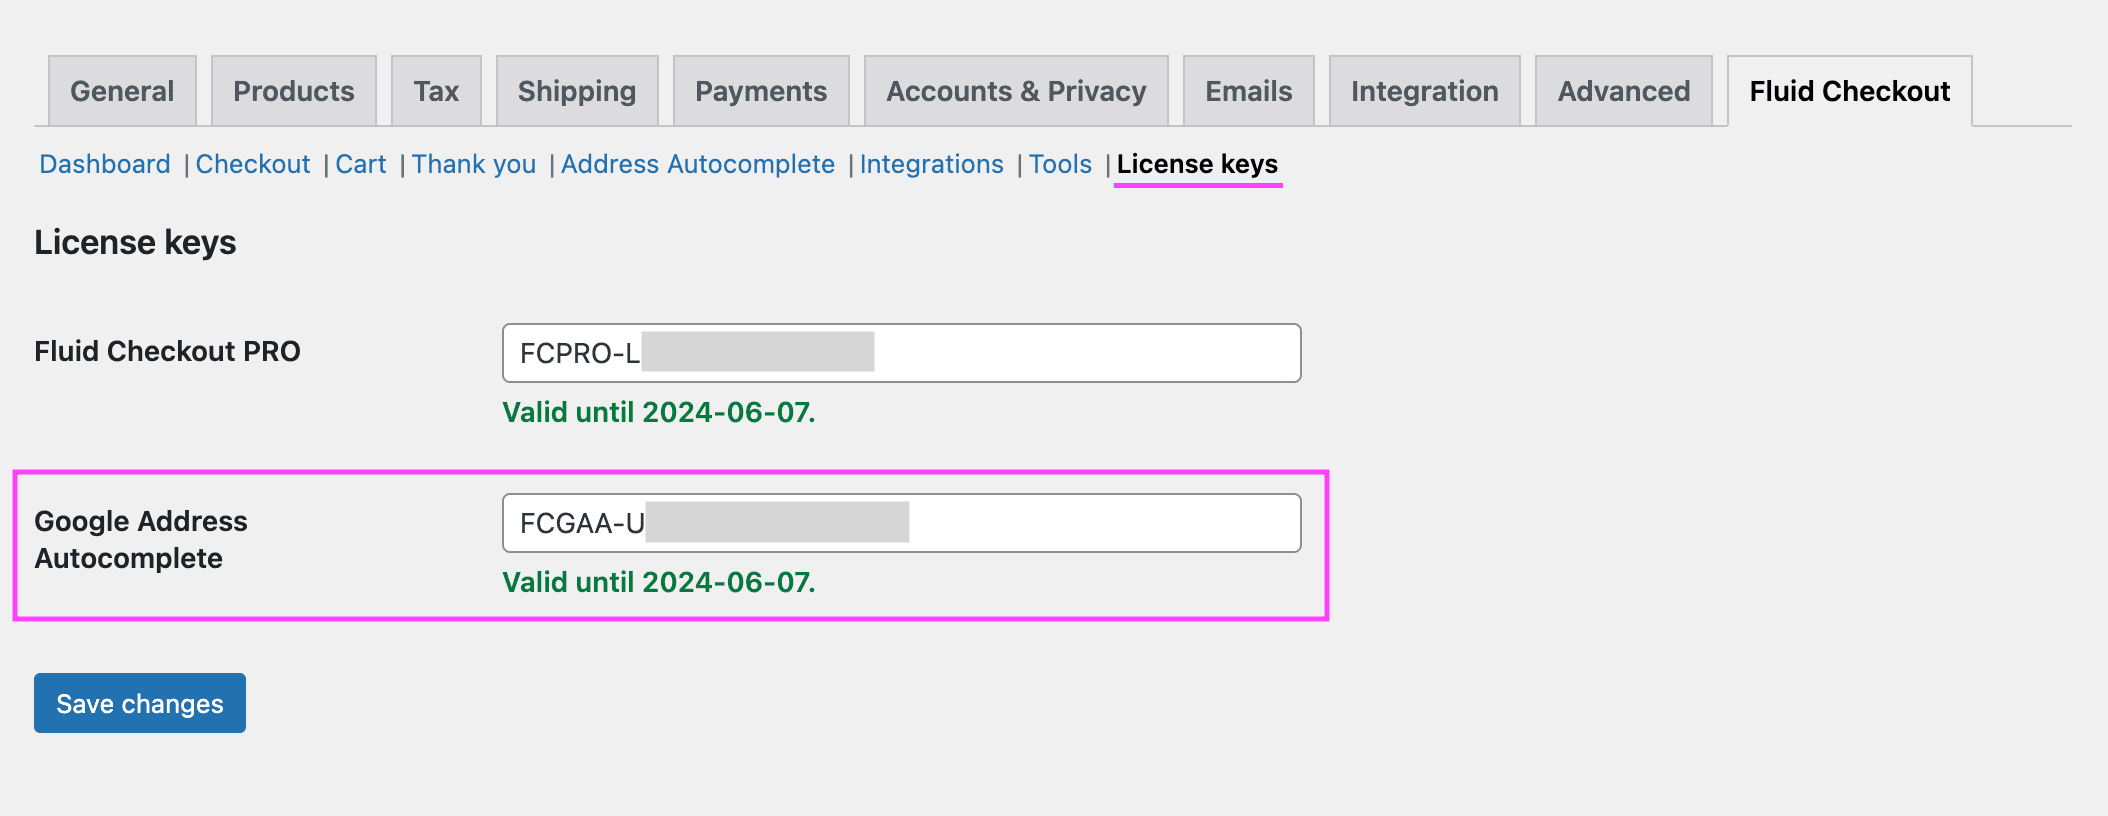
- Locate the license key field related to Google Address Autocomplete and type your license key into the field.
- Click the button “Save changes” at the bottom of the page to save your changes and activate your license key.
If you have any issues activating your license key, please contact our support.
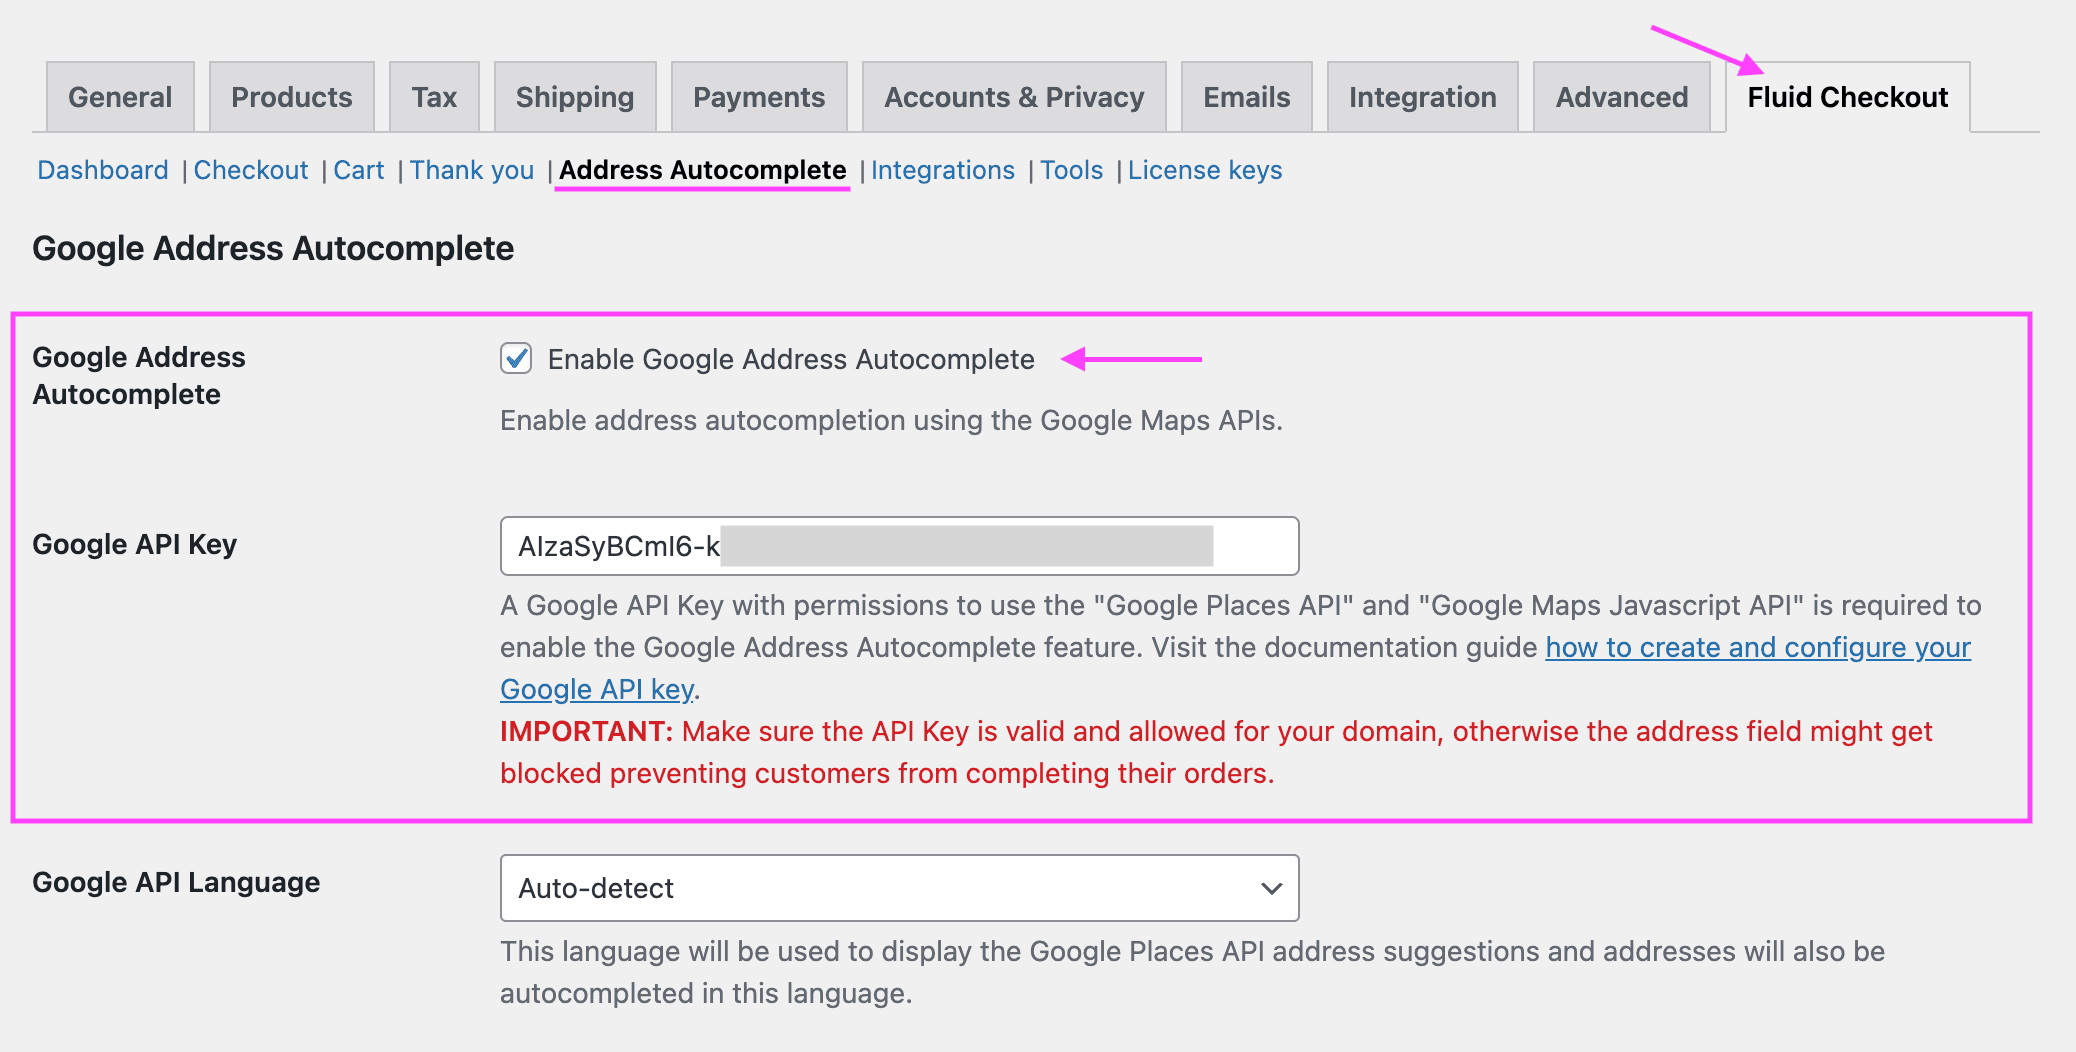
Enable Google Address Autocomplete feature on the plugin settings #
To enable the Address Autocompletion using the Google Maps APIs, enter the following information on the plugin settings page:
- Go to WP Admin > WooCommerce > Settings > Fluid Checkout > Address Autocomplete.
- Check the option “Google Address Autocomplete > Enable Google Address Autocomplete”.
- Enter your Google API Key in the field “Google API Key” (ie. AIzaSyCcVm8-xxxxxxxxxxxxxxxxxxxxxxxxxxx).
- Scroll down to the bottom of the settings page and choose the option “Save changes”.
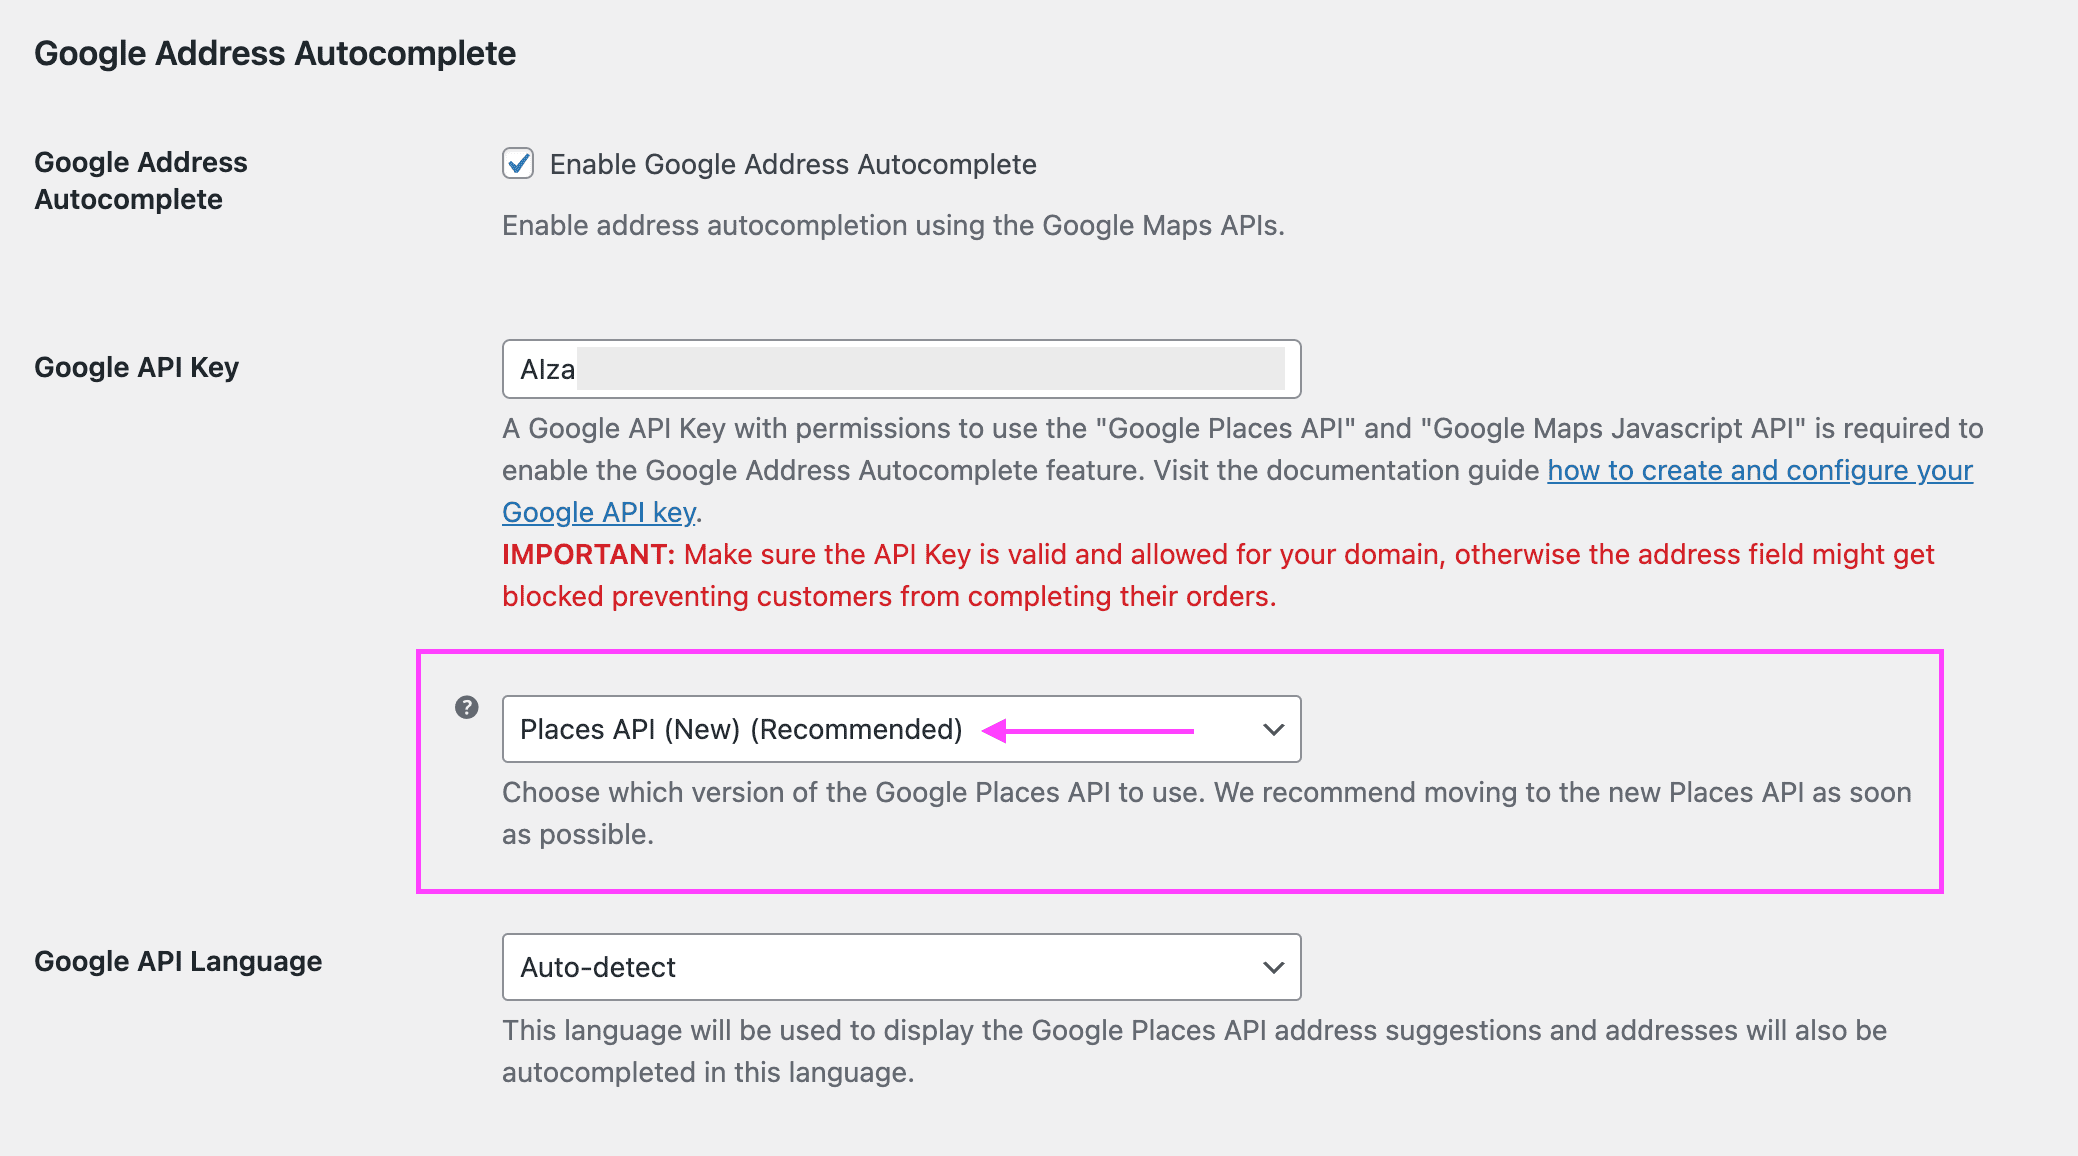
Migrating from Google Places API (Legacy) to Places API (New) #
This section is only relevant if you already use our Google Address Autocomplete add-on on your website with the previous version of the Google Maps and Places API (Legacy) and want to start using the Google Places API (New).
If this is the first time you install our Google Address Autocomplete add-on, you can only use the Places API (New) version, and should skip this section.
Please note that the option to choose the API version will only appear if you have installed the plugin previously to March 1st, 2025. For installations after this date you can only use the Places API (New) version which is automatically selected.
To enable the Google Places API (New) in the plugin settings:
- Authorize your Google API Key to access the Places API (New) on your Google Console account;
- Then, choose the new version of the API in the plugin settings.
Enable Autocomplete from CEP field for Brazilian websites on the plugin settings #
To enable the Address Autocompletion via the CEP field using the Brasil API, enter the following information on the plugin settings page:
- Go to WP Admin > WooCommerce > Settings > Fluid Checkout > Address Autocomplete.
- Locate the section “Brasil API Address Autocomplete”.
- Check the option “Enable Brasil API Address Autocomplete for CEP fields”.
- Scroll down to the bottom of the settings page and choose the option “Save changes”.
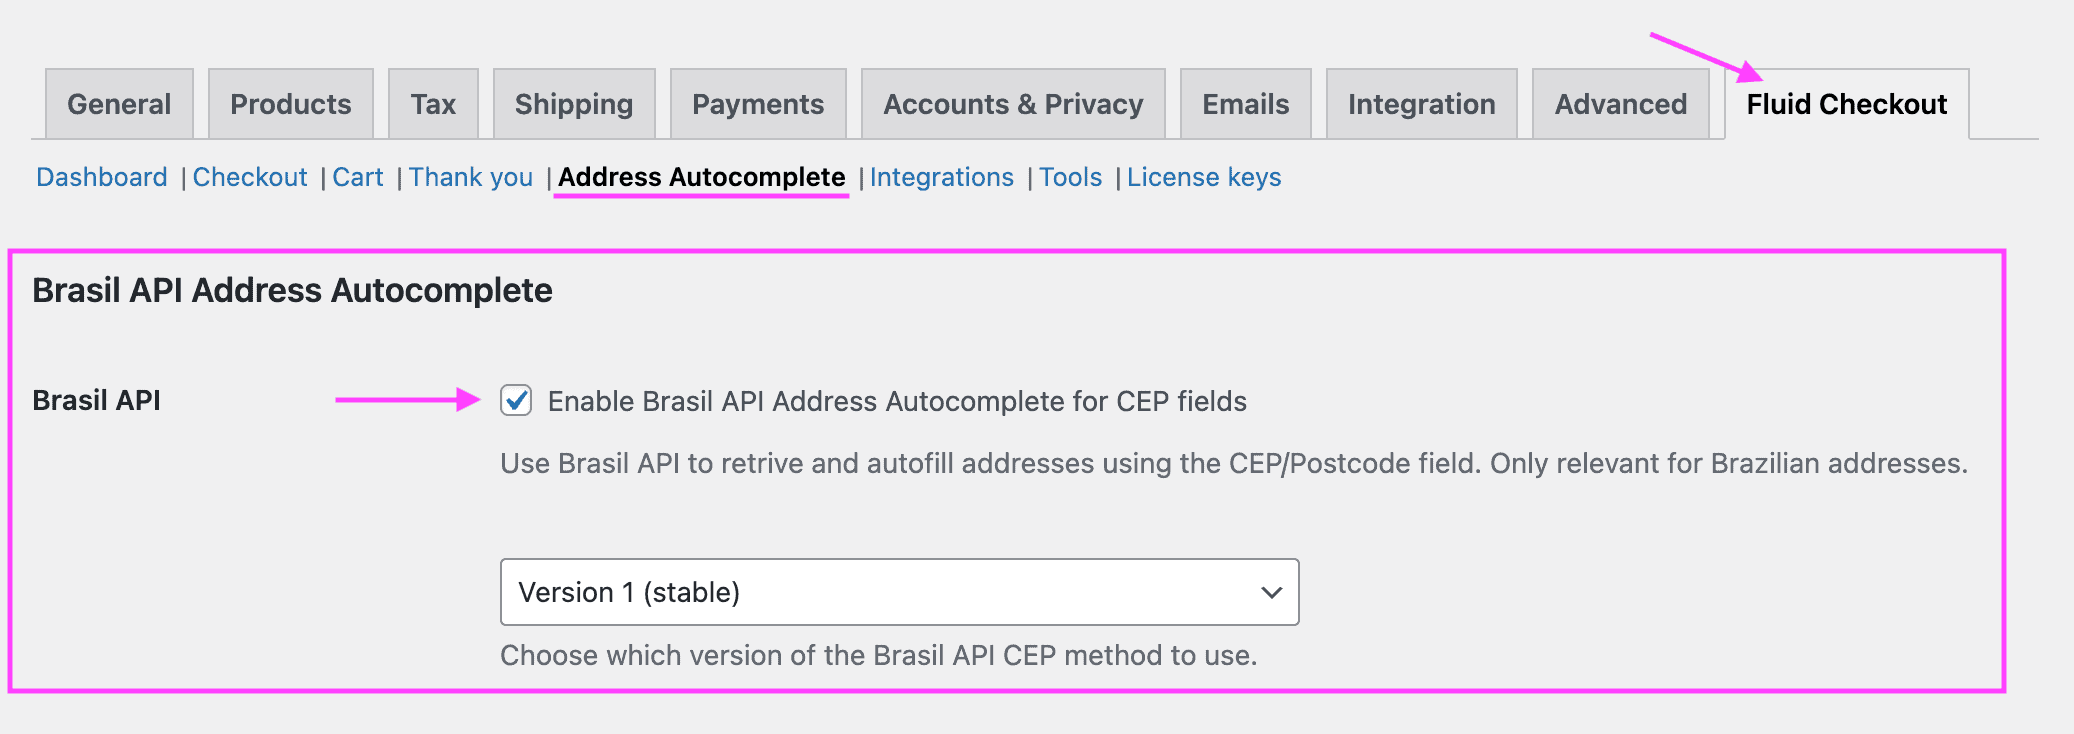
Although a Google API Key is not required for using autocomplete via the CEP field for Brazilian websites, you can use this feature alongside the Google Address Autocomplete feature which will use the Google Maps APIs to autocomplete the address fields if the customer selects an address suggestion while typing in the “Street and house number (address_1)” field. If you wish to use both Brasil API and Google Maps APIs, also follow the instructions on the step: Enable Google Address Autocomplete feature on the plugin settings.
Enable debug mode #
When using the Google Address Autocomplete feature, sometimes not all fields are filled in after selecting an address suggestion. This might happen because Google was unable to return all the data, or when you have custom fields added by another plugin or customizations in code which are not yet mapped with the data returned by the Google Maps APIs.
The plugin has a debub mode feature which will output on the Console tab in the Browser DevTools all the data returned by the Google Maps APIs and which fields were filled with which data. This can come in handy when trying to understand why some fields were not filled in, or when mapping custom fields added by other plugins or customizations in code.
Note: Please note that enabling the debug options will affect the performance of your website and should only be used while troubleshooting.
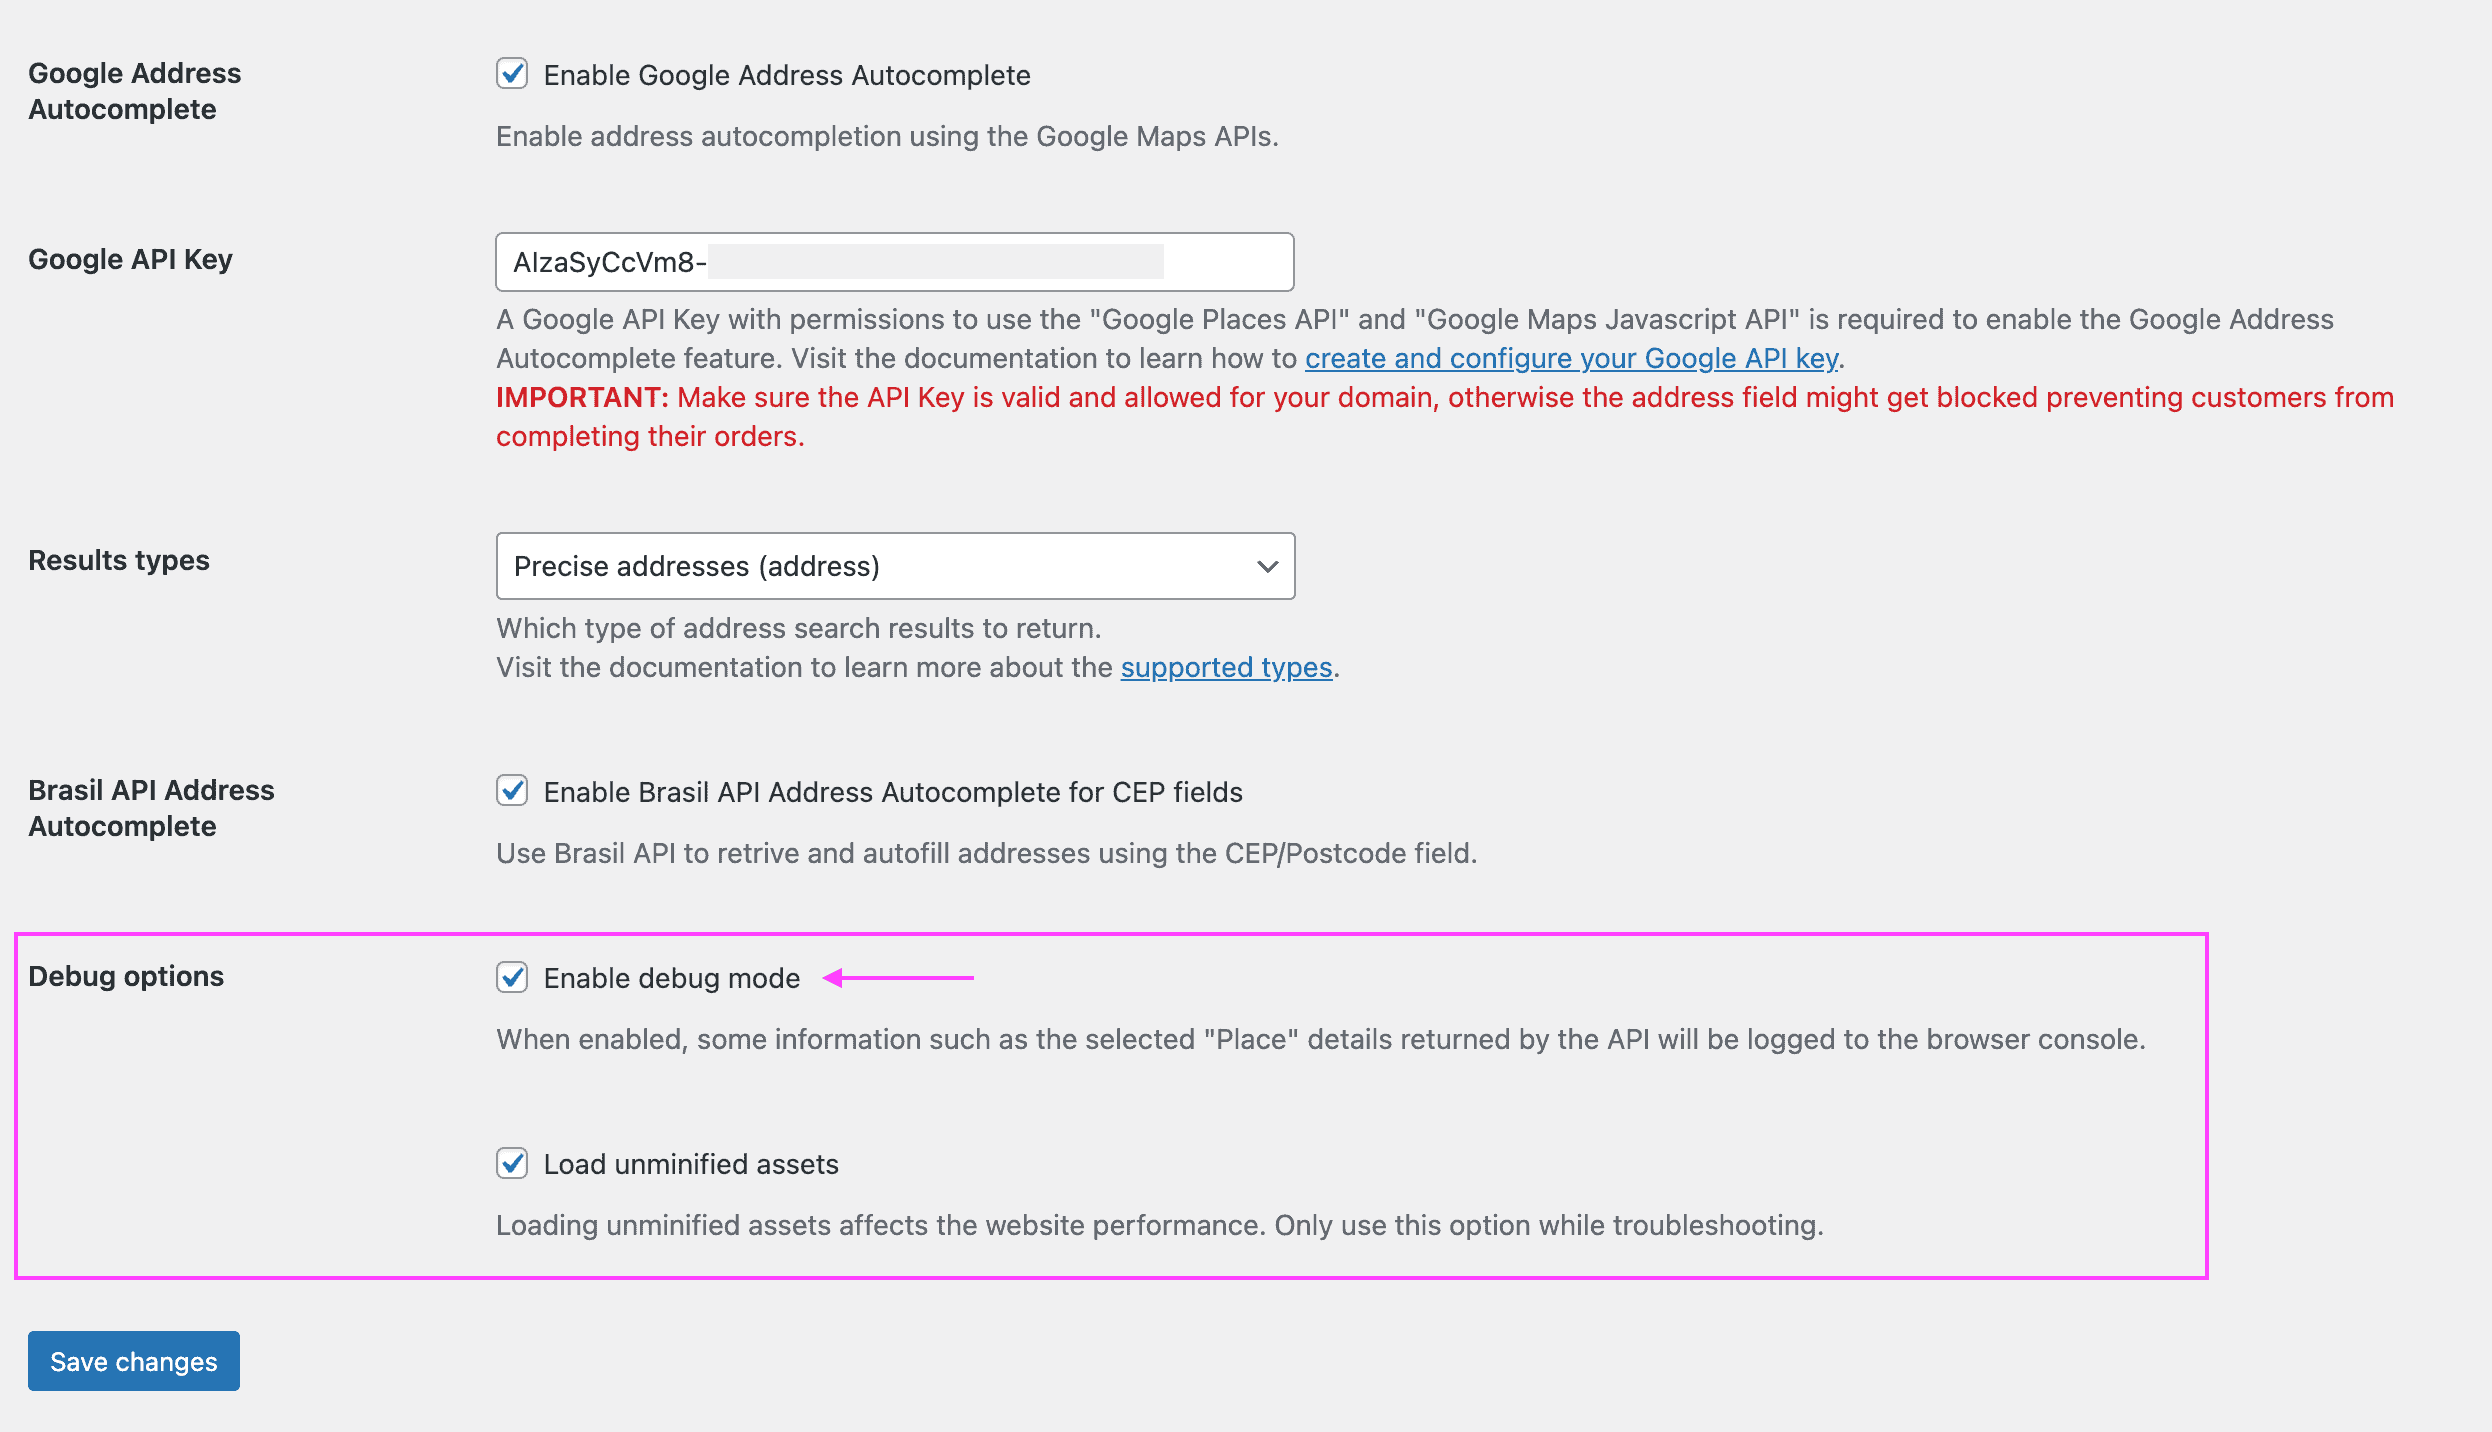
To enable the Debug mode, select the following options on the plugin settings page:
- Go to WP Admin > WooCommerce > Settings > Fluid Checkout > Address Autocomplete.
- Locate the section “Debug options”.
- Check the option “Debug options > Enable debug mode”.
- Check the option “Debug options > Load unminified assets”.
- Scroll down to the bottom of the settings page and choose the option “Save changes”.