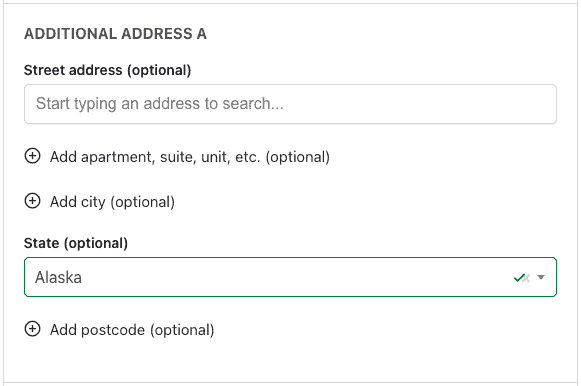
If you need to collect custom addresses on your checkout form, it is possible to use our plugin Google Address Autocomplete for WooCommerce to autocomplete custom address sections added to your checkout page.
To use autocomplete on your custom address section, you’ll need to:
- Create custom address sections on your checkout page
- Change script settings to identify and enable autocomplete on custom sections
Creating the custom address sections on the checkout page #
In order for the Google Address Autocomplete to be able to identify custom address fields, these fields need to be wrapped in one specific section on the checkout form.
In this article, we’ll be using the CSS class additional-address-section to identify our custom address sections. You can use any valid CSS selector, customizing the code snippet below.
It is important that only one field for each address field (address_1, address_2, city, state, country and postcode) to be present in one custom address section.
More information about compatibility with Checkout Field Editor PRO and working with custom fields can be found in our article:
Customizing checkout fields and adding custom checkout fields
Adding custom checkout sections using Checkout Field Editor PRO #
For this article, we’ll be using the plugin Checkout Field Editor PRO by ThemeHigh to add our custom address sections as it allows us to create separate section and add the necessary CSS class to the sections. Although, it is probably possible to accomplish this using another checkout field editor plugin or via custom PHP code.
You’ll also need Fluid Checkout PRO for the custom sections added with the plugin Checkout Field Editor PRO by ThemeHigh to be displayed nicely as subsections within the Fluid Checkout steps.
Even though the plugin Checkout Field Editor PRO by ThemeHigh has an option to add a custom CSS class to the new sections. These sections are not output within a separate element, so keep in mind that you might need to customize the selectors below to make it work on your website in case you are not using Fluid Checkout PRO.
Before starting these steps, make sure you have the plugins Fluid Checkout PRO and Checkout Field Editor PRO by ThemeHigh installed and activated.
- Go to WP Admin > WooCommerce > Checkout Form.
- On the “Checkout Fields” tab, choose the option “+ Add new section”.
- On the new section popup screen, select the sub-tab “Basic Info”.
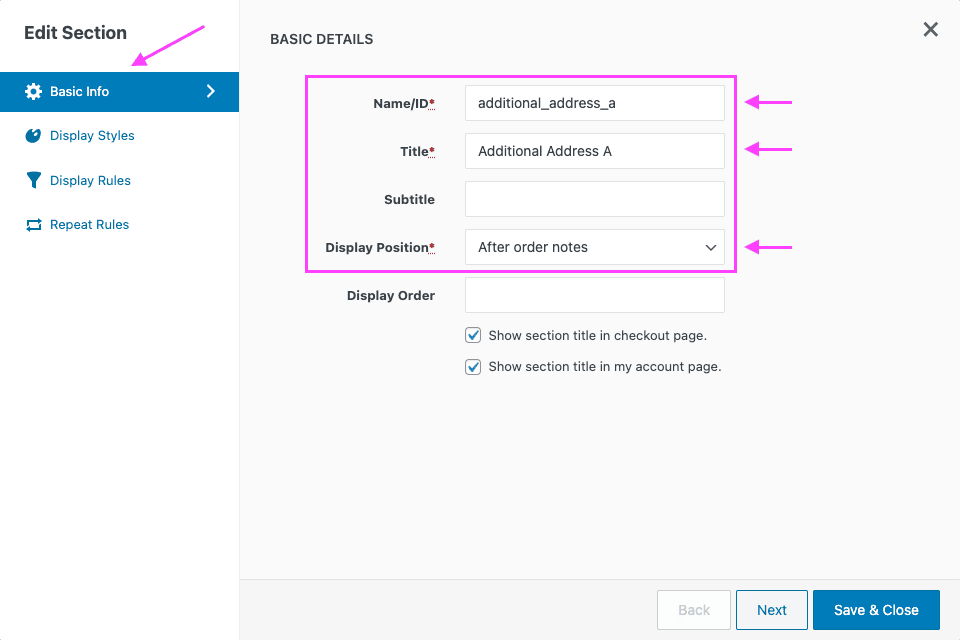
- On the “Basic Info” subtab, type an ID for your new section in the field “Name/ID”.
- Give your new section a title in the field “Title”.
- Select the position on the checkout page where the new section will be added by choosing one option on the field “Display Position”.
- Select the sub-tab “Display Styles”.
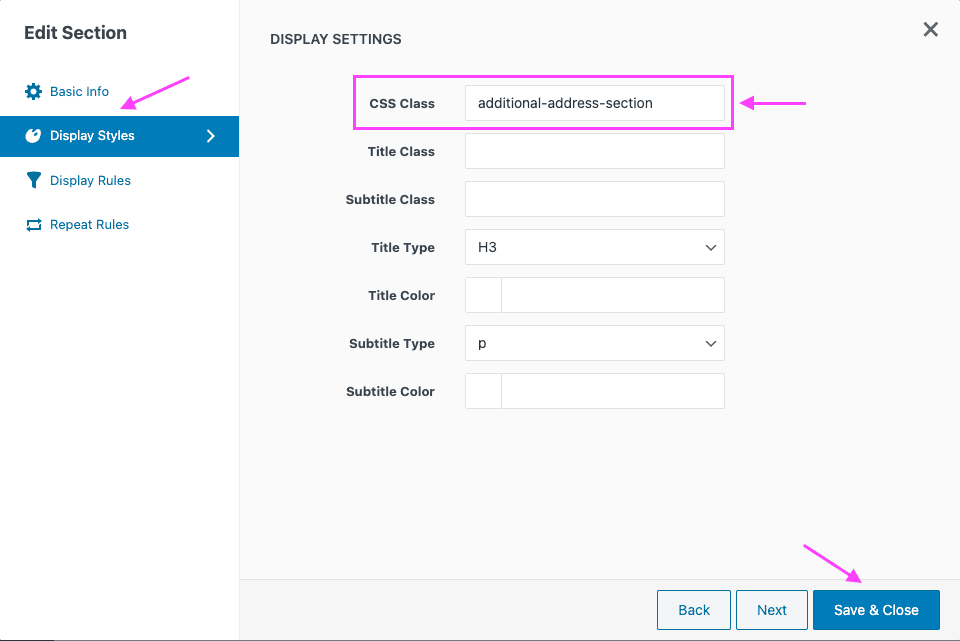
- On the “Display Styles” subtab, type
additional-address-sectionin the field “CSS Class”. - Choose the option “Save & Close” on the bottom right of the popup screen.
It is time to add the custom address fields to the new section.
- Go to WP Admin > WooCommerce > Checkout Form.
- On the “Checkout Fields” tab, choose your new section by clicking on it’s name.
- On your custom section fields list, choose the option “+ Add field”.
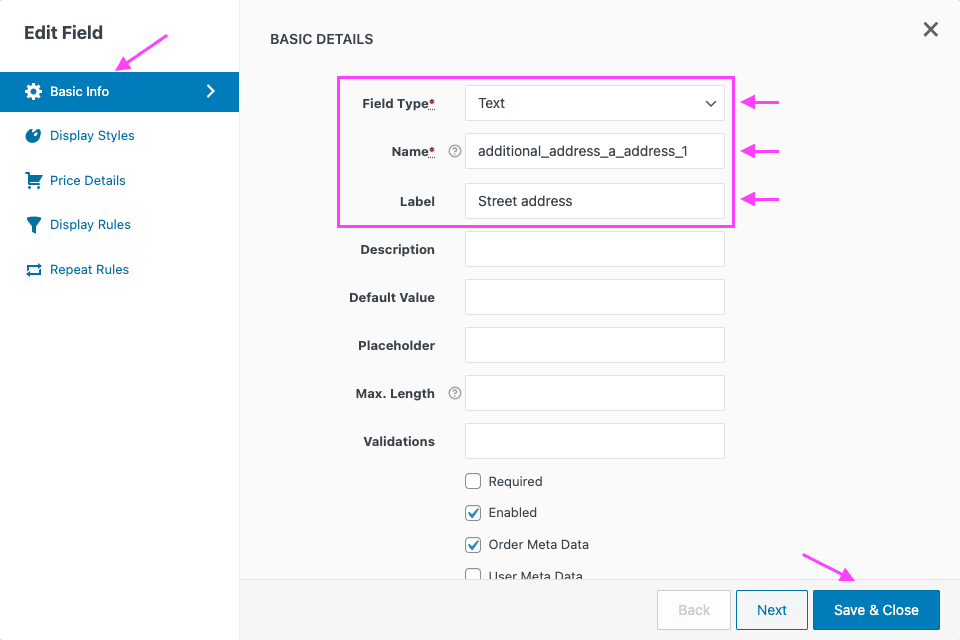
- On the “New Field” popup screen, select the sub-tab “Basic Info”.
- On the “Basic Info” sub-tab, select “Text” as the type of data the for the new field in the field “Field type”.
- Type an ID similar to
additional_address_a_address_1for your new section in the field “Name”. It is important that the field ID ends withaddress_1so that the Google Address Autocomplete script knows which field to add the address search to. Please note that this is the ID of the field, the name of the field displayed on the checkoutn page will be defined in the next step. - Type the field label to be displayed on the checkout page in the field “Label”.
- Optionally, set the other attributes to the field.
- Choose the option “Save & Close” on the bottom right of the popup screen.
- Repeat the steps 3 to 9 for each of the other address field (
address_2,city,state,countryandpostcode).
It is also important that the country field is added to the custom address section, otherwise the Google Address Autocomplete will not be able to autocomplete the fields. If you only allow one country, add the country field as a hidden field and set the country code as the default value for the field:
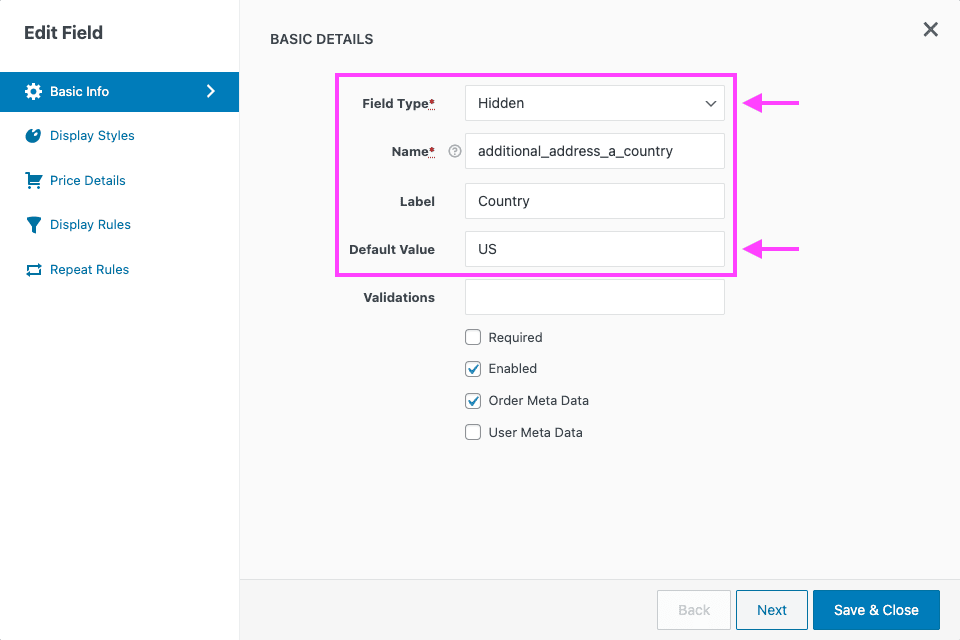
For the state field, you’ll need to manually enter the options while creating the field. These options will not be filtered based on the selected country. You’ll need custom code to filter the available states based on the selected country.
Once the custom address section and fields are added to the checkout page, it’s time to tell the Google Address Autocomplete script to enable the address search and autocomplete for them.
Changing the script settings to identify and enable autocomplete on custom sections #
In order for the Google Address Autocomplete script to identify the custom address sections and enable the address search on the “Street address” field, you need to pass in the new selectors with the code snippet below:
/**
 * Use autocomplete on custom address sections.
 *
 * @param   array  $settings  JS settings object of the plugin.
 */
function fcgaa_enable_autocomplete_custom_address_sections( $settings ) {
    // Add to search input selector fields which attribute name ends with `address_1`
    $settings[ 'autocompleteInputSelector' ] = '#address_1, #shipping_address_1, #billing_address_1, #company, #shipping_company, #billing_company, .additional-address-section input[name$="address_1"]';
    // Add custom sections selector to the address group selector
    $settings[ 'addressGroupSelector' ] = '.woocommerce-shipping-fields, .woocommerce-billing-fields, .woocommerce-address-fields, .additional-address-section';

    return $settings;
}
add_filter( 'fc_gaa_google_autocomplete_js_settings', 'fcgaa_enable_autocomplete_custom_address_sections', 10 );
If you are unsure about how to add the code snippet to your website, check our article:
How to safely add code snippets to your WooCommerce website
