Upcoming features: some of these features will be available with version Lite 4.2.0+ and PRO 3.2.0+, which will be released early March 2026. If you already have Fluid Checkout PRO and want early access to this feature, please contact our support team.
For many online stores, streamlining the shopping experience can directly influence conversion rates and customer satisfaction. Combining the cart and checkout pages in WooCommerce is one effective way to achieve this.
When you bring both pages together, your customers can review what’s in their cart and complete their purchase all in one place. No extra clicks, no waiting for pages to load, just a faster, easier way to buy. This streamlined flow can help reduce cart abandonment, especially for mobile shoppers who prefer quick, simple checkouts.
The more intuitive the process feels, the more likely customers are to follow through and hit that “Place Order” button.
With Fluid Checkout PRO, you can merge the cart and checkout pages for your WooCommerce store. On this guide you will see how to accomplish this:
- Enable editing cart items at checkout
- Show expansible order summary at the top for mobile devices
- (Optional) Switch to 1 column checkout layout for large tablets, laptops and desktops
- Disable cart page on WooCommerce settings to skip it altogether
Enable editing cart items at checkout #
The first and most important step is to enable editing the cart items at checkout, which will add the quantity fields and a button to remove items from the cart on the checkout page.
Currently, only the quantity of items can be changed at checkout with Fluid Checkout, so if you need to allow customers to change product variation or other attributes at the cart, this might not be the right solution for you.
How to enable editing cart items at checkout for WooCommerce #
- Go to WP Admin > WooCommerce > Settings > Fluid Checkout.
- Navigate to the sub-tab “Checkout”.
- Locate the section “Checkout elements > Cart items”.
- Check the option “Enable options to edit cart items on the checkout page”.
Please note that you will need Fluid Checkout PRO to unlock this option.
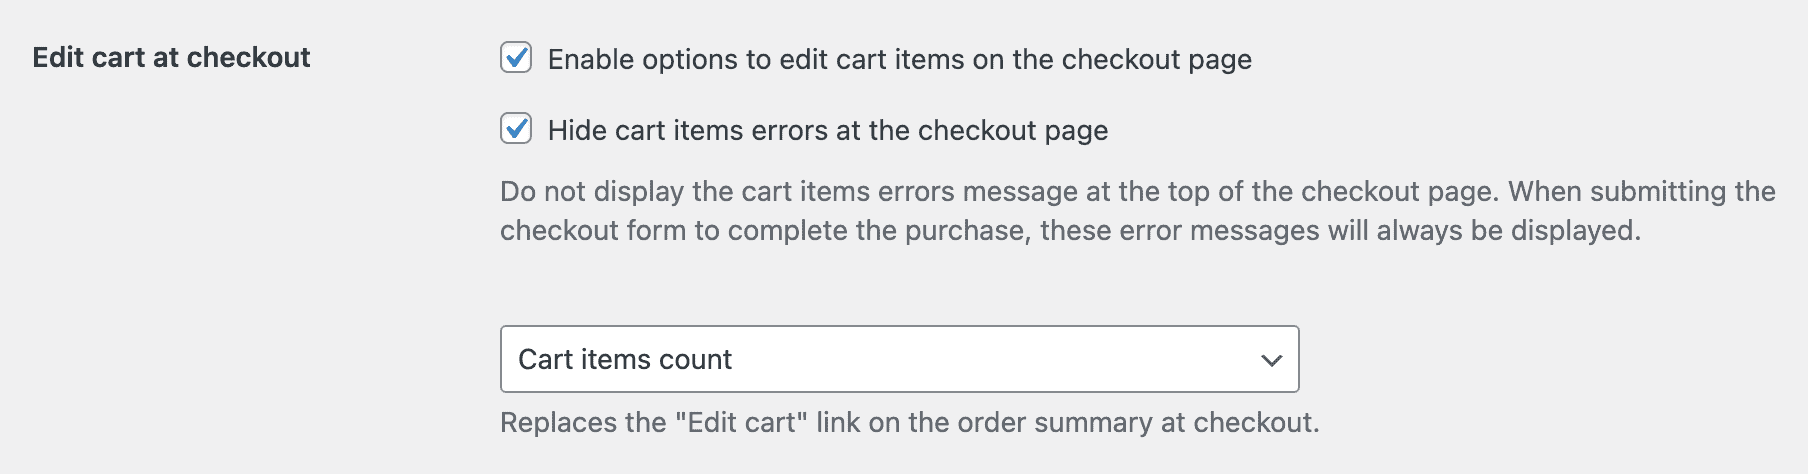
- Optionally, also check the option “Hide cart items errors at the checkout page”.
- Save your changes.
You can read more about this feature and its additional options on our documentation: WooCommerce edit cart on checkout — change quantity or remove items from the cart directly at the checkout page
Show expansible order summary at the top for mobile devices #
Before the customer proceed to fill the checkout form they will want to check what’s in their cart. For that reason, and because there will be no cart page before checkout, we need to move the order summary to show before checkout steps.
- Go to WP Admin > WooCommerce > Settings > Fluid Checkout.
- Navigate to the sub-tab “Checkout”.
- Locate the section “Checkout elements > Order summary”.
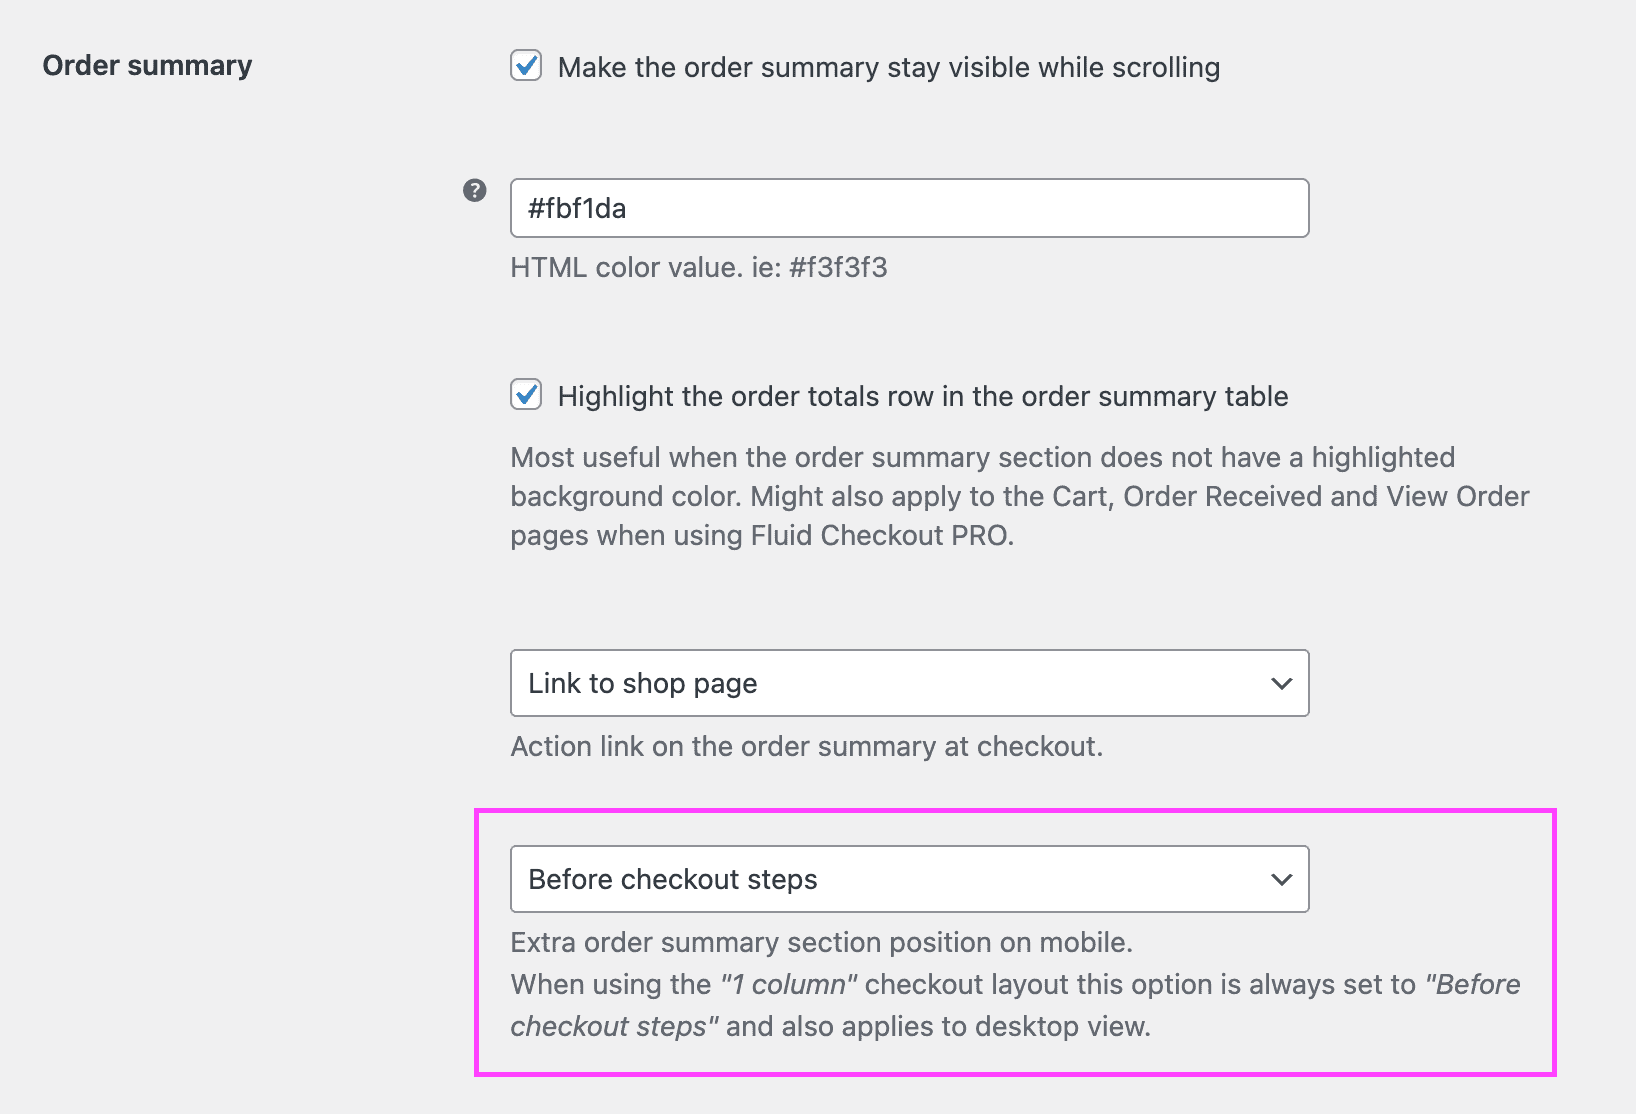
- Choose the option “Before checkout steps” as the position to show the order summary on mobile.
Please note that you will need Fluid Checkout PRO to unlock this option. - Save your changes.
You can read more about this feature and its additional options on our documentation:
WooCommerce checkout layouts – Multi step, single step, 1 or 2 column layouts, and expansible order summary
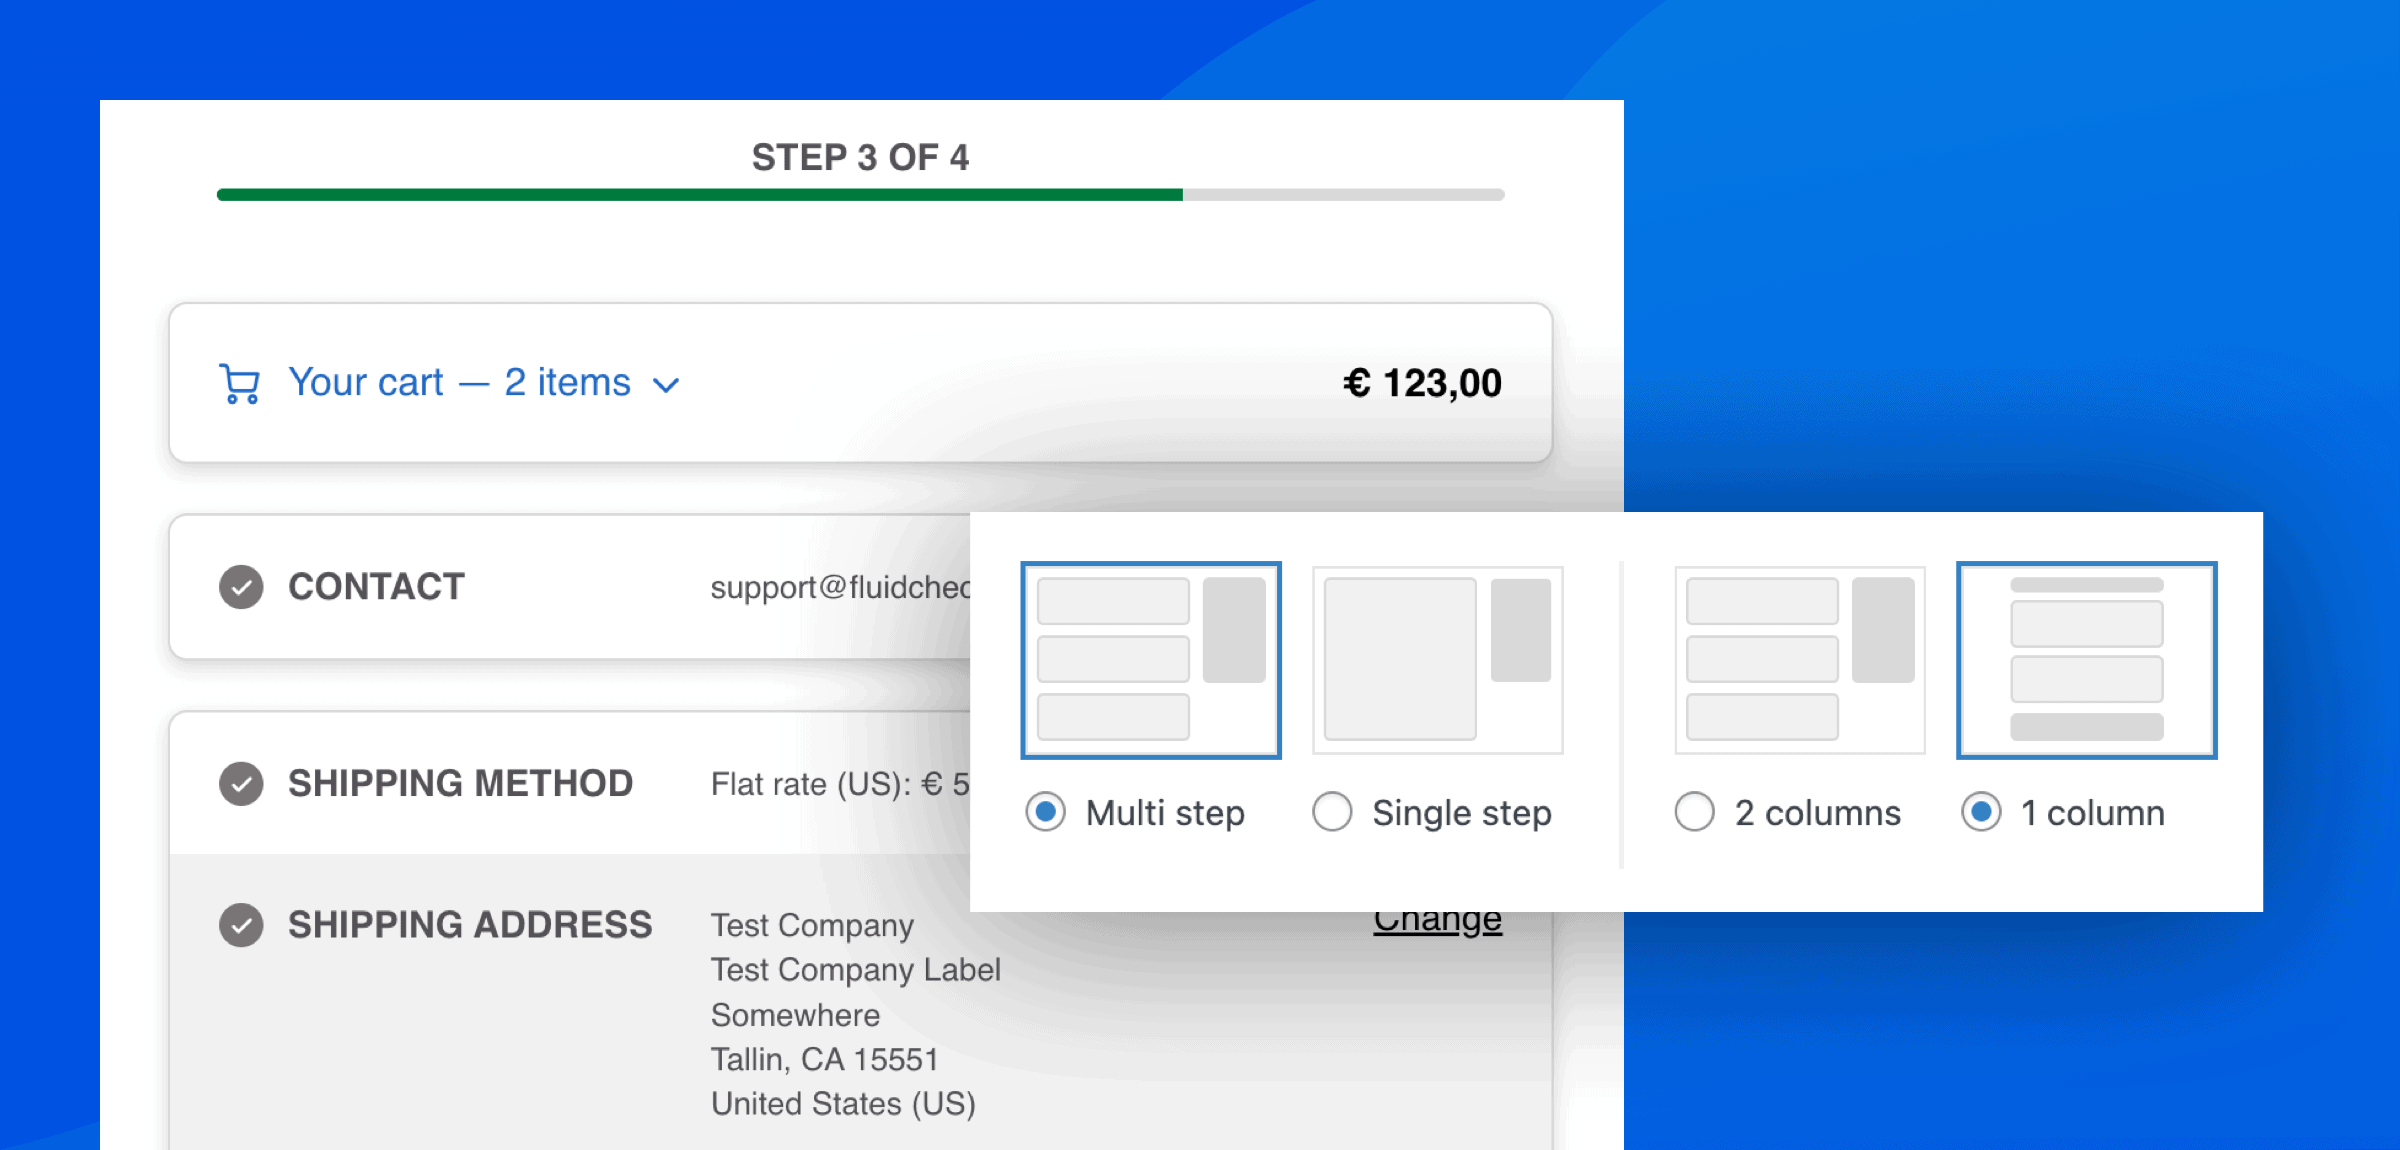
Optionally switch to 1 column checkout layout for large screens #
Changing the checkout layout to 1 column is not required for successfully combining the cart and checkout pages, but it is recommended since this will ensure that the order summary with the cart items and options to change cart items is the first thing your customers see on the page.
By default, Fluid Checkout uses a 2 columns layout and will show the order summary on the right part of the of checkout page on large devices such as large tables, laptops and desktops. With the 1 column layout, the checkout page will be displayed on a single column without a sidebar. With this option, the checkout layout will be the same as on mobile, just larger.
How to enabling the 1 column layout for WooCommerce #
- Go to WP Admin > WooCommerce > Settings > Fluid Checkout.
- Navigate to the sub-tab “Checkout”.
- Locate the “Layout & design” section at the top of the page, then locate the “Checkout layout” options.
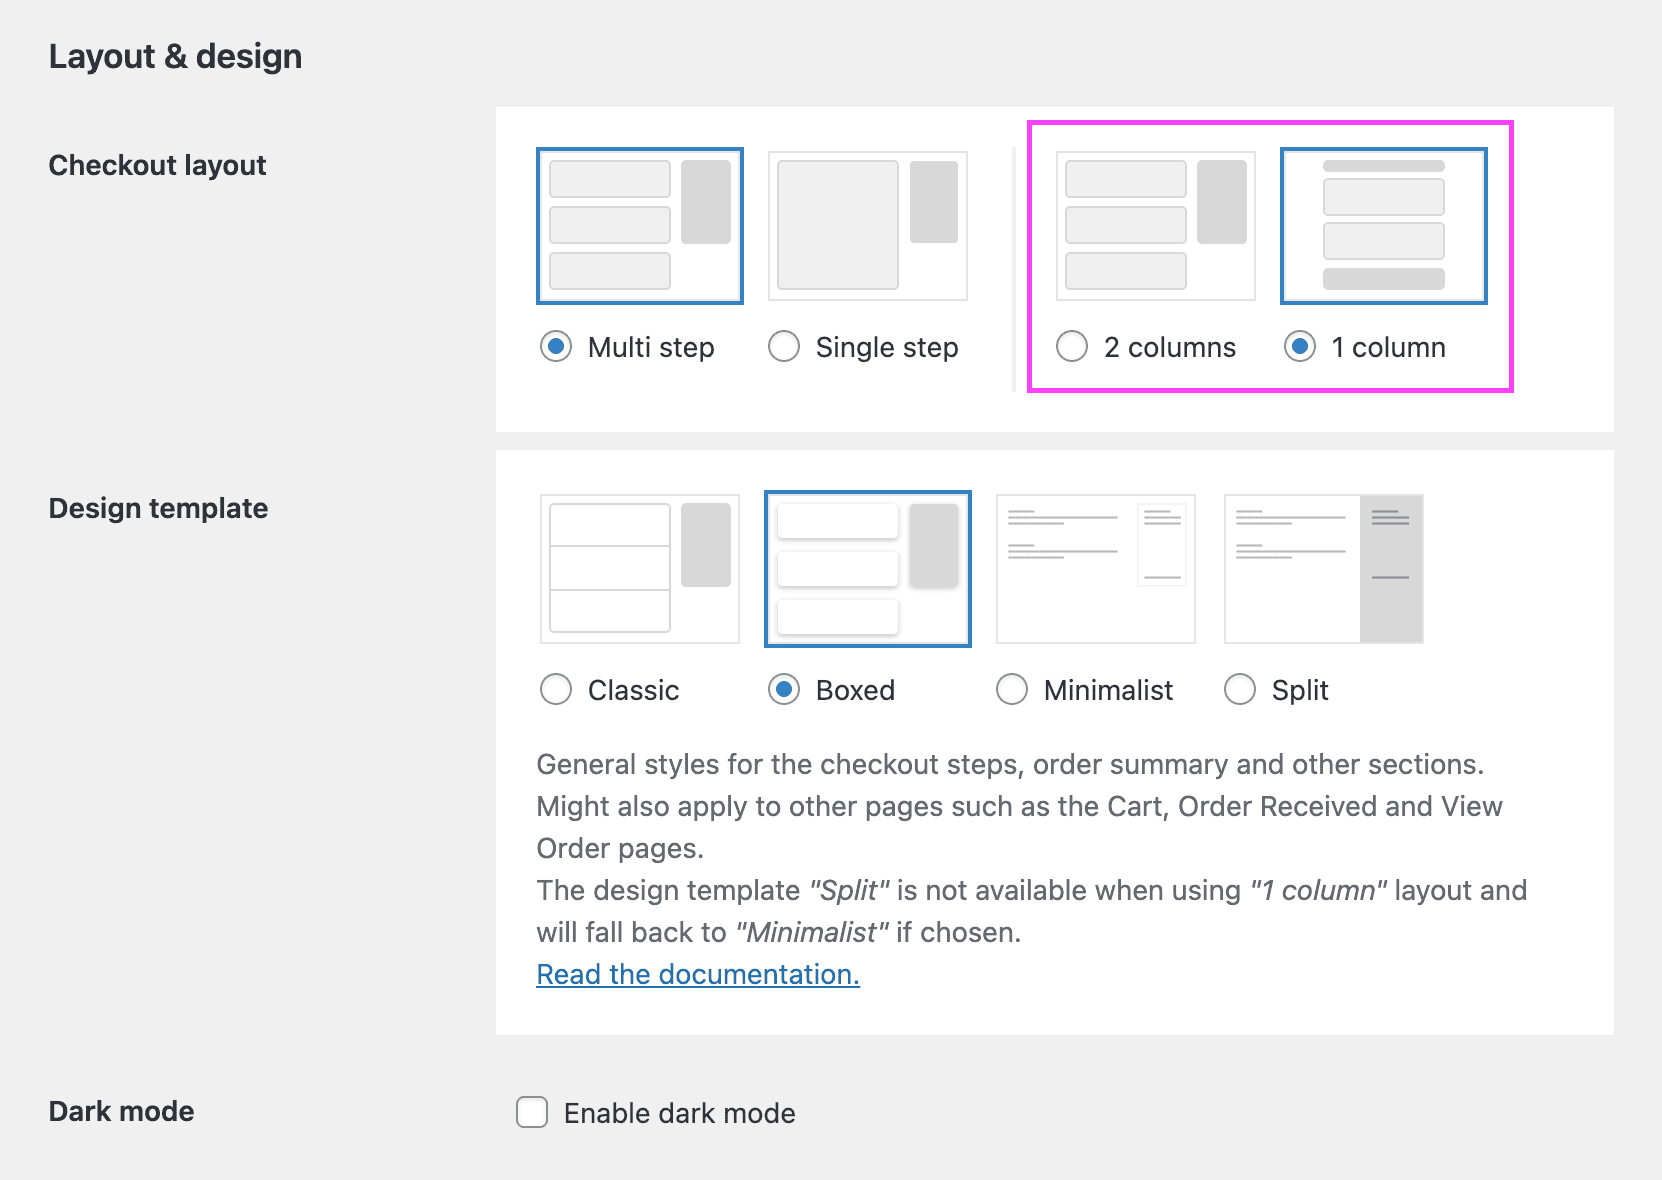
- Choose the 1 column layout option.
Please note that you will need Fluid Checkout PRO to unlock the 1 column layout option. - Save your changes.
You can read more about this feature and its additional options on our documentation:
WooCommerce checkout layouts – Multi step, single step, 1 or 2 column layouts, and expansible order summary
Disable cart page on WooCommerce settings to skip it altogether #
As the cart items can now be edited at your checkout page, you can disable the cart page on WooCommerce settings and redirect any links or direct visits straight to the checkout page.
Remove page selected as cart page on WooCommerce settings #
- Go to WP Admin > WooCommerce > Settings > Advanced.
- Locate the section “Page setup” at the top of this settings page.
- Locate the field “Cart page” and click the “x” button that appears on the right part of the field, you might need to hover the pointer over the field to see it. It is not possible to select the same page as cart and checkout pages, so we need to set the cart page option as empty.
- This will remove the page selected as the cart page and the field will show a placeholder text “Search for a page…”.

- Check the field “Checkout page” and confirm that your checkout page is still selected correctly.
- Save your changes.
Add redirects from cart to checkout page #
To ensure customers will end up in the checkout page with the cart options combined into it when trying to visit the cart page, we need to add URL redirections.
Add proper URL redirects #
It is important o redirect any and all request to visit the cart page to its new location within the checkout page. This can be accomplished by adding a redirect on your SEO plugin or a dedicated redirections plugin from the cart page URL to the checkout page URL:
yourdomain.com/cart/→yourdomain.com/checkout/
This will ensure that customers trying to access the cart page whether through links on your website or directly by typing the URL on their browsers will end up on the combined cart and checkout pages.
Change cart page URLs to use the checkout page directly #
Additionally, it is recommended to use a simple code snippet below to change the cart page links to link directly to the combined checkout page URL to avoid redirects in most cases which will make the customer reach the checkout page faster:
/**
 * Redirect the cart page visits to the checkout page, or shop page when cart is empty.
 */
function fluidcheckout_redirect_cart_to_checkout_or_shop() {
   return ( isset( WC()->cart ) && ! WC()->cart->is_empty() ) ? wc_get_checkout_url() : wc_get_page_permalink( 'shop' );
}
add_filter( 'woocommerce_get_cart_url', 'fluidcheckout_redirect_cart_to_checkout_or_shop', 10 );
If you are unsure about how to add the code snippet to your website, check our article:
How to safely add code snippets to your WooCommerce website
Conclusion #
Combining your cart and checkout pages on WooCommerce is a small change that can have a big impact. By cutting out unnecessary steps, you give your customers a faster, smoother path to purchase. It’s a simple way to boost sales, reduce abandoned carts, and create a buying experience that keeps your customers coming back.