Skip to content
Fluid Checkout
  • Demo
  • Features
  • Add-ons
    • Complete Bundle Save 42%
    • Fluid Checkout PRO
    • Google Address Autocomplete
    • Address Book
    • EU-VAT Assistant
  • Pricing PRO
  • Docs
  • Support
  • My account
0,00 € 0 items
Home / Docs / Compatibility with WooCommerce Block-based checkout and cart forms

How can we help?

Getting started

  • Do I need to uninstall the free version when upgrading to PRO, or is Fluid Checkout Lite required?
  • Getting Started with Fluid Checkout
  • Translate Fluid Checkout plugins into your language

Features

  • WooCommerce edit cart on checkout — change quantity or remove items from the cart directly at the checkout page
  • Trust symbols — add security badges, trust seals and other trust symbols to strategic places on the checkout, cart and order received pages
  • Order pay – optimized and intuitive design for your WooCommerce Order Pay page
  • Local Pickup — WooCommerce Local Pickup hide shipping address when local pickup is selected
  • International phone numbers — WooCommerce checkout phone number validation and formatting based on country rules
  • Express checkout — quick payment buttons for Google Pay, Apple Pay and other payment methods
  • Design templates — match your brand styles on the WooCommerce Checkout template
  • Billing address positions — choose to display billing address before shipping, inside the shipping step or force shipping and billing address to a single section
  • Account matching / user matching — associate purchases with and existing customer account without logging in

Customizations

  • Change the icon or icon color for the cart button on mobile
  • Move the “Phone” field to the contact step
  • Configure cart quantity fields for decimal quantities
  • Change fields copied from shipping address to billing address
  • Move first and last name fields to the contact step
  • Customize Local Pickup location address and use multiple pickup locations
  • Customize button colors and other button styles
  • Customize colors of elements on Fluid Checkout
  • Customize template files for WooCommerce and Fluid Checkout
  • Customize checkout steps
  • Add custom house number field and make it required
  • Customize checkout fields and adding custom checkout fields
  • Safely add code snippets to your WooCommerce website

Compatibility

  • Compatibility with plugin YITH WooCommerce Cart Messages Premium
  • Compatibility with plugin WooCommerce Delivery Slots by Iconic
  • Compatibility with plugin Mailchimp for WooCommerce
  • Compatibility with plugin WooCommerce Checkout Manager By QuadLayers
  • Compatibility with plugin Breakdance
  • Compatibility with theme Pressmart
  • Compatibility with theme Divi and the Divi Builder
  • Compatibility with WooCommerce Block-based checkout and cart forms
  • Compatibility with theme Botiga
  • Compatibility with theme Atomion
  • Compatibility with theme OceanWP
  • Compatibility with plugin Digits
  • Compatibility with plugin Storefront Powerpack
  • Troubleshooting – jQuery events or vanilla JavaScript events not working
  • Compatibility with theme ZK Nito
  • Compatibility with theme Woodmart
  • Compatibility with plugin “Plugin Organizer”

Troubleshooting

  • Troubleshooting – jQuery events or vanilla JavaScript events not working
  • Troubleshooting – Local pickup prevents customer from proving a shipping address, blocking other shipping methods
  • Troubleshooting – Trust symbols widgets randomly moving to other areas when switching themes

Account & Purchases

  • Can I get a refund for my purchase?
  • Finding my invoice, adding billing details and VAT number
  • New versions updates are not appearing on my website

Development

  • Troubleshooting – jQuery events or vanilla JavaScript events not working
  • Changelog format and semantic version numbers
  • Changelog – Fluid Checkout PRO & Lite
View Categories

Compatibility with WooCommerce Block-based checkout and cart forms

The block-based checkout and cart forms will be automatically replaced with Fluid Checkout’s optimized forms if you are using Fluid Checkout Lite 3.1.3+, and Fluid Checkout PRO 2.1.2+ for the optimized cart page feature if enabled.

In case you are using an older version of our plugins or are having issues with compatibility with some 3rd-party plugins, please continue and follow the steps below.

Shortcode-based vs block-based checkout #

Up until WooCommerce version 8.2, the WooCommerce checkout shortcode has been the default way WooCommerce used to output the checkout form to the checkout page.

Since WooCommerce 8.3+, when creating new shops with WooCommerce the cart and checkout pages are created with the Checkout and Cart blocks for the block based editor (Gutenberg). More information can be found on WooCommerce’s website.

Manually replacing the block-based forms is not necessary anymore since Fluid Checkout Lite 3.1.3+ and Fluid Checkout PRO 2.1.2+ as they will be automatically replaced.

Fluid Checkout needs the classic shortcodes of the WooCommerce checkout and cart pages to work. This means you may need to replace the block-based WooCommerce forms with the shortcode below.

[woocommerce_checkout]

Similarly, if you are using the optimized cart page feature from Fluid Checkout PRO, you may need to use the cart shortcode:

[woocommerce_cart]

Checkout page #

Follow the steps below to check whether you have the shortcodes added to your checkout page and replace the block-based checkout form with the shortcode if needed:

  1. Go to WP Admin > Pages.
  2. Locate the page selected as your Checkout page, then click the option to edit it.
  3. In the page editor, enable the List View and then locate the Checkout Block. If you do not find the Checkout Block on the page content, skip to step 5.
Screenshot of the checkout edit page screen, showing the steps to delete the block-based checkout form.
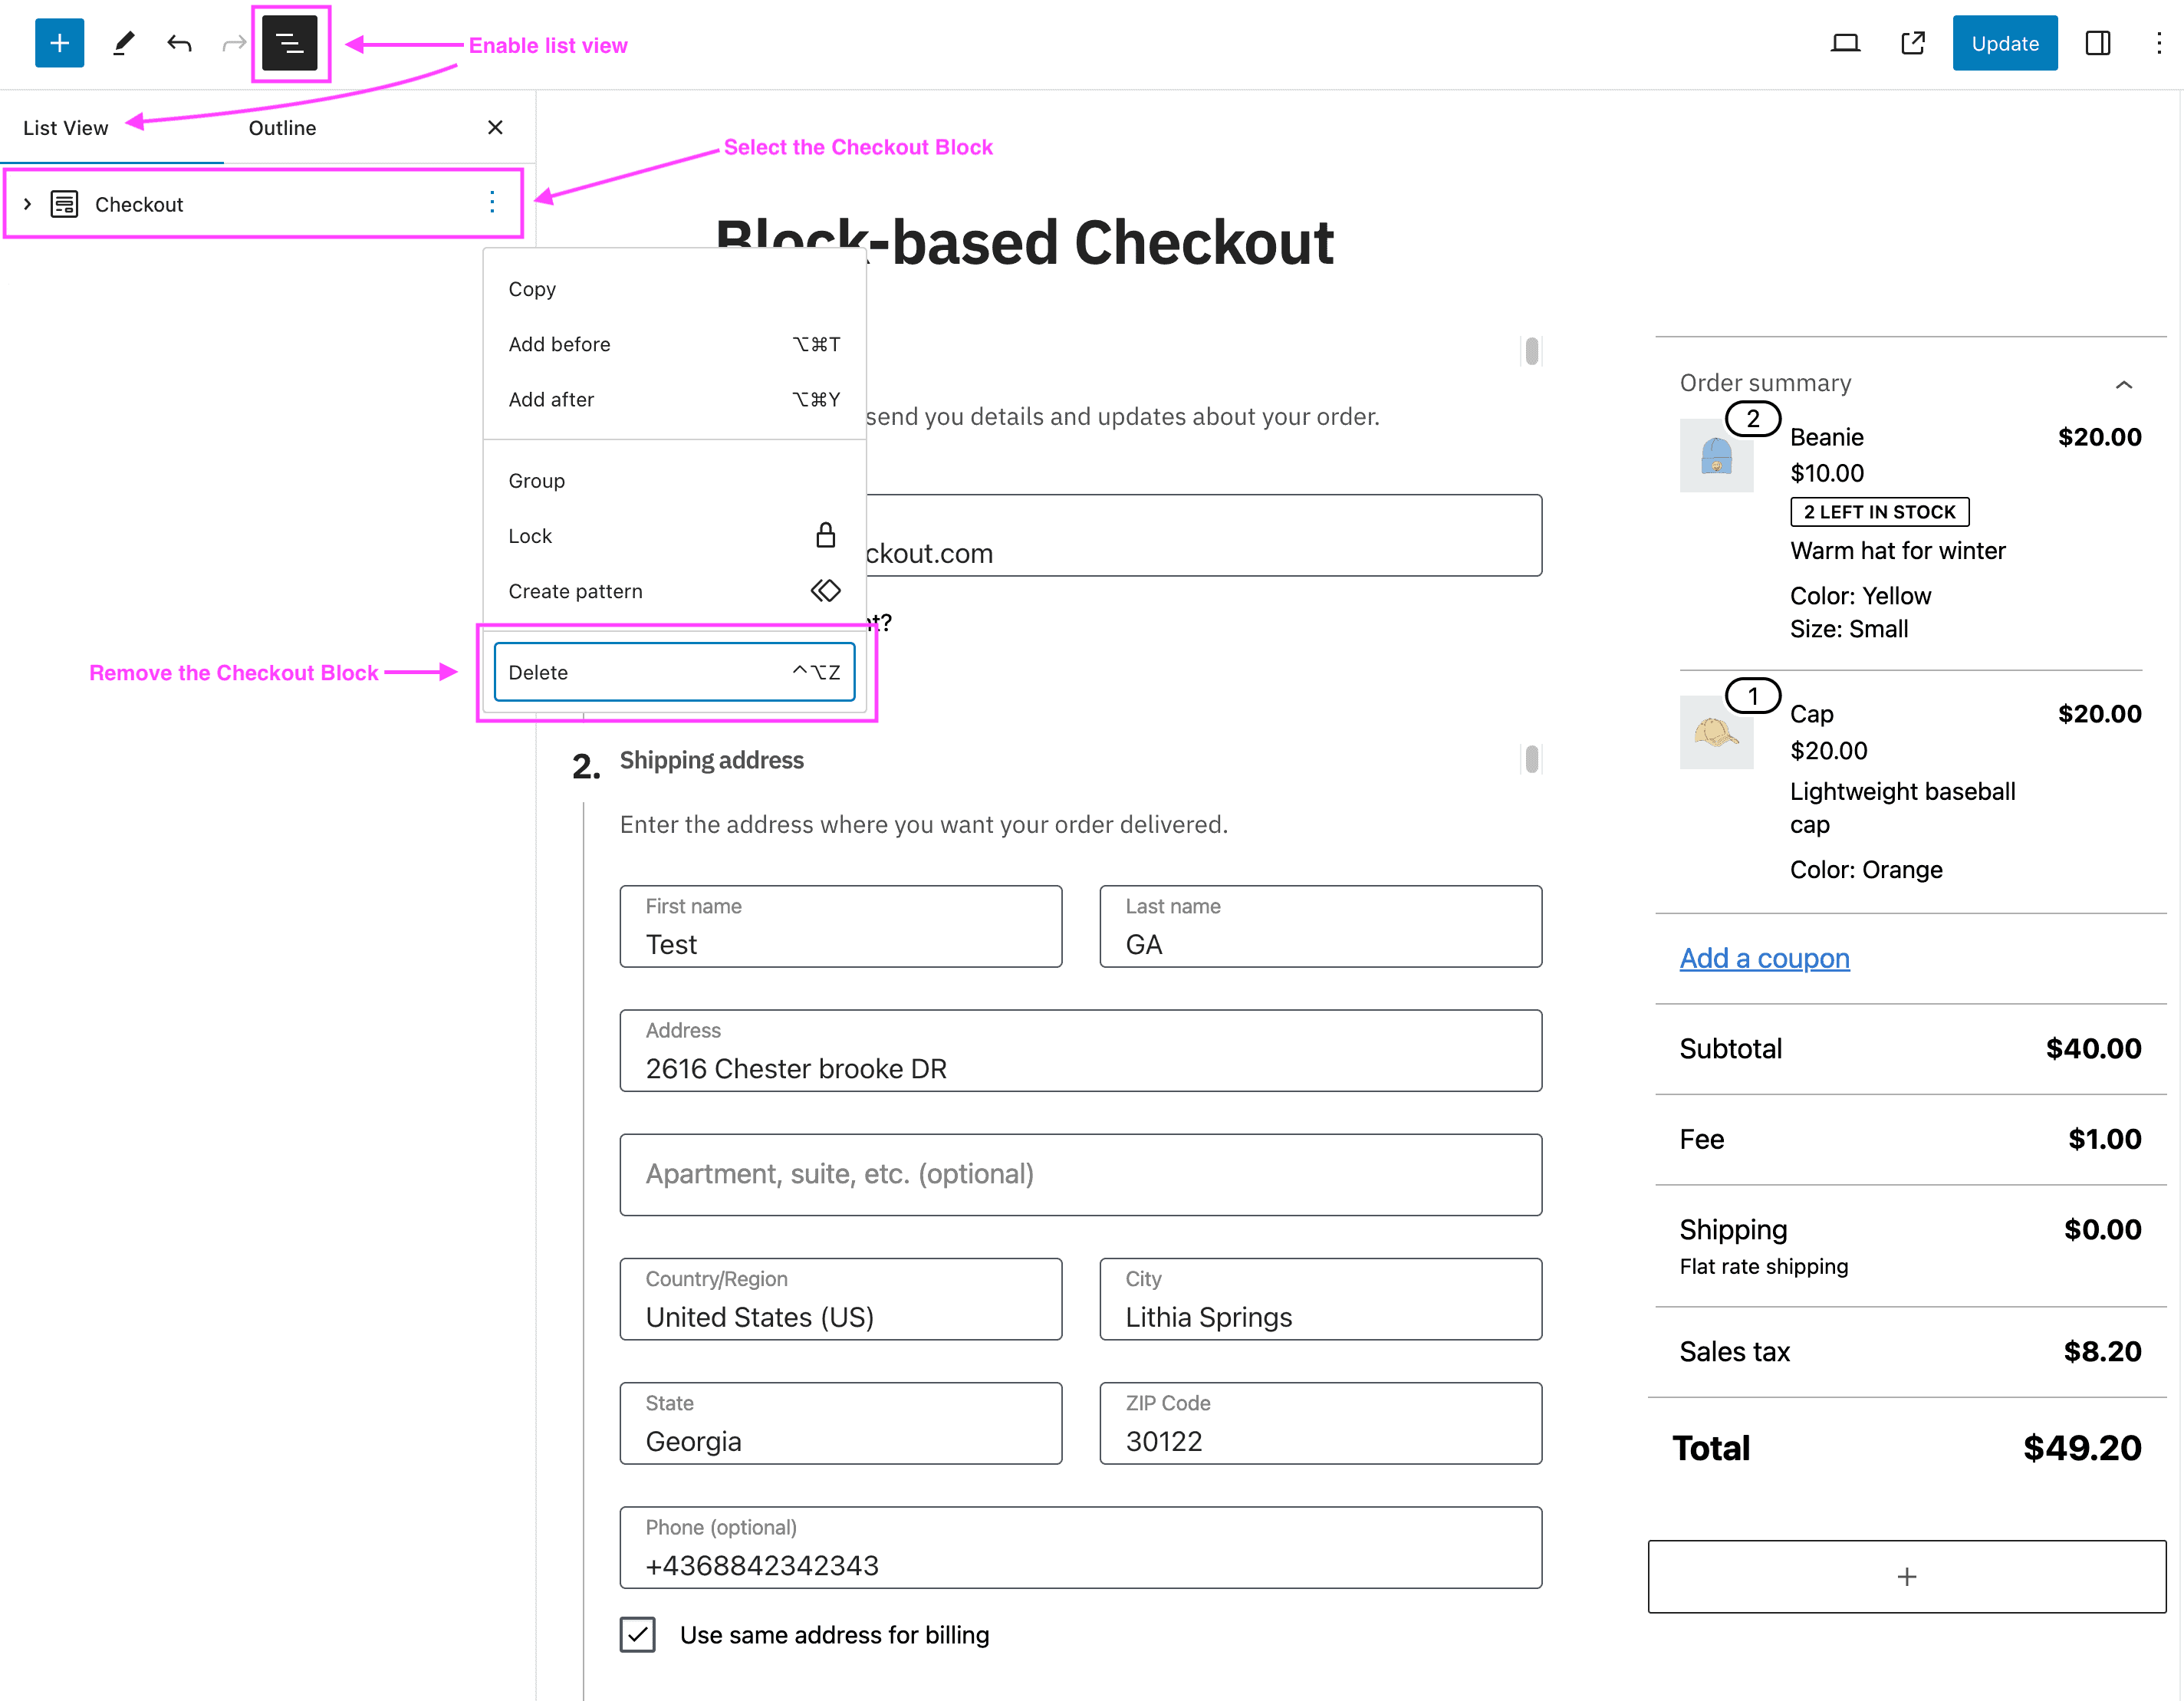
  1. Select and delete the Checkout block.
Screenshot of the checkout edit page screen, showing the steps to add the shortcode-based checkout form.
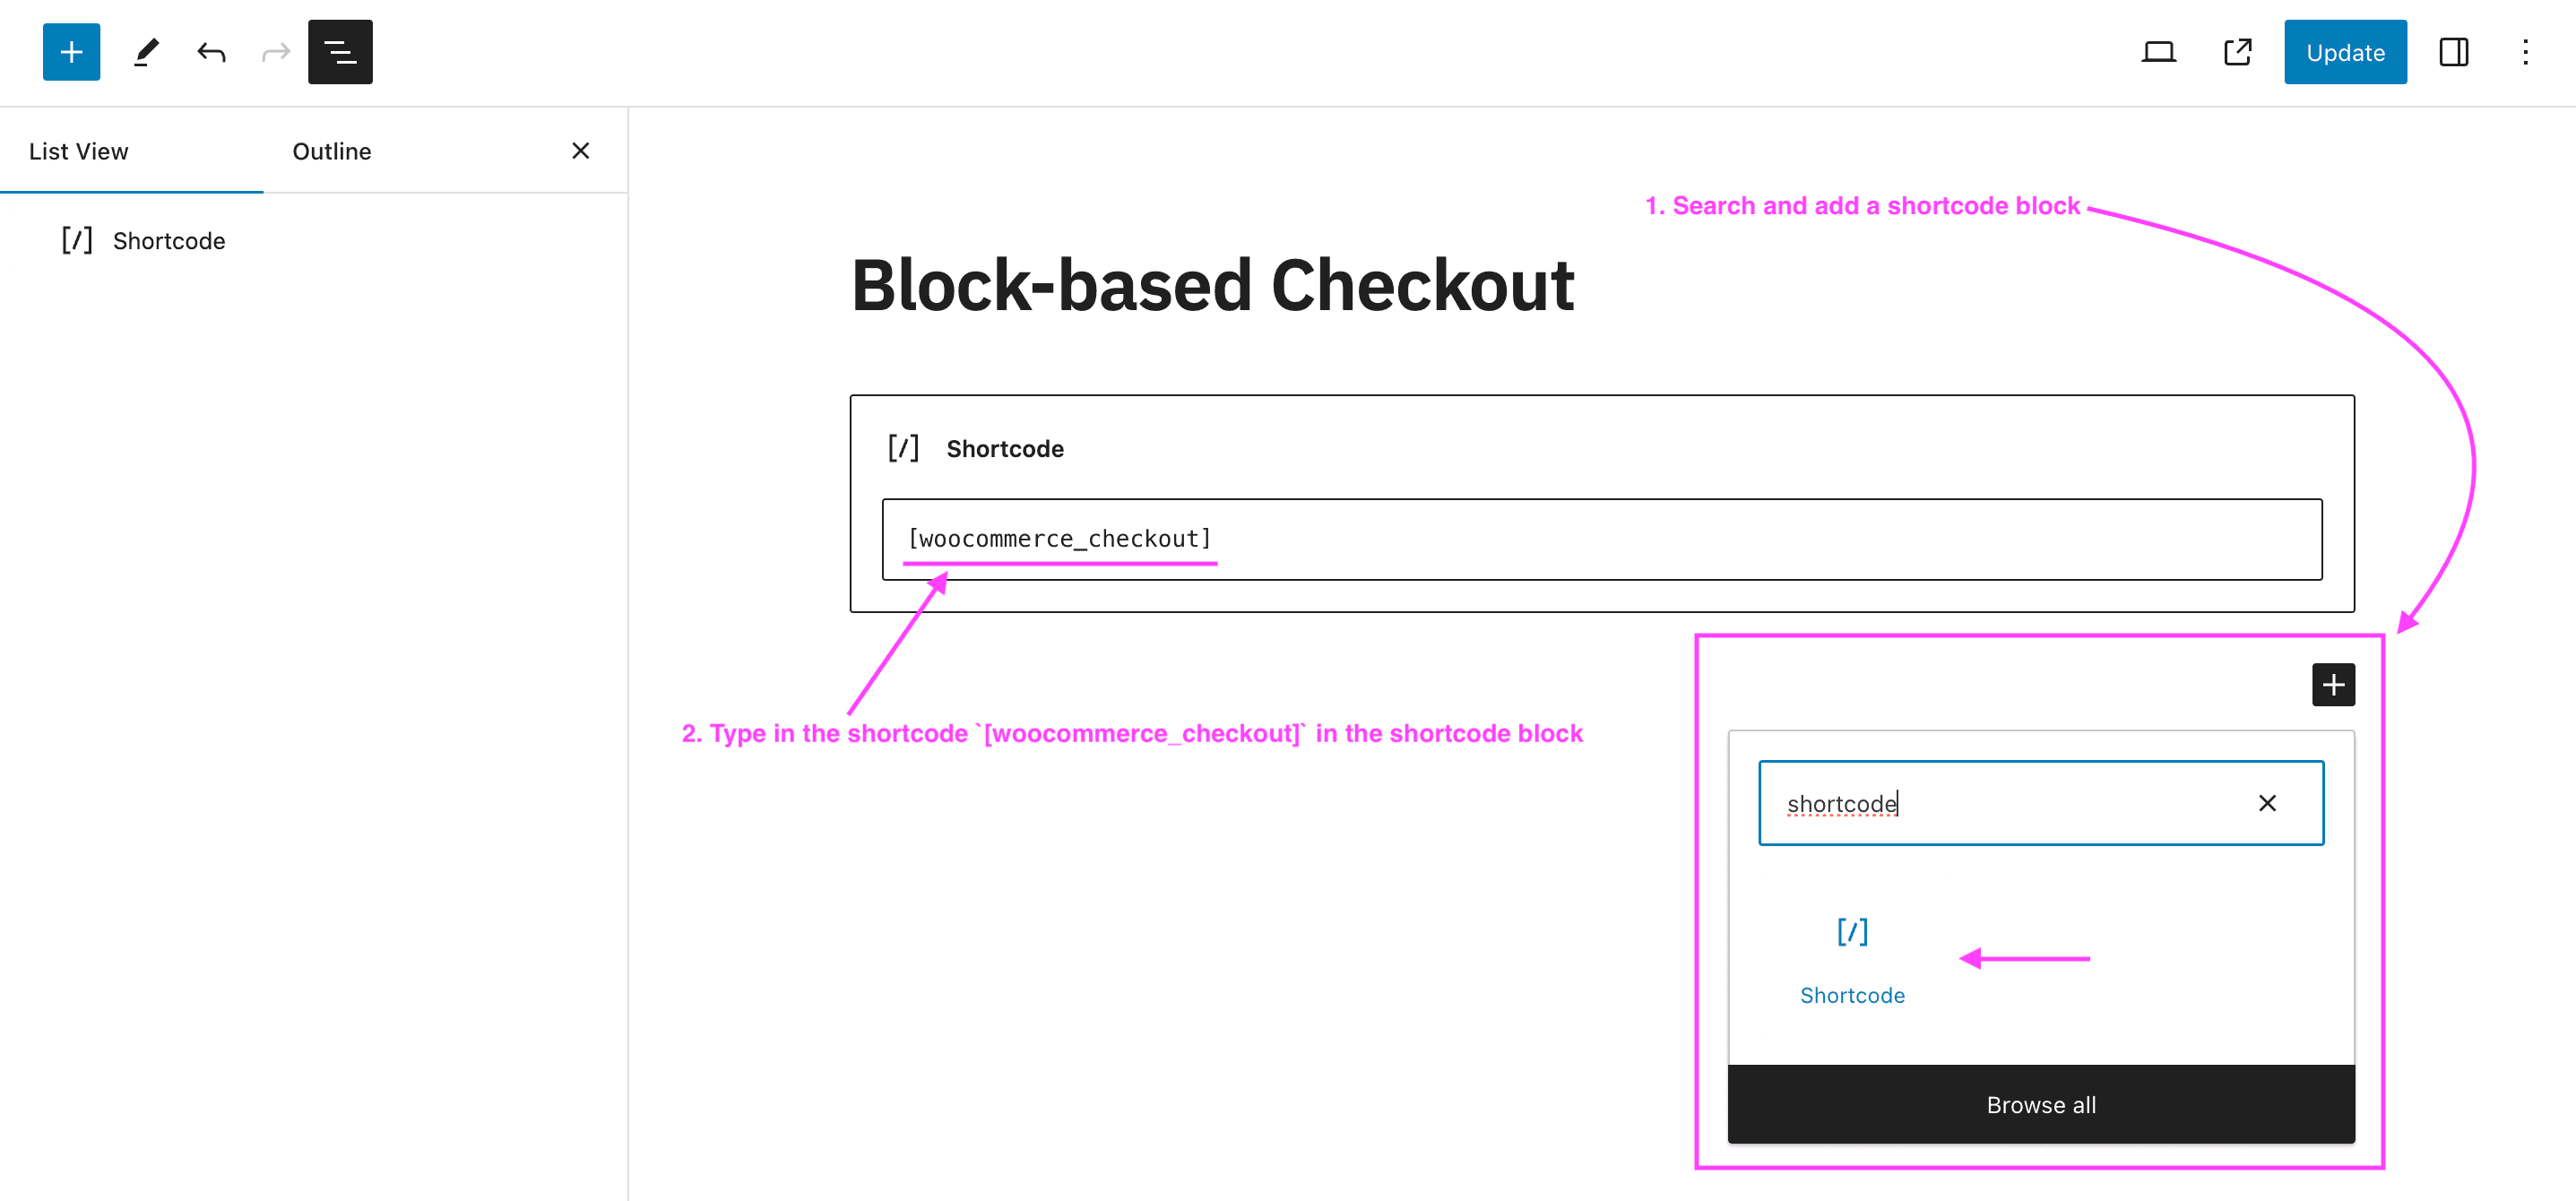
  1. Check whether you already have a Shortcode for the checkout form (see code below). If not, add a new Shortcode block in place of the removed Cart Block and type in:
[woocommerce_checkout]
  1. Click the “Update” button at the top right of the page editor screen to save the changes.

Cart page #

If you are using Fluid Checkout PRO, similarly to replacing the block with the shortcode for the checkout form (see above), you may also need to replace the shortcode for the cart page. Follow the steps below to check whether you have the shortcodes added to your cart page and replace the block-based cart form with the shortcode if needed:

  1. Go to WP Admin > Pages.
  2. Locate the page selected as your Cart page, then click the option to edit it.
  3. In the page editor, enable the List View and then locate the Cart Block. If you do not find the Cart Block on the page content, skip to step 5.
  4. Select and delete the Cart block.
  5. Check whether you already have a Shortcode for the cart form (see code below). If not, add a new Shortcode block in place of the removed Cart Block and type in:
[woocommerce_cart]
  1. Click the “Update” button at the top right of the page editor screen to save the changes.

Order confirmation page template #

If you have Fluid Checkout PRO and are using a Block-based theme, Fluid Checkout will automatically revert to using the checkout page template for the order confirmation page when using the Optimized Order Received (thank you) page layout.

If you want to use the WooCommerce Order Confirmation template instead you may need to replace the contents in the order confirmation page template in the block editor with the checkout shortcode for it to work as expected with Fluid Checkout.

Follow the steps below to check whether you have the shortcodes added to your cart page and replace the block-based cart form with the shortcode if needed:

  1. Go to WP Admin > Appearance > Editor.
  2. Go to Templates in the editor menu.
  3. Locate or search for the template “Order confirmation”, then click on it to open it in the editor.
  4. On the top of the editor, press the “Document overview” button (with 3 horizontal slightly misaligned) to see the blocks hierarchy.
  5. In the page template editor, enable the “List View” in the “Document Overview” and then locate the contents related to the order confirmation page.
  6. Remove from the page template content section any block related to the order confirmation (thank you) page:
    • Order status
    • Order summary
    • Account creation
    • Order totals section
    • Downloads section
    • Shipping address section
    • Billing address section
    • Additional fields
    • Additional information
  7. Add a new Shortcode block in place of the removed order received blocks and type in:
[woocommerce_checkout]
  1. Click the “Update” button at the top right of the page editor screen to save the changes.
Still stuck? How can we help?

How can we help?

Updated on April 30, 2025
Table of Contents
  • Shortcode-based vs block-based checkout
    • Checkout page
    • Cart page
    • Order confirmation page template
Fluid Checkout

Frictionless Multi-step Checkout for WooCommerce

© 2021-2025 Fluid Checkout OÜ

Terms | Refunds | Privacy Policy | Cookies

Products
  • All products
  • Fluid Checkout PRO
  • Fluid Checkout Lite
  • Google Address Autocomplete add-on
  • Address Book add-on
  • EU-VAT Assistant add-on
Company
  • Support
  • My account
  • Careers Hiring
  • About
  • Affiliates program
  • Homepage
  • Homepage
  • Features
  • Pricing PRO
  • Demo
  • Docs
  • Support
  • My account